Quick Start
This section introduces some of the basic tasks that you can accomplish in Corel AfterShot Pro. If you're looking for a quick way to start working with the application, take a few minutes to go through the steps below. The steps include handy shortcuts and tips that help you work quickly.
There are three main steps:
1. Open your photos in Corel AfterShot Pro.
2. Select and edit one or more photos.
3. Output your edited photos individually or as a batch.
Before you begin, see
Workspace tour for a quick overview of the workspace.
Step one: Open your photos
To get you started quickly, we're going to work directly from the folders on your computer. After you're familiar with the application, you can choose to build a Library by importing photos into Corel AfterShot Pro. When you're ready for more information, see
About the Library.
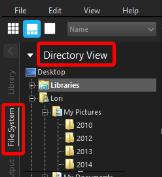
To navigate to your photos
• In Corel AfterShot Pro, click the File System tab, and navigate to your folder in the Directory View.
When you click a folder, the photos from the folder are displayed as thumbnails in the Thumbnail panel.
Thumbnail panel, displayed as a strip in Standard View
Step two: Selecting and editing photos
To view and adjust images, you need to select them. The Thumbnail panel displays thumbnails of the photos that are in the active folder. When you select a thumbnail, the Preview panel displays a larger view of the photo. When you edit a photo, the original file (master file) is never altered — edit information is saved separately and what you see onscreen is a master version, a preview that shows your edits. You can edit the entire photo or a selected area of the photo. When you are finished editing a photo, you can simply move on to the next photo, or you can save your changes as a new version. This means that you capture the edits as a variation of the original file. The version can be viewed as a thumbnail or in the Preview panel. It can also be output.
To preview and select photos
1 In the Browse panel, click the File System tab.
2 Navigate to the folder you want. The Thumbnail panel displays the photos that are in the folder.
3 Click a thumbnail to display it in the Preview panel.
Before you start editing, you can choose between viewing the edits directly on the master version of your file, or creating a new version for editing by pressing Insert or by right-clicking the thumbnail and choosing Version > New Version from Defaults.
You can also | |
Scroll quickly through thumbnails | Press [ or ]. |
Compare two or more photos (or versions) in the Preview panel | Click the Toggle Multi-Image View button  (or press M), and Ctrl + click or Command-click the thumbnails. The Preview panel displays the selected photos. This is a great way to select and flag the best photo in a series of similar photos. For more information about flagging and organizing your photos, see Organizing images. |
Select all thumbnails | Press Ctrl + A or Command-A. |
Deselect thumbnails | Click a background area of the Thumbnail panel or press Ctrl + D or Command-D. |
Note: The last image you select is called the active image. While in Multi-Image View mode, metadata changes, adjustments, and other edits apply only to the active image.
To edit a photo
1 In the Browse panel, navigate to the folder you want.
The Thumbnail panel displays the photos that are in the folder.
2 Click a thumbnail to display it in the Preview panel.
3 Experiment by trying any of the editing actions in the following table.
To | Do the following |
Flag or add keywords (i.e. add metadata) | • Flag — click a thumbnail and on the Top toolbar click the Flag as Pick button  or press . (period key). To mark a photo as a reject, click the Flag as Reject button  or press , (comma key). • Keywords — on the Tools panel, click the Metadata tab, click inside the Keywords box, and type one or more keywords, separated by commas. |
Crop a photo | On the AfterShot Pro toolbar at the bottom of the Preview panel, click the Crop tool  . In the Cropping palette, adjust the settings that you want, and in the Preview panel, drag the crop area over the area that you want to preserve. Click Done in the Cropping palette. |
Adjust the color, tone, or sharpness of the entire photo | In the Tools panel, click the Standard tab, and adjust the settings you want in the Basic Adjustments section. |
Edit a selected area only | 1 Click the Open Layer Manager button  in the upper-right corner of the window. 2 In the Layers palette, click the +Adjust button at the top of the palette. A new editing layer is created. 3 Click a Region tool, such as the Circle Region tool, click an area that you want to adjust, and adjust the Size, Feather, or other settings at the bottom of the Layers palette. 4 In the Basic Adjustments section of the Tools panel, adjust any of the settings you want — the changes apply to the selected area(s) of the current layer. |
Tip: There are some handy ways to undo actions. Here are a few you can try:
• To undo one action at a time, press Ctrl + Z or Command-Z.
• To reset a Tools panel slider to its original setting, double-click the slider name.
• To clear all the changes that you've made to a photo, right-click the thumbnail, and choose Settings > Apply Default Settings from the context menu.
To show your edits on a new version
• In the Thumbnail panel, right-click or Control-click an edited photo (master version), and from the context menu, choose Version > New Version from Current.
Note: You can confirm that a photo has been edited by looking for the
Edit icon

in the corner of the thumbnail.
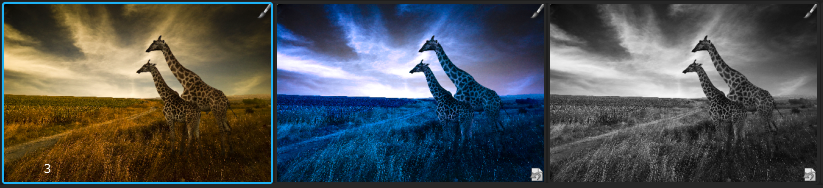
A new thumbnail appears next to the thumbnail of the master version. By default, versions use the following naming convention: original file name + version number (_v2, _v3, ...).
Three edited versions based on the same master file
You can now return to the master version and edit it in a new way and create another version. To start from the original settings, you can clear the edits made to the master version by right-clicking or Control-clicking the thumbnail, and choosing Settings > Apply Default Settings from the context menu.
Tip: Whether you choose to create a new version before or after editing a master version depends on your workflow. For example, if you know that you want to make several versions from the outset, you can create a version before you start editing, so you can always see how the original master file looks. If you want to quickly fix a photo, you can simply edit the master version—you can create other versions later if you want. The non-destructive nature of editing in Corel AfterShot Pro gives you maximum flexibility.
For more information about editing photos, see
Editing photos.
Step three: Exporting photos for sharing and print
After you organize and edit your photos, you can share your work by exporting your photos. Exporting lets you save your photos to a standard file format so that you can share your work on the Web, via email, or use your files in other applications. You can also output your files to print. There are a number of standard output choices, called batches, that let you output quickly, but you can also create a custom batch. For example, you can choose file type, quality, color space, and image size. You can also set a naming convention to rename the files when they are output and you can apply presets. For more information about outputting, see Exporting images.
To get you started quickly, let's use standard batches to save to JPEG and print a couple of 5 x 7 inch photos.
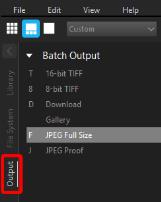
To output to a full-sized JPEG
1 In the Thumbnail panel, select one or more photos that you want to output.
2 Do one of the following:
• • In the Browse panel, click the Output tab, and in the Batch Output section, drag the thumbnails to JPEG Full Size.
• • Press F (shortcut key assigned to JPEG Full Size batch).
3 In the Select a Destination dialog box, choose a folder where the files will be saved.
After you select a destination folder, files are saved automatically to that folder for the rest of the session. You can change the destination and access other output settings by double-clicking a batch name in the Batch Output or Printing section.
To print to a standard print size
1 In the Thumbnail panel, select two photos that you want to print.
2 In the Browse panel, click the Output tab, and in the Printing section, drag the thumbnails to a batch name, such as 5x7 Qty.2. Numbers appear next to the batch name, (0 of 2), to indicate the number of photos printed and the total number of photos in the batch.
3 Double-click the batch name to preview the print job in the Print Settings dialog box.
4 In the Print Layout section, enable the Scale crop or Scale reduce option (matches the photos to the selected print ratio) and preview the results.
5 Choose your printer from the drop-down list in the bottom left corner.
6 Click Print.
Moving on
Now that you have been introduced to the basics, here are some additional topics that will provide you with more detailed information: