Understanding export settings
When you export your files, whether you use a batch preset or not, you can specify the settings. The settings available depend on the type of output. For example, if you choose to output a JPEG Full Size batch, the settings are very different from the settings you choose for a Gallery.
By having multiple tabs in the Batch Export Settings dialog box, you can create multiple output types within a single batch. For example, you can create small thumbnail images, large Web-viewable images, and full size TIFF images with a single click.
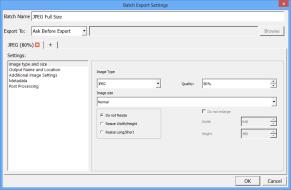
Batch Export Settings dialog box
The Export dialog box and the Batch Export Settings dialog box contain the following settings categories, depending on the type of output: Image Type and Size, Output Name and Location, Additional Image Settings, Metadata, and Post Processing. For more detailed information about the settings in these categories and general settings, see the descriptions in the topics below.
Batch Name
The Batch Export Settings dialog box includes the following controls:
• Batch Name — identifies the batch that you are using. This is also an entry field when you create a new batch.
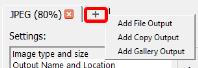
• Output tabs— let you add more than one output when you run a batch. You can choose from three output types: File, Copy, Gallery. A tab appears for each output type.
Click the plus sign on the tab to add another output to your batch preset.
Export To
Export To determines where the files will be saved. You can choose from the following options:
• Ask Before Export — prompts you for a location (Select a Destination dialog box) each time you export.
• Ask Once Per Session — prompts you for a location the first time you export and uses the same location each time you export until you close the application.
• Choose Folder — saves the exported files to the same folder every time you run the batch. Use the Browse button to set the fixed destination. For example, if you automatically sync a folder on your computer with an online photo sharing service, you can create a batch preset that saves the photos you want to share to this folder.
• Source Folder — saves the exported files in the folder specified in the text box relative to the folder that contains the master files that you are exporting. For example, entering "Converted" in the text box would tell this batch to create a subfolder called “Converted” in each of the folders where the original master files are stored. The output files are saved within the “Converted” folders.
Image Type and Size settings
Image Type lets you choose a file format type. If you choose JPEG, you can set a value in the Quality box.
• Image Size allows you to alter the size of your output images and choose scaling quality.
• Normal / Proof — select the quality for scaling the image. Proof Quality produces images that are half-height and half-width of the original image.
• Do Not Resize — maintains the same pixel dimensions as the original image file.
• Resize Width/Height — resizes the output image to fit within the specified dimensions. Enter a maximum pixel Width and pixel Height in the boxes to the right.
• Resize Long/Short — resizes the output image to fit within the specified dimensions. Enter a maximum value in pixels for the long and short edge of the output image in the boxes to the right. Long/Short resizing lets you specify a non-square bounding box that the output image will be fit into, regardless of the landscape/portrait formatting of the image.
• Do not enlarge — similar to Resize to Fit except that small images will not be expanded to fit the specified dimensions.
Note: For more information about resizing, see About image size.
Output Name and Location settings
This section controls how Corel AfterShot Pro names the files that you're outputting.
You can choose a preset renaming format from the drop-down list, or you can type the formatting codes in the box below the drop-down list. For more information about renaming formats, see
Renaming formats.
• Save in subfolder — lets you specify a subfolder so that images from different output tabs in the same batch are output to different folders. For example, you can create thumbnails on one tab and save them in a subfolder named “thumbs” and save full size JPEG images into a separate folder using a single batch. This folder is specified relative to the overall batch destination.
• Overwrite existing output files — replaces existing files that have the same name with those being created with the latest batch.
• Ask for job name each time — if you use the [jobname] renaming variable as part of the renaming format, it ensures that you are prompted to choose a job name each time images are sent to this batch. If this option is not checked, the last job name for the batch is used.
Additional Image Settings
This section lets you apply presets or metadata to your images before creating output images. Multiple presets can be added to a single batch. The presets are applied in the order in which they appear. You can drag presets to reorder them in the list.
• Add Preset button

— lets you to add a preset to apply to your output images.
• Remove Selected Preset button

— lets you remove a preset.
• Output Color Space — lets you convert the color space. Note that this can affect the color, contrast, and overall look of your output images, so we recommend that you soft proof to preview the effect on specific images.
Metadata settings
This section provides control over the metadata included in the files that you are outputting. You can also set the DPI.
• Embed EXIF — writes EXIF data to the output file, including shutter speed, aperture, and other shooting data.
• Embed XMP — writes metadata to the output file in XMP.
• Embed IPTC — writes metadata to the output file in IPTC format as well as legacy IPTC formats.
• Embed color profile — includes the color profile in the output file.
• Embed Copyright — includes copyright information regardless of the EXIF or XMP embedding options.
• DPI — lets you enter a DPI value for the files. This does not affect the pixel size or file size of the resulting image. For more information about resizing, see About image size.
Post Processing settings
This section lets you perform additional adjustments after each image has been converted.
• Output Sharpening — applies additional sharpening to images. Output sharpening is a standard USM process or unsharp mask sharpening.
• Open with [application] — lets you launch an external application at the end of the output process.