Applying Artistic effects
You can apply Artistic effects to age a photograph or to create a variety of artistic results. Balls and Bubbles, Colored Foil, and Solarize are among the effects included in this group.
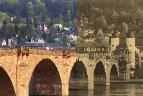
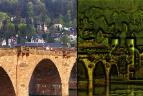
Aged Newspaper
Edit workspace
The Aged Newspaper effect applies a warm brown tone and blurs the image so that it resembles a newspaper that has yellowed with age. This effect works best with images that contain text.
For best results, you should convert your image into grayscale and then increase the color depth to 16 million colors before applying this effect. You can access the Aged Newspaper dialog box by clicking Effects Artistic Effects Aged Newspaper.
The Aged Newspaper dialog box contains the following control:
• Amount to age — lets you select the intensity of the effect by dragging the slider or typing a number in the box.
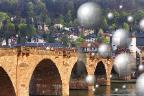
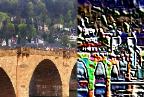
Balls and Bubbles
Edit workspace
The Balls and Bubbles effect lets you create sophisticated multilayered spherical objects. You can use environment maps and bump maps with this effect. For more information, see
Applying environment maps and bump maps.
You can access the Balls and Bubbles dialog box by choosing Effects Artistic Effects Balls and Bubbles.
The Balls and Bubbles dialog box has four tabs: Shape, Surface, Maps, and Illumination.
The Shape page contains the following controls:
• Automatic multiple balls or bubbles — applies an assortment of bubbles to your image. This option also lets you specify the coverage, average size, size variation, and type of the bubbles.
• Coverage — determines how much of the canvas is filled with bubbles or balls
• Average size — sets a standard size for the bubbles or balls
• Size variation — determines how dissimilar in size the largest and smallest bubbles can be. A value of 0 forces all the bubbles to be uniform. A value of 100 allows the bubbles be as random as possible.
• Balls or Bubbles type — lets you choose nonintersecting, intersecting, or overlapping balls and bubbles
• Randomize — randomly sets the size and placement of the bubbles
• Seed — determines the strength of the effect
• Single ball or bubble — applies a single ball or bubble instead of multiple ones
• Maximum possible size — makes a single ball or bubble the largest possible size. You can choose another size by dragging a bounding box in the Before pane.
The Surface page contains the following controls:
• Material — lets you choose the color, gradient, and pattern for the surface material of the balls and bubbles. You can combine each of these elements with choices from the Textures panel of the Material Properties dialog box. Note that when you select the Textures option, the material becomes semitransparent.
• Opacity — sets the maximum opacity for the object. The default is 15% for bubbles. A solid object would have a setting of 100%.
• Shininess — determines how the light is absorbed or reflected from the surface. This control interacts with the setting for the Gloss control.
• Gloss — determines how the light is absorbed or reflected from the surface. This control interacts with the setting for the Shininess control.
The Maps page contains the following controls:
• Bump map — lets you add surface texture to your balls and bubbles by activating the bump map controls
• Smoothness — determines the smoothness of the effect
• Depth — determines the depth of the effect. The greater the value, the more recessed the black areas on the map appear and the more raised the white areas appear. Negative values reverse this effect.
• Fit bump map — automatically resizes the map to wrap around the sphere. You can unmark the check box to change the size of the map.
• Size — lets you set the size of the map when the Fit bump map check box is unmarked.
• Environment map check box — lets you add surface details to your balls and bubbles by activating the environment map controls
• Opacity — controls the strength of the effect. As the opacity increases, the image displays more of the effect and less of its original appearance.
• Environment map option and swatch — let you choose an image from the Environment Maps folders or the current image
• Current Image — wraps the current image around the spherical objects
• Diffraction map — wraps a rainbow-style light pattern around the spherical objects. To change the pattern, adjust the Fringe spacing and Type settings.
• Type — sets randomness of the origins, direction, and paths of the bands
The Illumination page contains the following controls:
• Maximum — sets the maximum value for the overall lighting of the object
• Minimum — sets the minimum value for the overall lighting of the object
• Add and Remove buttons and Lights menu — let you add or remove individual lights. By default, a single light with a highlight appears just above and to the left of the center.
• Position — lets you move the focus of the light by clicking on the highlight and dragging it to a new location
• Back light — redirects the light so that it comes from behind the object. You can drag back lights, but they are visible only around the perimeter of the sphere.
• Bubble light — scatters the illumination as though it were passing through a semitransparent object. This option is available only when the Opacity setting is less than 100%.
• Color — lets you choose the color for each light. The default color is white.
• Highlight size — lets you control the size of each highlight
Chrome
Edit workspace
The Chrome effect gives an image a metallic look. It works best with images that have distinct areas of contrast. You can access the Chrome dialog box by choosing Effects Artistic Effects Chrome.
The Chrome dialog box contains the following controls:
• Flaws — sets the number of creases, or folds. Each fold is a transition between light and dark areas.
• Brightness — sets the brightness of the chrome
• Use original color — applies the image’s color for the chrome
• Color — makes the chrome a uniform color. You can choose a color by unmarking the Use original color check box, and then clicking the color box to access the Color dialog box. You can also right-click the color box to access the Recent Color dialog box. The default color is white.
Colored Edges
Edit workspace
The Colored Edges effect makes an image look retouched by enhancing and coloring its edges. You can access the Colored Edges dialog box by choosing Effects Artistic Effects Colored Edges.
The Colored Edges dialog box contains the following controls:
• Luminance — adjusts the overall brightness of the image
• Blur — determines the softness of the image. As you increase the value, the image becomes less sharp.
• Color — lets you choose a color for the edges. To change the edge color, you can click a color in the original image, click the color box to access the Color dialog box, or right-click the color box to access the Recent Colors dialog box.
• Intensity — controls the intensity of the effect. As you increase the value, more edges are colored, and more color is applied to the edges.
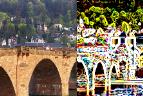
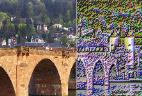
Colored Foil
Edit workspace
The Colored Foil effect adds a sculpted look to the edges and applies several colors to an image. You can access the Colored Foil dialog box by choosing Effects Artistic Effects Colored Foil.
The Colored Foil dialog box contains the following controls:
• Blur — determines the softness of the image. As you increase the value, the image becomes less sharp.
• Detail — controls the amount of the effect applied. As you increase the value, color is applied to more areas of contrast.
• Color — lets you choose a color for the light shining on the image. To change the light color, you can click a color in the original image, click the color box to access the Color dialog box, or right-click the color box to access the Recent Colors dialog box.
• Angle — affects which edges appear light and shadowed. The needle points to the direction of the light source, measured in degrees of rotation around the circle. To set the value, you can click in the circle, drag the needle, or set or type a number in the control.
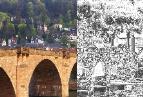
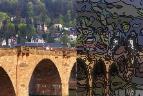
Contours
Edit workspace
The Contours effect reproduces the look of a topographical map by covering the image with contour lines. You can access the Contours dialog box by choosing Effects Artistic Effects Contours.
The Contours dialog box contains the following controls:
• Luminance — adjusts the overall brightness of the image
• Blur — determines the softness of the image. As you increase the value, the image becomes less sharp.
• Detail — controls where the color is applied. As you increase the value, the color is applied to more areas of contrast.
• Intensity — controls the amount of color applied to each area. As you increase the value, more color is applied.
• Color — lets you choose a color for the contour lines. To change the color, you can click a color in the original image, click the color box to access the Color dialog box, or right-click the color box to access the Recent Colors dialog box.
Enamel
Edit workspace
The Enamel effect applies the look of a shiny, hard surface to the image. You can access the Enamel dialog box by clicking Effects Artistic Effects Enamel.
The Enamel dialog box contains the following controls:
• Blur — determines the softness of the image. As you increase the value, the image becomes less sharp.
• Detail — controls the scale of the relief. Low values produce fewer levels of relief and a softer, less defined effect.
• Density — controls the number of areas of relief. Low values produce fewer larger areas and a softer look. Higher values add relief to smaller areas, producing a denser effect.
• Angle — affects which edges appear light and shadowed. The needle points to the direction of the light source, measured in degrees of rotation around the circle. To set the value, you can click in the circle, drag the needle, or set or type a number in the control.
• Color — lets you choose a color for the light shining on the edges of the forms. To change the light color, you can click a color in the original image, click the color box to access the Color dialog box, or right-click the color box to open the Recent Colors dialog box.
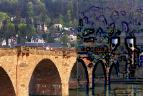
Glowing Edges
Edit workspace
The Glowing Edges effect makes the image appear to have been created from neon tubes. The edges in an image become brightly colored, while the remaining portions turn black. You can access the Glowing Edges dialog box by choosing Effects Artistic Effects Glowing Edges.
The Glowing Edges dialog box contains the following controls:
• Intensity — sets the brightness of the edges. As you increase the value, more edges are displayed, and they become brighter.
• Sharpness — controls the tightness of the edges. As you increase the value, the edges narrow and become more defined.
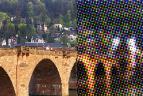
Halftone
Edit workspace
The Halftone effect applies a series of dots to the image, rather than a continuous tone. Halftone images can be printed easily and are therefore typically used in newspapers and magazines. You can choose different sizes, colors, and shapes for the Halftone effect. Larger dots produce darker, more dense areas of the image, whereas smaller dots produce lighter areas. You can access the Halftone dialog box by choosing Effects Artistic Effects Halftone.
The Halftone dialog box contains the following controls:
• Halftone pattern — lets you choose a line, round, or square pattern
• Size — lets you choose a size for the pattern cell
• Screen angles — lets you choose the angles for the screen. In the case of a grayscale image, you can choose only one angle. For an RGB image, you can choose an angle for each color channel.
• Use as overlay — lets you adjust the strength of the effect and apply blending
• Blend mode — lets you choose from a wide variety of blending effects
• Opacity — controls the strength of the effect. As the opacity increases, the image displays more of the effect and less of its original appearance.
• RGB — processes the red, green, and blue channels independently
• Greyscale — lets you choose pattern and background colors
• Ink — lets you choose the color for the pattern
• Background — lets you the choose the color of the background
• Transparent — makes the original image visible in the effect background. Unmark this check box if you want to choose a color for the background.
Hot Wax Coating
Edit workspace
The Hot Wax Coating effect makes the image appear coated in a layer of hot wax. The current Foreground/Stroke color is used for the wax. You can apply the Hot Wax Coating effect by choosing Effects Artistic Effects Hot Wax Coating.
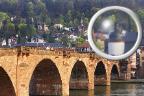
Magnifying Lens
Edit workspace
The Magnifying Lens effect lets you bring attention to a portion of your image by placing a magnifying lens over it. You can use environment maps and bump maps with this effect. For more information, see
Applying environment maps and bump maps.
The Magnifying Lens dialog box has four tabs: Shape, Properties, Illumination, and Frame. You can access the Magnifying Lens dialog box by clicking Effects Artistic Effects Magnifying Lens.
The Shape page contains the following controls:
• Magnification — sets the strength of the magnification
• Refraction — controls the degree of refractive distortion
• Defocus — blurs the magnified image
• Darkness — sets the darkness of the image surrounding the magnified frame
• Spherical — uses a round magnifying lens
• Cylindrical vertical — uses a cylindrical lens to produce a magnified image that is wider than it is long
• Cylindrical horizontal — uses a cylindrical lens to produce a magnified image that is longer than it is wide
The Properties page contains the following controls:
• Material swatch — lets you choose the colors, gradients, and patterns for the surface material of the magnified image. You can combine each of these elements with choices from the Textures panel of the Material Properties dialog box. Note that when you select the Textures option, the material becomes semitransparent.
• Opacity box in the Material panel — sets the maximum opacity for the surface material. At higher values, you can see more of the material and less of the original image.
• Shininess — determines how the light is absorbed or reflected from the surface. This control interacts with the setting for the Gloss control.
• Gloss — determines how the light is absorbed or reflected from the surface. This control interacts with the setting for the Shininess control.
• Environment map check box — lets you add surface details to your magnified image by activating the Environment map controls
• Opacity box in the Environment Map panel — sets the opacity of the environment map that covers the magnified image. Higher values let you see more of the environment map.
• Current image — uses the current image as an environment map
• Environment map option and swatch — let you choose an image from the Environment Maps folders
The Illumination page contains the following controls:
• Maximum — sets the maximum value for the overall lighting of the object
• Minimum — sets the minimum value for the overall lighting of the object
• Add and remove buttons and Lights menu — let you add or remove individual lights. By default, a single light with a highlight appears just above and to the left of the center.
• Position — lets you move the focus of the light by clicking on the highlight and dragging it to a new location
• Back light — redirects the light so that it comes from behind the object. You can drag back lights, but they are visible only around the perimeter of the sphere.
• Color — lets you choose the color for each light. The default color is white.
• Highlight size — lets you control the size of each highlight
The Frame page contains the following controls:
• Circular — provides a curved frame edge
• Rounded square — provides a rounded square frame edge
• Thickness — specifies the thickness of the frame
• Material — lets you choose the material for the frame
• Color — lets you choose the color for the frame
Neon Glow
Edit workspace
The Neon Glow effect gives an image a three-dimensional appearance by applying a neon effect and heightening the contrast of the edges. You can access the Neon Glow dialog box by choosing Effects Artistic Effects Neon Glow.
The Neon Glow dialog box contains the following controls:
• Detail — controls the number of colors and the brightness of colors. Increasing the detail level increases the number of strokes and the strength of the contrast between light and dark areas.
• Opacity — controls the strength of the effect. As the opacity increases, the image displays more of the effect and less of its original appearance.
Posterize
Edit workspace
The Posterize effect reduces the number of bits for each color channel, which decreases the number of colors and levels of lightness in the image or selection. The result is a flatter-looking image that has bands of color rather than smooth gradients. You can access the Posterize dialog box by choosing Effects Artistic Effects Posterize.
The Posterize dialog box has the following control:
• Levels — divides the range of lightness levels (from 2 to 255) into a chosen number of equal increments. As the number of levels decreases, the image or selection appears flatter.
Solarize
Edit workspace
The Solarize effect lets you convert all colors in an image or selection above a specific lightness value into their inverse on the scale from 1 to 254. The threshold level is the lightness value above which all colors are inverted. You can access the Solarize dialog box by choosing Effects Artistic Effects Solarize.
The Solarize dialog box contains the following control:
• Threshold — sets the threshold level. As the level increases, increasingly lighter colors are inverted.
Topography
Edit workspace
The Topography effect gives an image a three-dimensional look so that the image appears to have been created from a system of terraces. You can access the Topography dialog box by choosing Effects Artistic Effects Topography.
The Topography dialog box contains the following controls:
• Width — controls the size of each terrace or layer
• Density — sets the number of terraces
• Angle — affects which edges appear light and shadowed. The needle points to the direction of the light source, measured in degrees of rotation around the circle. To set the value, you can click in the circle, drag the needle, or set or type a number in the control.
• Color — lets you choose a color for the light shining on the sides of the terraces. To change the light color, you can click a color in the original image, click the color box to access the Color dialog box, or right-click the color box to access the Recent Colors dialog box.