Applying Distortion effects
You can apply Distortion effects to an image and produce interesting results. Curlicues, Pixelate, and Warp are examples of effects that let you distort your image.
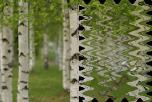
Curlicues
Edit workspace
The Curlicues effect turns an image into a series of rows and columns composed of curls. You can access the Curlicues dialog box by choosing Effects Distortion Effects Curlicues.
The Curlicues dialog box contains the following controls:
• Number of columns — sets the number of curls in each row
• Number of rows — sets the number of curls in each column. If the number of columns is set at 5 and the number of rows is set at 4, then each of the four rows will have five curlicues.
• Symmetric — links the Rows and Columns values so that changing one changes the other. Mark this check box if you want an equal number of rows and columns.
• Radius — sets the radius of the curls. This value is a percentage of the smallest dimension — either the column width or the row height.
• Strength — controls the amount of rotation of each curl
• Clockwise — sets the direction of the curls
Displacement Map
You can warp, or displace, one image based on the contents of another image. For information about using the Displacement Map effect, see
Using the Displacement Map effect.
Lens Distortion
Edit workspace
The Lens Distortion effect simulates barrel, fisheye, or pincushion distortion in an image. You can access the Lens Distortion dialog box by choosing Effects Distortion Effects Lens Distortion.
The Lens Distortion dialog box contains the following controls:
• Horizontal — positions the center of the distortion horizontally in the image. Increasing the value moves the center of the distortion to the right. Decreasing the value moves the center of the distortion to the left.
• Vertical — positions the center of the distortion vertically in the image. Increasing the value moves the center of the distortion toward the bottom. Decreasing the value moves the center of the distortion toward the top.
• Distortion type — lets you specify whether to choose Barrel, Fisheye, Fisheye (Spherical), or Pincushion distortion
• Strength — determines the strength of the Barrel or Pincushion effects
• Field of view — determines the strength of the Fisheye or Fisheye (Spherical) effect
• Wrap — makes the image appear as though it were a tile repeating in each direction
• Repeat — finds the edge pixel of each side and repeats it outward infinitely
• Color — lets you choose a color to represent out-of-bounds pixels. You can click the color box to access the Color dialog box, or right-click the color box to access the Recent Colors dialog box.
• Transparent — makes out-of-bounds pixels transparent (available only with layered images).
Pinch
Edit workspace
The Pinch effect is a deformation that makes the image or selection appear pinched by pushing the contents in toward the center. You can access the Pinch dialog box by choosing Effects Distortion Effects Pinch.
The Pinch dialog box contains the following control:
• Strength — determines how much of the image is pushed toward the center
Pixelate
Edit workspace
The Pixelate effect divides an image into rectangles or squares of a specified size. You can access the Pixelate dialog box by choosing Effects Distortion Effects Pixelate.
The Pixelate effect dialog box contains the following controls:
• Block width — sets the width of the blocks in pixels
• Block height — sets the height of the blocks in pixels
• Symmetric — creates square blocks. You can create rectangular blocks by clearing the check box.
Polar Coordinates
Edit workspace
The Polar Coordinates effect changes pixels by mapping them from Cartesian to polar coordinates, or from polar to Cartesian coordinates. You can access the Polar Coordinates dialog box by choosing Effects Distortion Effects Polar Coordinates.
The Polar Coordinates dialog box contains the following controls:
• Rectangular to polar — maps pixels from Cartesian to polar coordinates
• Polar to rectangular — maps pixels from polar to Cartesian coordinates
• Wrap — makes the image appear as though it were a tile repeating in each direction
• Repeat — finds the edge pixel of each side and repeats it outward infinitely
• Color — lets you choose a color to represent out-of-bounds pixels. You can click the color box to access the Color dialog box, or right-click the color box to access the Recent Colors dialog box.
• Transparent — makes out-of-bounds pixels transparent.
Punch
Edit workspace
The Punch effect is a deformation that makes an image or selection appear punched out from behind so that the contents in the center expand toward the outer edges. You can access the Punch dialog box by choosing Effects Distortion Effects Punch.
The Punch dialog box contains the following control:
• Strength — determines how much of the image is pushed out toward the edges
Ripple
Edit workspace
The Ripple effect is a deformation that creates concentric rings similar to those produced by dropping a pebble in water. You can access the Ripple dialog box by choosing Effects Distortion Effects Ripple.
The Ripple dialog box contains the following controls:
• Horizontal — moves the central point of the ripples. The value is a percentage of the width of the image or selection. The default position, 50, corresponds to the center of the image or selection.
• Vertical — moves the central point of the ripples. The value is a percentage of the height of the image or selection. The default position, 50, corresponds to the center of the image or selection.
• Amplitude — controls the amplitude of each ripple, or the distance from the trough to the crest
• Wavelength — controls the distance from the crest of one ripple to the crest of the next
• Color — lets you choose a color to represent out-of-bounds pixels. You can click the color box to access the Color dialog box, or right-click the color box to access the Recent Colors dialog box.
• Transparent — makes out-of-bounds pixels transparent (available only with layered images)
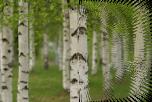
Spiky Halo
Edit workspace
The Spiky Halo effect is a deformation that you can use to create a radical pattern of waves or ripples. You can access the Spiky Halo dialog box by choosing Effects Distortion Effects Spiky Halo.
The Spiky Halo dialog box contains the following controls:
• Horizontal — moves the central point of the ripples. The value is a percentage of the width of the image or selection. Negative values move the halo to the left, and positive values move the halo to the right.
• Vertical — moves the central point of the ripples. The value is a percentage of the height of the image or selection. Negative values move the halo up, and positive values move the halo down.
• Amplitude — sets the apparent height of the waves. Lower values produce smoother ripples.
• Frequency — sets the number of rays for each quarter-circle
• Radius — sets the distance of the waves from the center. Lower numbers cause the waves to begin closer to the center.
• Color — lets you choose a color to represent out-of-bounds pixels. You can click the color box to access the Color dialog box, or right-click the color box to access the Recent Colors dialog box.
• Transparent —makes out-of-bounds pixels transparent (available only with layered images)
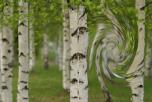
Twirl
Edit workspace
The Twirl effect distorts an image by twisting or whirling it around its center. You can twirl an image up to two rotations in either direction. You can access the Twirl dialog box by choosing Effects Distortion Effects Twirl.
The Twirl dialog box has the following control:
• Degrees — sets the direction and amount of twirl. Positive values create a clockwise twirl; negative values create a counter-clockwise twirl.
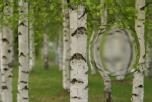
Warp
Edit workspace
The Warp effect makes a circular area of the image appear at a higher or lower zoom level. The area is distorted as if viewed through a convex or concave lens. You can access the Warp dialog box by choosing Effects Distortion Effects Warp.
The Warp dialog box has the following controls:
• Horizontal — moves the central point of the warp horizontally. The value is a percentage of the width of the image or selection. Negative values move the center to the left, and positive values move the center to the right.
• Vertical — moves the central point of the warp vertically. The value is a percentage of the height of the image or selection. Negative values move the center up, and positive values move the center down.
• Size — sets how far the effect continues from the center. The value is a percentage of the image size. As you lower the number, less of the image appears distorted.
• Strength — sets the level of the distortion. Positive values make the distorted image area appear closer, and negative values make it appear farther away.
Wave
Edit workspace
The Wave effect distorts an image by creating undulating lines. You can determine the amount of distortion by setting the size of the wave. You can access the Wave dialog box by choosing Effects Distortion Effects Wave.
The Wave dialog box contains the following controls:
• Amplitude (in the Horizontal displacement group box) — sets the distance from the trough to the crest for horizontal ripples
• Amplitude (in the Vertical displacement group box) — sets the distance from the trough to the crest for vertical ripples
• Wavelength (in the Horizontal displacement group box) — sets the distance from the crest of one horizontal ripple to the crest of the next
• Wavelength (in the Vertical displacement group box) — sets the distance from the crest of one vertical ripple to the crest of the next
• Color — lets you choose a color to represent out-of-bounds pixels. You can click the color box to access the Color dialog box, or right-click the color box to access the Recent Colors dialog box.
• Transparent — makes out-of-bounds pixels transparent (available only with layered images)
Wind
Edit workspace
The Wind effect blurs an image to make it look as though it has been blown by wind coming from either the left or the right. You can access the Wind dialog box by choosing Effects Distortion Effects Wind.
The Wind dialog box contains the following controls:
• Wind direction group box — lets you choose From left or From right for the wind direction
• Wind strength — controls the strength of the deformation. Increasing the strength increases the blurriness of the image.