You can quickly improve the appearance of the subjects in your photos by performing the following cosmetic changes:
• removing blemishes — by using the Blemish Fixer mode of the Makeover tool
• whitening teeth — by using the Toothbrush mode of the Makeover tool
• fixing bloodshot eyes — by using the Eye Drop mode of the Makeover tool
• adding a suntan — by using the Suntan mode of the Makeover tool
• thinning a photo subject — by using the Thinify mode of the Makeover tool
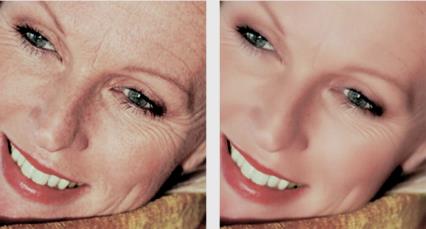
• removing wrinkles — by using the Scratch Remover tool
• smoothing skin tone quickly — by using the Skin Smoothing command in the Adjust menu
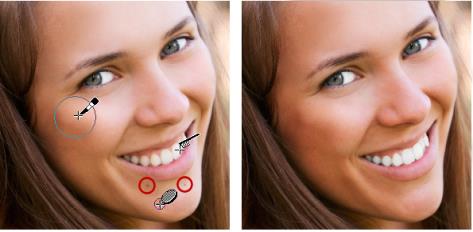
You can remove blemishes, whiten teeth, and apply a suntan.
To remove facial blemishes
Edit workspace
1 On the Tools toolbar, choose the Makeover tool .
2 On the Tool Options palette, choose the Blemish Fixer mode.
The pointer changes to concentric circles.
3 On the Tool Options palette, adjust the Size control to the smallest size that allows the inner circle to enclose the blemish.
The outer circle is for the material used to cover the blemish.
4 On the Tool Options palette, adjust the Strength control.
Values range from 1 to 100. Higher values apply more of the source material (enclosed in the outer circle) to the blemish area (enclosed in the inner circle).
5 Click directly over the blemish.
You can zoom in on the photo for better control of the Makeover tool.
To whiten teeth
Edit workspace
1 On the Tools toolbar, choose the Makeover tool .
2 On the Tool Options palette, choose the Toothbrush mode.
3 On the Tool Options palette, adjust the Strength control as desired.
Higher settings produce more intense whitening but may also produce an unnatural appearance.
4 Click directly over the teeth.
If the teeth are separated or partially obscured, you may need to apply this tool to each tooth individually.
The Toothbrush mode of the Makeover tool works only with color photos.
To apply whitening eye drops
Edit workspace
1 On the Tools toolbar, choose the Makeover tool .
2 On the Tool Options palette, choose the Eye Drop mode.
3 Type or set a value in the Strength control.
Higher values whiten more of the eye area but may spread the whitening beyond the affected area of the eye.
4 Zoom in as necessary, and then carefully click over the bloodshot portion of the eye.
To apply a suntan
Edit workspace
1 On the Tools toolbar, choose the Makeover tool .
2 On the Tool Options palette, choose the Suntan mode.
3 Type or set a value in the Size control.
4 Type or set a value in the Strength control.
Higher values produce a darker tan.
5 Carefully drag over the skin of the photo subject.
To apply a thinning effect
Edit workspace
1 On the Tools toolbar, choose the Makeover tool .
2 On the Tool Options palette, choose the Thinify mode.
3 Type or set a value in the Strength control.
Higher values compress more pixels in the horizontal axis.
4 Click the middle of the photo subject.
The pixels compress on either side of the point you click. You can continue clicking to enhance the thinning effect.
To remove facial wrinkles
Edit workspace
1 On the Tools toolbar, choose the Scratch Remover tool .
2 On the Tool Options palette, choose either the square edge or the beveled edge selection box.
3 Type or set a value in the Width control so that the wrinkle fits inside the inner portion of the selection box you drag.
4 Position the pointer just outside the wrinkle, and carefully drag over the wrinkle so that the wrinkle is enclosed in the inner rectangle.
The wrinkle is covered by the surrounding skin texture.
If you need to start again, you can undo the correction, adjust the Width control, and redrag.
For wrinkle lines that are not straight, correct just one portion at a time.
To smooth skin tone
Edit workspace
1 Choose AdjustSkin Smoothing.
2 In the Skin Smoothing dialog box, adjust the Amount slider.
Moving the slider to the right applies more smoothing; moving the slider to the left applies less smoothing.
The Skin Smoothing command smooths skin tones and diminishes the appearance of wrinkles and blemishes quickly.
The Skin Smoothing command automatically detects and smooths skin tones without affecting eyes or lips. However, if other areas in your photo are affected because they are similar in color to the skin tone, you can use a selection to isolate the area you want to smooth. For more information about selections, see Creating selections.
 or the beveled edge
  selection box.