You can quickly apply preset effects by using the Instant Effects palette. It is available in multiple workspaces and is an easy way to apply an effect when you don’t want to adjust controls. When you create a preset in any effects dialog box, your preset automatically displays in the Instant Effects palette in the User Defined category.
Instant Effects palette
Using the Effect Browser
You can use the Effect Browser when you want to preview multiple effects before applying them to your image. The Effect Browser displays the presets that come with Corel PaintShop Pro as well as any that you create.
To display the thumbnail previews that you see in the Effect Browser, Corel PaintShop Pro applies an effect’s default preset and any presets that you saved to the image. The preset is saved as a script in the file format for Corel PaintShop Pro (PspScript).
The Effect Browser displays thumbnails that let you preview and choose effects.
To choose an effect from the Effects menu
Edit workspace
1 From the Effects menu, choose an effect category, and choose an effect. (For example, choose EffectsDistortion EffectsTwirl.)
For most effects, a dialog box appears.
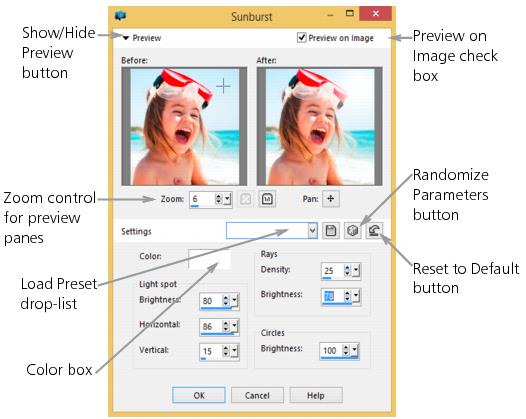
2 Specify the desired settings, or choose a preset from the Load Preset drop-list.
You can preview the effect in the After pane.
Note: Presets are not available for all effects.
3 Click OK.
You can also
Save settings for reuse
Click the Save Preset button , type a name in the Preset name box, and click OK.
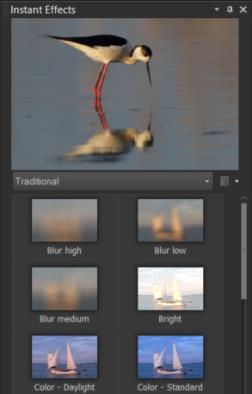
To choose an effect from the Instant Effects palette
1 In the Instant Effects palette, choose a category from the drop-list at the top of the palette.
If the Instant Effects palette is not displayed, choose ViewPalettesInstant Effects.
2 Double-click a thumbnail to apply the effect to the active image or the selected images.
Effects are cumulative; each time you double-click, the new effect is added to the previous effect.
To undo an effect, click the Undo button (Adjust and Edit workspaces). Note that the Revert Current Editing command reverts all unsaved effects.
In the Manage workspace, if you apply effects to an image that is in a RAW file format, a JPEG version of the image is created.
Custom presets (saved in any effect dialog box) appear in the User Defined category in the Instant Effects palette the next time that you launch the application.
To choose an effect from the Effect Browser
Edit workspace
1 Choose EffectsEffect Browser.
The Effect Browser appears.
2 From the hierarchical list in the left pane, do one of the following:
• To preview all effects applied to the image, click the Presets folder.
• To preview an effect category, click a subfolder of the Effects folder (for example, 3D Effects, Artistic Effects, or Photo Effects).
Corel PaintShop Pro scans the selected folder and creates thumbnails of the image with each effect applied to it.
3 Click a thumbnail image to choose an effect preset.
4 Click Apply.
You can also
Modify the selected preset
Click Modify, and adjust the settings in the dialog box for the effect.
Note: This button is unavailable for effects that cannot be adjusted.
Resize the thumbnail preview
Choose FilePreferencesGeneral Program Preferences, and click Display and Caching along the left side. In the Effect browser thumbnails group box, set a value in the Size (Pixels) control.
The thumbnail previews displayed in the Effect Browser for a given effect include the default preset and any presets that you have saved. Presets are saved as script files (with a .PspScript filename extension) and are located in the Presets folder of the main program folder. You can change the location for storing preset files. For information about changing where preset files for effects are stored, see To change file locations for resources.