You can remove unwanted portions of an image to create stronger compositions or to draw attention to another area of the image. Corel PaintShop Pro helps you crop by providing presets to common image sizes, such as 4 × 6 inches or 10 × 15 centimeters.
Cropping reduces the amount of hard drive memory required for storing the image. In addition, cropping can improve color corrections by eliminating extraneous areas of color. If a photograph requires both cropping and color correction, you should crop the image first and then apply the color correction.
Before printing an image, you can crop it to a specific print size. In addition, you can select an area within the image and then crop the image to the selection borders. You can also create a new image from the cropped area.
You can also rotate the crop rectangle and stretch it outside the bounds of the image. In this case, the crop command resizes the image so that the whole new image fits into the new shape.
You can crop an image based on its opaque (nontransparent) areas. Cropping in this way is useful when you want to eliminate transparent areas at the edges of the image. You can also set the crop area to cover the opaque area of a single layer or of an entire image.
Important! Cropping permanently removes the image area outside the crop rectangle. To preserve the original photo, use the Save As command, and save the cropped version of your image to a new filename.
To crop an image
Edit workspace
1 On the Tools toolbar, choose the Crop tool .
By default, the crop rectangle appears on the image, and the area outside the crop rectangle is shaded.
2 Adjust the crop area size by dragging any of the handles or edges. To reposition the crop rectangle, place the cursor inside and drag.
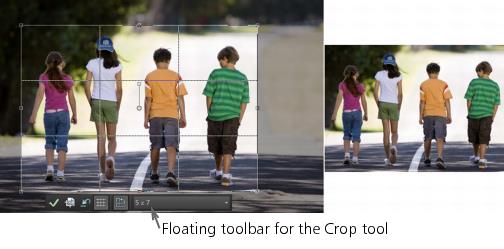
You can use a preset crop size by choosing an option from the Presets drop-list on the floating toolbar for the Crop tool, or from the drop-list on the Tool Options palette.
3 When you’re ready to crop the image, click the Apply button on the Tool Options palette or on the floating toolbar for the Crop tool.
You can also
Apply the crop by using your mouse or keyboard
Double-click inside the crop rectangle, or press Enter.
Set the size of the crop rectangle on the Tool Options palette
Specify the Pixel Dimensions values in the Width and Height controls or the Document size values in the Width, Height and Units controls.
Constrain the crop area to its current proportions
Mark the Maintain aspect ratio check box on the Tool Options palette. This option is available only for custom-defined crop rectangles.
Rotate the crop rectangle by 90 degrees
Click the Rotate Crop Rectangle button on the floating toolbar.
Rotate the crop rectangle by a specific angle
Specify the degree of rotation in the Angle controls on the Tool Options palette.
Freely rotate the crop rectangle
Drag the square end of the rotation handle or a corner point. This feature can be helpful when, for example, you want to straighten and then crop a crookedly scanned photo.
Move the rotation axis point of the crop rectangle
Specify the X and Y coordinates under Pivot on the Tool Options palette or hold down Ctrl, and then drag the axis point of the rotation handle (the circular end of the handle) to a new position.
Move the rotation axis point to the center of the crop rectangle
Click the Center Pivot button on the Tool Options palette.
Modify the crop shading area
Choose FilePreferencesGeneral Program Preferences, choose Transparency and Shading from the list, and specify the settings for Color and Opacity in the Shading group box.
Turn off the shading option
Choose FilePreferencesGeneral Program Preferences, choose Transparency and Shading from the list, and unmark the Enable crop shade area check box in the Shading group box.
Turn off the floating toolbar for the Crop tool
Choose FilePreferencesGeneral Program Preferences, choose Transparency and Shading from the list, and unmark the Enable floating crop toolbar check box in the Shading group box.
Choose not to display the crop rectangle when the tool is selected
Choose FilePreferencesGeneral Program Preferences, choose Transparency and Shading from the list, and unmark the Automatically display crop rectangle check box in the Shading group box.
Clear the crop area
Click the Clear button on the floating toolbar for the Crop tool.
After cropping an image, you may notice that the Width and Height values on the Tool Options palette are each set at 0.100. These settings do not reflect the cropped image size. To see the image size dimensions after cropping, choose ImageImage Information.
If you need to, you can stretch the rotated crop rectangle outside the bounds of the image. The area outside the original image will be transparent or filled with the background, depending on which layer you are working on.
To crop an image for printing
Edit workspace
1 On the Tools toolbar, choose the Crop tool .
2 Define the crop area by dragging within the image.
3 On the Tool Options palette, mark the Specify Print Size check box.
Note: If the Specify Print Size check box is marked, the image resolution changes when you change the values in the Height and Width controls of either the Pixel Dimensions or the Document size. The current resolution appears to the right of the Units drop-list.
4 In the Units drop-list, select Inches or Centimeters.
Note: The Pixels option is unavailable for this method of cropping.
5 Type or set the dimension values in the Height and Width controls.
The final crop area is sized as specified, and the image resolution is reduced or increased as needed.
6 Click the Apply button on the Tool Options palette, or on the floating toolbar for the Crop tool.
To crop to a selection in an image
Edit workspace
1 Make a selection in the image.
2 Choose ImageCrop to Selection.
The selection can be any shape. Corel PaintShop Pro positions a crop area rectangle around irregularly shaped selections.
If you crop to a selection that is feathered, the current background color fills in the feathered region of the selection.
You can also crop to the selection by choosing the Crop tool and clicking Current Selection in the Snap crop rectangle to group box on the Tool Options palette. Adjust the crop area, and click Apply .
To crop to an opaque area in a layer or an image
Edit workspace
1 Click the Crop tool .
2 On the Tool Options palette, select one of these options from the Snap Crop Rectangle To group box:
• Layer Opaque — selects opaque areas in the current layer
• Merged Opaque — selects opaque areas in all layers
3 Adjust the crop area.
4 Click the Apply button on the Tool Options palette, or on the floating toolbar for the Crop tool.
If any layer has a solid-color (nontransparent) background, the entire layer or image is selected as the crop area.
Opaque areas that are not rectangular may have transparent areas remaining after cropping.
To create a new image by cropping
Edit workspace
1 On the Tools toolbar, choose the Crop tool .
2 Define the crop area by dragging within the image.
3 Click the Crop as new image button on the Tool Options palette, or on the floating toolbar for the Crop tool.
A new image is created, but the cropped image remains unchanged, and remains the active image.
This feature offers a useful method of creating individual images from a scan of multiple images. For example, if you scan four photos in one scanning session, you can use this feature to quickly separate each photo into an individual image file.