Cutting out image areas
You can use the Object Extractor to cut out an image area from the surrounding background. You can then edit the cutout separately from the background, display it against a different background, or combine it with other images.
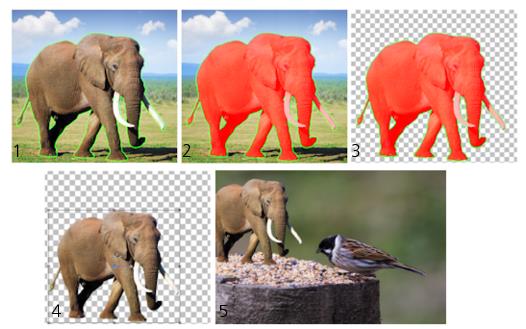
Object Extractor workflow: (1) Outline the edges of the image area; (2) add a fill; (3) preview the cutout, and touch it up if necessary; (4) bring the cutout into the image window; (5) place the cutout against a different background image (optional).
To cut out an image area
Edit workspace
1 On the Layers palette, click the layer that contains the image area that you want to cut out.
2 Choose Image Object Extractor.
The
Object Extractor dialog box appears, with the
Brush tool

activated by default.
3 Adjust the brush size by moving the Brush size slider.
4 In the preview area, draw a line along the edges of the image area that you want to cut out.
Ensure that the selection outline slightly overlaps the surrounding background and completely surrounds the area in a closed ring.
5 Choose the
Fill tool

, and click inside the area you want to cut out.
An overlay covers the image area that you clicked.
Note: If the selection outline is not closed, the fill covers the entire image. If this is the case, click the
Eraser tool

to clear the fill, and then complete the selection outline with the
Brush tool.
6 Click Process to preview the result.
If you are not happy with the result, click Edit Mask to return to the previous view and touch up the cutout.
You can also | |
Erase parts of the selection outline | Choose the Eraser tool  , and drag over the selection marquee that you want to delete. |
Refine the edge detail in the final result | Move the Accuracy slider to a higher value if the object has an intricate or complex outline. The Accuracy slider is available only after you click Process. |
Revert to the original image | Click Reset. The Reset button is available only before you click Process and clears both the fill and the selection outline. |
Hide the fill overlay and the edge outline | Mark the Hide Mask check box. |
Specify an exact size for the brush or eraser nib | Type or set a value in the Brush size box. |
Zoom in and out | Type or set a value in the Zoom box. |
Display an image at its actual size | Click the Zoom to 100% button  . |
Display an image in the entire preview area | Click the Fit Image to Window button  . |
Pan to another area of the image | Using the Pan tool  , drag the image until the area you want to see is visible. |
The background layer is automatically promoted to a raster layer when you use the Object Extractor command.
You can switch from the Brush tool to the Eraser tool by right-clicking and dragging in the preview area.