You can remove flaws and objects in your images by using the Clone Brush tool or the Object Remover tool. The Clone Brush tool lets you remove flaws and objects by painting over them with another part of the image. The paint source can be a part of the same layer, another layer in the image, a merged image, or a layer from another image.
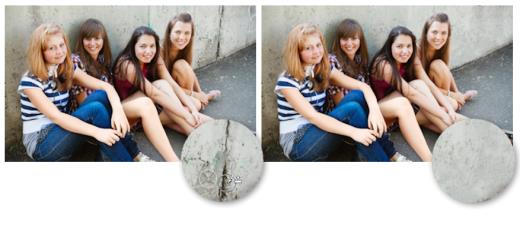
The Clone Brush tool was used to remove the cracks on the wall from the photo on the left.
The Object Remover tool lets you remove objects when the surrounding area is fairly uniform in color and texture. This tool is similar to the Clone Brush tool in that it lets you identify the area to remove and then choose a background for covering that area.
The Object Remover tool was used to remove one boat from the water.
To clone a part of an image
Edit workspace
1 On the Tools toolbar, choose the Clone Brush tool .
2 On the Tool Options palette, choose the brush tip, size, opacity, and other settings.
If you want the Clone Brush tool to reset the source point each time you resume painting, mark the Aligned mode check box. You can continue dragging over the target area to fill in the source image. Unmark the check box if you want every stroke to copy the same data from the original source point.
If you want to clone data from all layers merged together, mark the Use all layers check box. If you want to clone data from the current layer only, unmark the check box.
3 On the source image, right-click the center point of the source area.
If the image has more than one layer, click the name of the layer on the Layers palette before you define the source area.
4 Drag in the image where you want to paint the cloned area.
When you clone an image area, you must select a source area with data.
If your image contains a selection, you must right-click within the selection to set your clone source. If you are using a pen tablet, you can achieve the same result by holding down Shift.
You can also hold down Shift and click the image to set the source point.
You can resize the brush interactively by pressing Alt while dragging in the image window.
To remove objects from a photo
Edit workspace
1 On the Tools toolbar, choose the Object Remover tool .
2 On the Tool Options palette, choose the Selection Mode button .
3 Drag around the object that you want to remove.
4 On the Tool Options palette, choose the Source Mode button .
A rectangle is displayed in the image window.
5 Position the rectangle over the area that will replace the previous selection.
6 Drag the handles on the rectangle to resize it, or drag the rotation handle on the rectangle to rotate it.
It is recommended that you make the rectangle as large as, or slightly larger than, the area you are removing.
7 On the Tool Options palette, click the Apply button .
8 Choose SelectionsSelect None to deselect the selection.
You can also
Feather a selection made with the Freehand Selection tool
Before making the selection, adjust the Feather control on the Tool Options palette.
Adjust the opacity of the source material
Before clicking the Apply button, adjust the Opacity control on the Tool Options palette.
Choose source material from all layers or from the current layer
Mark the Use all layerscheck box to choose source material from all layers as though they were merged. Do not mark this check box if you want to choose source material from the current layer only.
Blend edges and use the object’s tonal ranges when applying the source material
Choose the Smart Blending option on the Tool Options palette.
You can also create a selection by using any of the selection tools before you activate the Object Remover tool.
You can deselect the selection by pressing Ctrl+ D.