Inspired by photos taken spontaneously with a vintage-style pocket camera, such as LOMO, Diana, or Holga, the Retro Lab lets you apply a fun retro effect. Sometimes referred to as a “toy camera” effect, this photo style is often characterized by colors and contrast that are pushed beyond their natural appearance with blurred or vignette edges.
For a quick effect, apply a preset. Want to dig deep? You can access a complete set of controls that let you create and save your own presets.
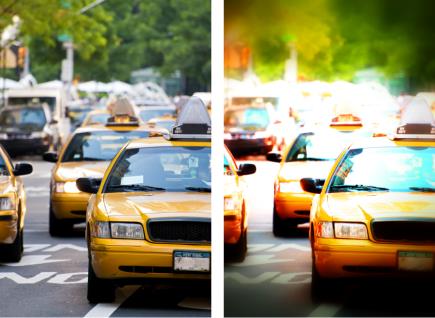
Original photo (left); photo after using Retro Lab (right). The Surreal preset was applied, then the Range controls and the Saturation slider were used to customize the effect.
To use Retro Lab to create a toy camera effect
1 Click EffectsPhoto EffectsRetro Lab.
If you want to apply a preset, click a preset in the Settings drop-list. Click OK to apply and exit the dialog box, or continue to the next step to create a custom effect.
2 To create a custom effect, do any of the following:
• In the Range area, click an Area of focus tool and drag in the Before pane of the Preview area to select an area of focus.
• Adjust the settings in the Range area to adjust the vignette effect. For information about individual controls, see To apply a Vignette effect.
• In the Color Adjust area, drag the sliders to get the color effect you want.
• In the Curves area, click and drag the diagonal line to adjust the tone or choose a color from the Channel drop-list and drag the diagonal line to adjust individual color channels. For more information about Curves, see To change color channel brightness.
If you want to save your settings, click the Save Preset button , type a name in the Preset name box, and click OK.