Nodes are square points on line and curve objects. You can change the shape of a line or curve object by dragging one or more of its nodes.
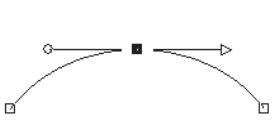
Nodes have zero, one, or two control arms. The length and direction of the control arms determine the shape of the contour at the node. The straight or curved line between two nodes is a line segment. There are four types of nodes: symmetrical, asymmetrical, cusp, and smooth.
You can use symmetrical nodes to create smooth, flowing curves on either side of a node. Any adjustments to one control arm are mirrored by the other.
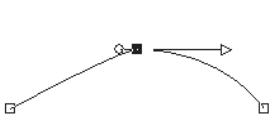
You can use asymmetrical nodes to obtain a different amount of curve on each side of the node, but keep a smooth flow through the node. You can adjust the length of each control arm, but the not the direction.
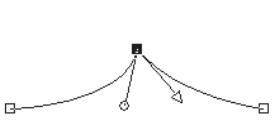
You can use cusp nodes to create extreme changes in direction. You can adjust the length and direction of each control arm independently.
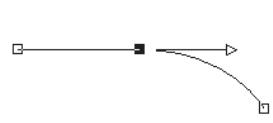
You can use smooth nodes to create a smooth transition between straight and curved line segments.
You can select a node to edit, or you can move it. Moving a node alters the shape of a vector object. If an object has more than one contour, you can move all of its nodes. You can also move the path to move the entire object. You can edit the contour of a vector object by adding, merging, or deleting nodes anywhere along a path.
You can merge nodes on a contour while retaining the line segments on each side. The line segments are combined into one line segment between remaining nodes. If the contour is curved at the node, Corel PaintShop Pro attempts to retain the curve.
You can also delete a node to remove the node and the line segments on each side.
To select a node
Edit workspace
1 On the Tools toolbar, select the Pen tool.
2 On the Tool Options palette, click EditMode button .
3 Click a vector object.
The object's nodes appear.
4 Click the node.
The selected node appears with a solid gray fill.
You can also
Select multiple nodes
Hold down Shift, and click the nodes.
Select all nodes on a contour
Double-click one node. If the object has only one contour, this selects all nodes in the path.
Select all nodes in a path (all nodes in the object)
Right-click a node, and choose EditSelect All.
Select the next or previous node on a contour
Hold down Shift, and press [ or ].
Deselect a selected node
Hold down Shift, and click the node.
To view the selected node more easily, click the Visibility icon on the Layers palette next to the vector object you are working on. This hides the fill and outline for the object. For more information about showing and hiding layers, see Viewing layers.
Start and end nodes are easy to find. The cursor displays “START” or “END” when you hold it over the node. If the shape is closed, the cursor displays “CLOSE.”
To move a node
Edit workspace
1 On the Tools toolbar, select the Pen tool.
2 On the Tool Options palette, click EditMode button .
3 Select a node, and then drag it to a new position.
You can constrain a node’s line segments to 45-degree increments by holding down Shift as you drag.
To add a node on a contour
Edit workspace
1 On the Tools toolbar, select the Pen tool.
2 On the Tool Options palette, click one of the following buttons:
• EditMode
• Knife Mode
3 Click the contour.
4 Hold down Ctrl, and click where you want to add a node.
The cursor displays “+ADD.”
To add a new start or end node
Edit workspace
1 On the Tools toolbar, select the Pen tool.
2 On the Tool Options palette, click the Drawing Lines and Polylines button .
3 Select the start or end node of the contour.
4 Click to add another node.
The contour automatically connects to the new node.
To merge one or more nodes
Edit workspace
1 On the Tools toolbar, select the Pen tool.
2 Select the node you want to merge.
If you want to select multiple nodes, hold down Shift and click.
3 Right-click a node, and choose EditMerge.
To transform nodes
Edit workspace
1 On the Tools toolbar, select the Pen tool.
2 On the Tool Options palette, click the EditMode button .
Note: If you cannot see all of the options on the Tool Options palette, click the More button .
3 Select one or more nodes.
4 Choose ObjectsTransform Selected Nodes,and choose one of the following commands:
• Flip — moves selected nodes along the vertical axis (those on top go the bottom and vice versa). On a single node, the command flips the node’s control arms.
• Mirror — moves selected nodes along the horizontal axis (those on the left go to the right and vice versa). On a single node, the command mirrors the node’s control arms.
• Rotate — rotates the selected nodes by the current rotation setting. Applied to a single node, the control arms (if any) will rotate.
• Skew X — moves selected nodes to the left or right (along the horizontal axis) using the current skew setting
• Skew Y — moves selected nodes to the left or right (along the vertical axis) using the current skew setting
• Contract — moves the selected nodes closer to each other by the current contraction setting. This command cannot be applied to a single node.
• Expand — moves the selected nodes away from each other by the current expansion setting. This command cannot be applied to a single node.
5 Where applicable, type a value for the selected transformation setting.
6 Click the Apply button .
To adjust a curve using a node’s control arms
Edit workspace
1 Select a node to display its control arms.
Note: Cusp nodes may have no control arms.
2 Move the cursor over a control handle until the cursor changes to two rotating arrows.
3 Drag the handle.
To constrain the control arms to fixed angles (45-degree increments), hold down Shift as you drag.
To straighten a curve between two nodes
Edit workspace
1 Select two consecutive nodes.
2 Right-click one node, and then choose Node TypeConvert to Line.
To delete a node
Edit workspace
1 Select a node.
2 Press Delete.
If you delete a node in the middle of an open contour, the vector object becomes two separate contours. If you delete a node in a closed contour, the contour opens.
 .
.