By default, images that you open in Corel PaintShop Pro appear at a magnification level that allows the full image to appear in the workspace. You can zoom in to get a closer look at image detail or zoom out to view a larger portion of the image. You can also magnify a specific area of an image.
You can view image areas that fall outside the current image window. For example, when you are working at a high magnification level, you can pan or jump to a different image area without having to adjust the magnification level. When an image is too large to fit within its window, scroll bars appear on the bottom and right sides of the image.
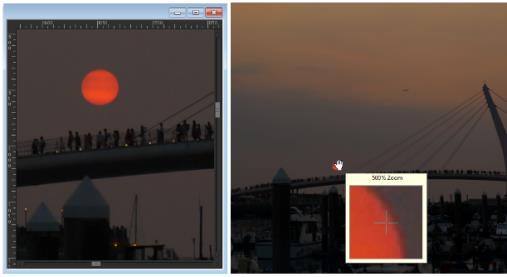
You can use the Zoom tool to magnify your image (left) or you can use the Magnifier command to view a specific area without changing the magnification of the image (right).
To zoom
Edit workspace
1 On the Tools toolbar, choose the Zoom tool .
2 Click to magnify the area, or right-click to reduce the area.
The magnification changes to a preset percentage that appears in the Zoom (%) control on the Tool Options palette.
You can also
Magnify the image by a specified percentage
On the Tool Options palette, type a value in the Zoom (%) control.
View the image at 100%
Choose ViewZoom to 100%, or click the Zoom to 100% button on the Tool Options palette.
By default, when you zoom in or out, the image window automatically resizes to fit the image.
You can also change the magnification when the Zoom tool is active by using the scroll-wheel if one is included on your mouse or stylus.
You can also change the magnification of an image by choosing ViewZoom in and ViewZoom out.
To magnify an image area
Edit workspace
1 Choose ViewMagnifier to place the cursor in magnifier mode.
2 Position the cursor over the image area that you want to magnify.
The area under the cursor is displayed at 500%.
To turn off the magnifier mode, choose ViewMagnifier again.
To pan around an image
Edit workspace
1 On the Tools toolbar, choose the Pan tool .
2 Drag within the image.
You can also
Pan while using another tool
Hold down the Spacebar, and drag with the other tool.
Pan around an image by using the Overview palette
Drag the preview rectangle on the Overview palette to a new position.
To fit the window to the image
Edit workspace
• Choose WindowFit to Image.
You can also fit the window to the image by clicking the Fit Window to Image button on the Tool Options palette when the Pan tool or Zoom tool is active.