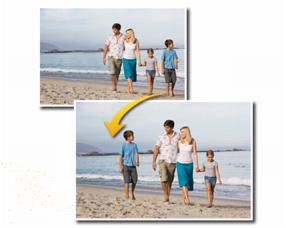
Magic Move lets you move part of an image to a new position and automatically fills the remaining empty area so that it matches the surrounding background—even if the background is textured or varied. This content-aware feature works with your favorite selection tools.
To move a selected area with Magic Move
1 In the Tools toolbar, choose one of the following selection tools:
• Selection Tool
• Freehand Selection
2 On the Tool Options palette, adjust the settings you want.
Note: Adjusting the Feather amount (for example, try a setting of 5-20) can improve how the selection blends into the new background.
3 In the image, select the area that you want to move. You don’t need to be precise. Magic Move works best when some of background is included in the selection.
4 On the Tool Options palette, click the Magic Move button .
5 In the Image window, drag the selected area to a new position.
The remaining empty area is filled with a content-aware fill that matches the surrounding background.
If you don’t get the results that you expect the first time, try these tips:
• It’s easy to undo and readjust the selection, and reapply Magic Move.
• You can use the Clone Brush to touch up areas
• You can blend areas using retouch tools, such as Smudge or Soften