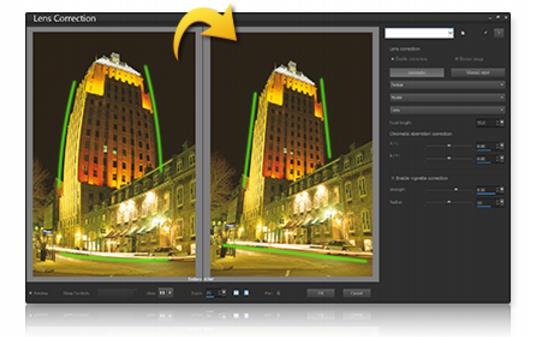
Using Lens Correction to fix distortion, chromatic aberration, and vignetting
Lens Correction is a collection of controls that lets you fix a range of lens-related issues in your photos. You can use Lens Correction with photos saved to JPEG, TIFF, and RAW formats.
Lens Correction can be used to fix a variety of issues, including Barrel distortion (above).
Distortion
While zoom lenses with a large range of focal lengths show the greatest lens distortion, even fixed-focal length, or “prime” lenses, can cause some types of distortion. Barrel and Pin Cushion distortion are caused from nonuniform magnification of the image from the outside of the image (perimeter) to the center. Barrel distortion refers to a rounded effect in an image caused by diminished lens magnification towards the edges. Pin cushion distortion refers to a pinched or narrowed appearance at the sides of an image. Each lens has its own Barrel and Pin Cushion characteristics, and by analyzing a set of images from a lens at all focal lengths, this distortion can be removed. Corel Corel PaintShop Pro includes profiles for several hundred lens and camera combinations.
Chromatic aberration
Chromatic aberration is also a type of distortion (known as CA distortion) caused by the nonuniform bending of light as it passes through a lens. The result is a color fringe (often appears purple) and uneven colors around edge details in high contrast scenes, such as branches of a tree silhouetted against a bright sky. Zoom lenses, particularly at their widest and longest focal lengths, exhibit the most severe distortion. CA distortion can be removed by adjusting the data for the colors that show the most distortion.
Vignetting
Vignetting is the darkening of corners of an image due to light fall-off, and can be caused by optics (the lens itself), the sensor (many sensors are less sensitive to light that hits the sensor at an angle), or from other causes like a filter or lens hood that shades the corners of an image. Vignetting can be corrected by brightening the corners of an image. In some cases, photographers chose to add a vignette effect to their photos to draw focus to the central subject. You can use Lens Correction to remove an unwanted vignette or add a vignette. When you add a vignette, it is always performed on the cropped portion of the image, while correcting vignette is applied to the entire original frame.
You can use the Automatic or the Manual controls to correct issues.
Automatic lets correct your images based on camera and lens profiles built into Corel PaintShop Pro.
• Enable correction — toggles Lens Correction on or off
• Auto crop — scales the image to fill the image frame
• Manufacturer drop-list — automatically displays the camera manufacturer (if the image has metadata) or you lets you set it manually
• Model drop-list — automatically displays the camera model (if the image has metadata) or lets you set it manually
• Lens drop-list — automatically displays the lens used to capture the photo (if the image has metadata).
Important! In some cases the application chooses the closest match, based on data. You can change incorrect guesses by selecting the correct manufacturer, camera model, and lens in the lists. These determine which profile to use when removing distortion.
• Focal Length — shows the focal length setting for the lens at the time the image was taken (if the image has metadata) or you can set it manually
Manual lets you manually enter correction parameters instead of using correction parameters from profiles built into the application. This is useful for lenses that are not yet in the lens correction database.
If you want more information about lens correction parameters in general, and how to determine them, you can visit the following third-party site:
http://wiki.panotools.org/Lens_correction_model.
Chromatic Aberration correction includes the following controls:
• R / C — controls the shift of colors along the Red/Cyan color axis
• B / Y — controls the shift of colors along the Blue/Yellow color axis
Vignette correction includes the following:
• Enable vignette correction — toggles vignette correction on or off. This control is independent of other types of lens correction.
• Strength — controls how light (positive or right) or dark (negative or left) the correction will be
• Radius — controls how far into the image the correction should extend
To use Lens Correction
1 Do one of the following:
• For RAW images, open the image in the Camera RAW Lab, and click the Lens tab.
• For JPEG and TIFF images, click Adjust > Lens Correction.
2 Click Automatic or Manual, and modify the settings you want.