You can apply the Texture effects to your images. These effects make the surfaces of your images resemble those of various materials, such as leather, mosaic tiles, and polished stone.
Blinds
Edit tab
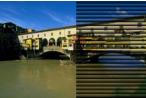
The Blinds effect makes the image appear to be drawn on vertical or horizontal window blinds. You can access the Blinds dialog box by choosing Effects Texture EffectsBlinds.
The Blinds dialog box contains the following controls:
• Width — sets the width of the blinds
• Opacity — controls the strength of the effect. As the Opacity increases, the image displays more of the effect and less of its original appearance.
• Color — lets you choose a color other than the default of black. You can click the color box to access the Color dialog box, or right-click the color box to access the Recent Colors dialog box.
• Horizontal — makes the blinds horizontal. You can unmark the check box to return the blinds to the default, vertical orientation.
• Light from left/top — lets you reverse the direction of light from the default setting, which is from the right side for a vertical orientation or the bottom for a horizontal orientation. The hard edge of the blinds is opposite to the light direction.
Emboss
Edit tab
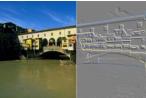
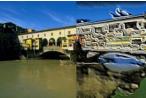
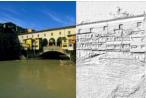
The Emboss effect converts the image into a bas-relief. The effect highlights the areas of contrast with black or white pixels, and it colors the low-contrast areas a medium gray. Color appears in areas of higher contrast. You can apply the Emboss effect by choosing Effects Texture EffectsEmboss.
Fine Leather
Edit tab
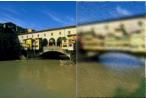
The Fine Leather effect makes the image appear embossed on fine-grained leather. You can access the Fine Leather dialog box by choosing Effects Texture EffectsFine Leather.
The Fine Leather dialog box contains the following controls:
• Color — lets you choose a color for the light shining on the image. To change the light color, you can click a color in the original image, click the color box to access the Color dialog box, or right-click the color box to access the Recent Colors dialog box.
• Angle — affects which edges appear light and shadowed. The needle points to the direction of the light source, measured in degrees of rotation around the circle. To set the value, you can click in the circle, drag the needle, or set or type a number in the control.
• Blur — determines the softness of the image. As you increase the value, the image becomes less sharp.
• Transparency — controls how much of the original image is visible. As you increase the value, more of the image shows through the furrows.
• Number of furrows — controls how many leather furrows, or lines, are applied
• Length of furrows — controls the length of the furrows, or lines
Fur
Edit tab
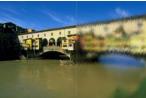
The Fur effect gives the image the appearance of being covered in fur or bristles. You can access the Fur dialog box by choosing Effects Texture EffectsFur.
The Fur dialog box contains the following controls:
• Blur — determines the softness of the image. As you increase the value, the image becomes less sharp.
• Density — controls the strength of the effect. Increasing the value adds more fur to the image.
• Length — sets the length of the individual strands of fur
• Transparency — controls how much of the image is visible. As you increase the value, the fur effect becomes more transparent, letting more of the image show through.
Mosaic–Antique
Edit tab
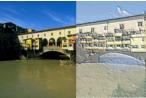
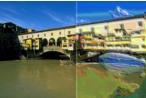
The Mosaic–Antique effect makes an image appear to be created from antique tiles. You can access the Mosaic–Antique dialog box by choosing Effects Texture EffectsMosaic–Antique.
The Mosaic–Antique dialog box contains the following controls:
• Number of columns — sets the number of columns of tiles. As you increase the number, you reduce the size of the tiles.
• Number of rows — sets the number of rows of tiles. As you increase the number, you reduce the size of the tiles.
• Symmetric — links the values for the numbers of rows and columns so that changing one value changes the other value. You can unmark this check box to have an unequal number of rows and columns.
• Tile diffusion — sets how much of the original image shows through the tiles. Increasing the opacity blurs the tiles.
• Grout width — sets the number of pixels between the tiles
• Grout diffusion — sets the opacity of the pixels between the tiles
• Locked transparency fill color — sets the fill color for the transparency
Mosaic–Glass
Edit tab
The Mosaic–Glass effect makes the image appear to be created from glass tiles. You can access the Mosaic–Glass dialog box by choosing Effects Texture EffectsMosaic–Glass.
The Mosaic–Glass dialog box contains the following controls:
• Number of columns — sets the number of columns of tiles. As you increase the number, the tiles become smaller.
• Number of rows — sets the number of rows of tiles. As you increase the number, the tiles become smaller.
• Symmetric — links the values for the numbers of rows and columns so that changing one value changes the other value. You can unmark this check box to have an unequal number of rows and columns.
• Glass curvature — sets the distortion of the tiles and the width and opacity of the area between them. As you increase the value, each tile displays a larger area of the image. The effect is similar to that produced by using the zoom-out setting of a camera lens.
• Edge curvature — sets the distortion of the area around the edges of the tiles. Larger values produce rounder edges and increase the zoom-out effect.
• Grout width — sets the number of pixels between the tiles
• Grout diffusion — sets the opacity of the pixels between the tiles
• Lock transparency fill color — sets the fill color for the transparency
Polished Stone
Edit tab
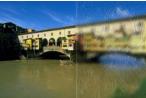
The Polished Stone effect makes the image appear carved on a hard, shiny surface. You can access the Polished Stone dialog box by choosing Effects Texture EffectsPolished Stone.
The Polished Stone dialog box contains the following controls:
• Blur — determines the softness of the image. As you increase the value, the image becomes less sharp.
• Detail — controls the scale of the relief. As you increase the value, smaller areas of contrast are shown in relief.
• Polishing — controls the size of the polished area. As you increase the value, the roughness decreases and the surface appears smoother.
• Angle — affects which edges appear light and shadowed. The needle points to the direction of the light source, measured in degrees of rotation around the circle.
• Color — lets you choose a color for the light shining on the edges of the forms. To change the light color, you can click a color in the original image, click the color box to access the Color dialog box, or right-click the color box to access the Recent Colors dialog box.
Rough Leather
Edit tab
The Rough Leather effect makes the image appear embossed on leather with a coarse grain. You can access the Rough Leather dialog box by choosing Effects Texture EffectsRough Leather.
The Rough Leather dialog box contains the following controls:
• Light color — lets you choose a color for the light shining on the leather surface. To change the light color, you can click a color in the original image, click the color box to access the Color dialog box, or right-click the color box to access the Recent Colors dialog box.
• Leather color — lets you choose a color for the leather background. To change the leather color, you can click a color in the original image, click the color box to access the Color dialog box, or right-click the color box to access the Recent Colors dialog box.
• Angle — affects which edges appear light and shadowed. The needle points to the direction of the light source, measured in degrees of rotation around the circle.
• Luminance — adjusts the overall brightness of the image
• Contrast — controls the roughness of the leather and the colors
• Sharpness — controls the sharpness of the edges in the image
• Blur — determines the blur of the original image
Sandstone
Edit tab
The Sandstone effect makes the image appear as though it is carved from sandstone. You can access the Sandstone dialog box by choosing Effects Texture EffectsSandstone.
The Sandstone dialog box contains the following controls:
• Blur — determines the softness of the original image
• Detail — controls the scale of the relief. As you increase the setting, the smaller areas of the contrast are shown in relief.
• Luminance — adjusts the overall brightness of the image
• Angle — affects which edges appear light and shadowed. The needle points to the direction of the light source, measured in degrees of rotation around the circle.
• Color — lets you choose a color for the light shining on the edges of the forms. To change the light color, you can click a color in the original image, click the color box to access the Color dialog box, or right-click the color box to access the Recent Colors dialog box.
Sculpture
Edit tab
The Sculpture effect accentuates the edges of the image so that they appear embossed or sculpted and overlays the result with a colored pattern. The patterns are 24-bit RGB images stored in the Patterns folder. You can access the Sculpture dialog box by choosing Effects Texture EffectsSculpture.
The Sculpture dialog box contains the following controls:
• Pattern — lets you select the pattern. The image’s color is the result of the pattern color combined with the light color.
• Size — resizes the pattern to a percentage of its original dimensions. You can decrease the value to make the pattern tiling more pronounced and increase the value to enlarge the pattern.
• Smoothness — controls the slope (sharpness) and thickness of the edges
• Depth — controls the height of the sculpting
• Ambience — adjusts the overall brightness of the image
• Shininess — determines how reflective the surface appears
• Color — lets you choose the color of the light shining on the image. The pattern color and saturation affect the light color. To change the light color, you can click a color in the original image, click the color box to access the Color dialog box, or right-click the color box to access the Recent Colors dialog box.
• Angle — affects which edges appear light and shadowed. The needle points to the direction of the light source, measured in degrees of rotation around the circle.
• Intensity — adjusts the brightness of the directional light. Note that the Ambience value determines the brightness of the entire image before the intensity is applied.
• Elevation — shows the angle of elevation of the light source above the image. At a setting of 90 degrees, the light source is positioned directly overhead. As you lower the value, the light source moves closer to the image, producing longer shadows.
Soft Plastic
Edit tab
The Soft Plastic effect makes the image look as though it were molded from plastic. You can access the Soft Plastic dialog box by choosing EffectsTexture EffectsSoft Plastic.
The Soft Plastic dialog box contains the following controls:
• Blur — determines the softness of the original image
• Detail — controls the scale of the relief
• Density — controls the number of areas of relief. Lower values produce fewer larger areas and a softer look. Higher values add relief to smaller areas, producing a denser effect.
• Angle — affects which edges appear light and shadowed. The needle points to the direction of the light source, measured in degrees of rotation around the circle.
• Color — lets you choose a color for the light shining on the edges of the forms. To change the light color, you can click a color in the original image, click the color box to access the Color dialog box, or right-click the color box to access the Recent Colors dialog box.
Straw Wall
Edit tab
The Straw Wall effect makes the image look like it is covered in straw. You can access the Straw Wall dialog box by choosing Effects Texture EffectsStraw Wall.
The Straw Wall dialog box contains the following controls:
• Blur — determines the softness of the original image
• Density — controls the number of straws covering the image
• Length — determines the length of the straws
• Width — determines the width of the straws
• Transparency — controls how much of the image is visible
• Color — lets you choose a color for the light shining on the edges of the forms. To change the light color, you can click a color in the original image, click the color box to access the Color dialog box, or right-click the color box to access the Recent Colors dialog box.
• Angle — affects which edges appear light and shadowed. The needle points to the direction of the light source, measured in degrees of rotation around the circle.
Texture
Edit tab
The Texture effect makes the image appear three-dimensional, as though it had a textured surface. You create the textures by using seamless tiles of 8-bit grayscale images that are stored in the Textures folder. You can access the Texture dialog box by choosing Effects Texture EffectsTexture.
The Texture dialog box contains the following controls:
• Texture swatch — lets you choose the texture
• Size — resizes the texture to a percentage of its original dimensions. You can decrease the scale to make the tiling more pronounced and increase the scale to enlarge the texture.
• Smoothness —controls the slope (sharpness) and thickness of the edges
• Depth — controls the height of the edges
• Ambience — adjusts the overall brightness of the image
• Shininess — determines how reflective the surface appears
• Color — lets you choose a color for the light shining on the image. To change the light color, you can click a color in the original image, click the color box to access the Color dialog box, or right-click the color box to access the Recent Colors dialog box.
• Angle — affects which edges appear light and shadowed. The needle points to the direction of the light source, measured in degrees of rotation around the circle.
• Intensity — adjusts the brightness of the directional light. Note that the Ambience value determines the brightness of the entire image before the Intensity effect is applied.
• Elevation — shows the angle of elevation of the light source above the image. At a setting of 90 degrees, the light source is positioned directly overhead. As you lower the value, the light source moves closer to the image, producing longer shadows.
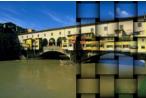
Tiles
Edit tab
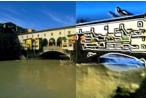
The Tiles effect makes the image appear to be created from tiles. The tiles can be of varying shape, depth, and shininess. You can access the Tiles dialog box by choosing EffectsTexture EffectsTiles.
The Tiles dialog box contains the following controls:
• Tile Shape — lets you select a triangular, square, or hexagonal tile
• Tile Angularity — reshapes the tiles. As you increase the value, the original tile shape changes to multiple shapes that align more closely with the edges of the image.
• Tile Size — lets you increase or decrease the size of the tiles
• Border Size — controls the grout, which is the width of the space between tiles. Note that the grout is always black.
• Smoothness — controls the slope (sharpness) and thickness of the edges
• Depth — controls the height of the edges
• Ambience — adjusts the overall brightness of the image
• Shininess — determines how reflective the surface appears
• Color — lets you choose a color for the light shining on the image. To change the light color, you can click a color in the original image, click the color box to access the Color dialog box, or right-click the color box to access the Recent Colors dialog box.
• Angle — affects which edges appear light and shadowed. The needle points to the direction of the light source, measured in degrees of rotation around the circle.
• Intensity — adjusts the brightness of the directional light. Note that the Ambience value determines the brightness of the entire image before the Intensity effect is applied.
• Elevation — shows the angle of elevation of the light source above the image. At a setting of 90 degrees, the light source is positioned directly overhead. As you lower the value, the light source moves closer to the image, producing longer shadows.
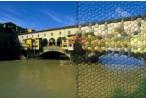
Weave
Edit tab
The Weave effect makes an image appear to be created with a woven pattern. You can weave the strands loosely or tightly. You can also fill the gaps between strands with any color. You can access the Weave dialog box by choosing EffectsTexture EffectsWeave.
The Weave dialog box contains the following controls:
• Gap size — sets the pixel size of the area between the woven strands
• Width — sets the pixel width of the woven strands
• Opacity — controls the strength of the effect
• Weave color — lets you choose a weave color. You can click a color in the original image, click the color box to access the Color dialog box, or right-click the color box to access the Recent Colors dialog box.
• Gap color — lets you choose a gap color. You can click the color box to access the Color dialog box, or right-click the color box to access the Recent Color dialog box.
• Fill gaps — fills the area that appears between the strands with a color. You can unmark the check box to fill the gap area with the image.