The Camera RAW Lab lets you develop a RAW image by saving a variety of processing settings. After processing a RAW image, you can leave it as a read-only RAW file, or from the Edit tab, save it to a different file format, such as JPEG, GIF, or PNG.
Camera RAW Lab
To launch the Camera RAW Lab
• Do one of the following:
• Click the Manage tab, select FileOpen, choose a RAW image file and click Open.
• Click the Manage tab,, right-click one or more thumbnails for RAW images, and choose Edit RAW.
• Click the Edit tab, drag a RAW image thumbnail from the Organizer palette to the image window, or double-click the thumbnail.
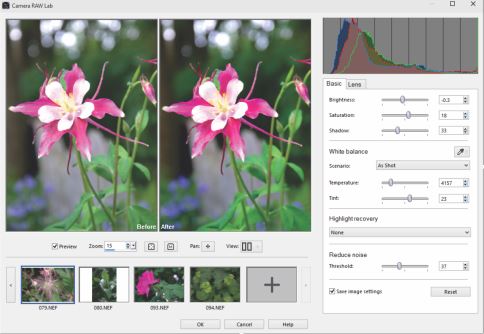
The Camera RAW Lab dialog box opens with the image.
To adjust settings for a RAW photo
1 In the Camera RAW Lab dialog box, click the Basic tab, and do any of the following:
• Drag the Brightness, Saturation, or Shadow sliders for a quick overall image adjustment.
• In the White balance area, adjust color by clicking a preset lighting option from the Scenario drop-list, or by clicking the preview area to set the white point with the Dropper tool. You can also adjust or fine-tune color with the Temperature and Tint sliders.
• In the Highlight recovery area, click an option in the drop-list. Highlight recovery works particularly well on images that are overexposed — it can help restore detail in blown-out areas.
• In the Reduce noise area, drag the Threshold slider to smooth digital noise.
You can preview the changes to the photo in the Preview area.
If you want to keep the settings for future use, check the Save image settings checkbox.
Click Reset at any time to clear all the settings.
2 Click one of the following:
• OK — applies the settings, and exits the Camera RAW Lab
• Cancel — exits the Camera RAW Lab without adjusting the photo’s settings
You can add more RAW photos to the Camera RAW Lab by clicking the Add more photos button in the thumbnail row (maximum of 30).
Image settings for RAW images are saved to a database. Changes to the file name or file location can be tracked in the database only if you make the changes in Corel PaintShop Pro.
 in the thumbnail row (maximum of 30).