You can remove a tripod, hand, or other device used to hold your 360° camera, from your 360° photos. A content-aware fill feature, Magic Fill, is used to sample the background and make the selected area disappear.
Magic Fill is a content-aware feature that can make unwanted elements of your photos vanish.
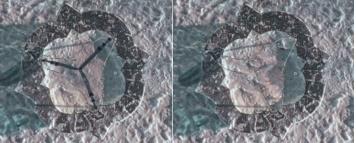
The Freehand Selection tool was used to loosely enclose the area with the tripod. Magic Fill uses content-aware technology to remove the tripod from the photo.
To remove a tripod from a 360° photo
1 In PaintShop Pro, open a photo that was captured with a 360° camera.
A message appears that lets you choose between editing in the 360° Photo window and the Adjust or Effect menu on the Edit tab.
2 Click Edit in 360° Photo.
3 In the 360° Photo window, click Remove Tripod.
4 In the Position area, an option.
5 In the Selections tools area, choose a selection tool.
6 Drag in the preview area to enclose the area that you want to remove. You don’t have to be very precise, you can include some surrounding area in the selection.
7 Set the Feather value to determine how the edges of the fill will blend with the background.
8 Click Magic Fill. If you need to fine-tune, you can repeat the selection and Magic Fill steps.
9 Click Save As, and save your file to a new file name and choose the original file format. Close the 360° Photo window to return to the main application window.