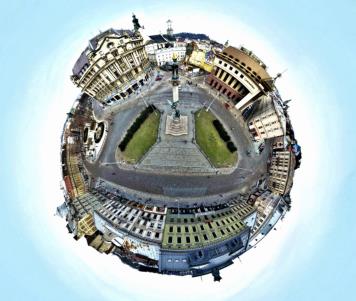
You can transform your 360° photos into tiny planet-style images or rabbit hole-style images by applying Planet Effects. Sometimes referred to as spherical panorama, these effects essentially wrap the bottom edge (to create a tiny planet) or top edge (to create a rabbit hole tunnel) of a 360° image into a spherical shape.
Important! Applying Planet Effects removes the 360° metadata from images, so it is important to save your new image to a new file name to preserve the original photo.
To apply a planet effect to a 360° photo
1 In PaintShop Pro, open a photo that was captured with a 360° camera.
A message appears that lets you choose between editing in the 360° Photo window and the Adjust or Effect menu on the Edit tab.
2 Click Edit in 360° Photo.
3 In the 360° Photo window, click Planet Effects.
4 In the Effects area, choose one of the following:
• Tiny planet: Uses the bottom edge of the image as the center of the sphere
• Rabbit hole: Uses the top edge of the image as the center of the sphere
5 Adjust the Rotate slider to determine the rotation of the sphere.
6 Adjust the Field of View slider to set the camera position for the scene (similar to zoom).
7 Choose an Aspect ratio setting for the image.
8 Click Save As, and save your file to a new file name. Close the 360° Photo window to return to the main application window.