Fine-tuning a selection with the Refine Brush
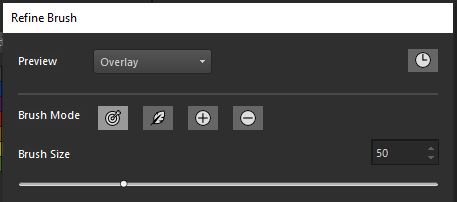
The Refine Brush feature lets you fine-tune the edges of a selection to pick up details like hair or fur that are notoriously difficult to select. The Refine Brush window includes a brush tool as well as sliders, for more global adjustments.
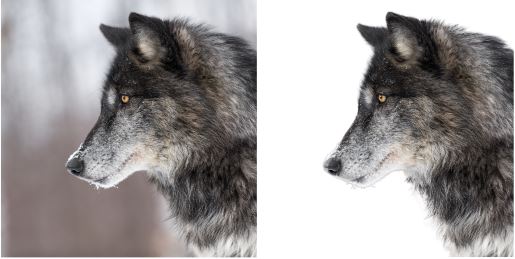
The wolf selection on the right was created with the Smart Selection Brush, then fine-tuned with Refine Brush. Previewing the selection with the White background helps reveal the edge details.
Start with the brush
In most cases, simply dragging across the image with the brush is the most effective way to refine your selection, including areas with fly-away hair strands and edges that vary. Brush modes include Refine (used in most situations), Feather, Add, and Remove.
Optional sliders for global adjustments
Although you don’t need to use the sliders in most cases, they can be used to make global adjustments if the selection edges are fairly consistent, for example, if you are refining a selection of an animal with short fur.
• Border Width — lets you specify the area that will be refined (along the edges of the selection)
• Expand Border — lets you expand the border area to the inside or outside.
• Smooth — reduces variation in the edge by smoothing from the outer border edge inward
• Feather — applies a blur effect to the border area
Previewing your selection
As you work, previewing your selection against different backgrounds is helpful. Starting with Overlay helps you see the areas to select, Black and White lets you identify the outline and semi-transparent areas, and Black, White, or Transparent help you see what your final selection will look like.
In addition, you can mark or unmark the Hide/Show Results check box to view the changes made to the original selection by the Refine Brush.
If at any point you want to undo or redo some work, you can open the History palette for the Refine Brush and review your actions. For information about history palettes, see To undo and redo actions by using the History palette.
Output
When you are finished, you can output your refined selection in a number of ways, including selection, mask, and layer options.
What kind of images work best?
• Sharp images where the entire selection is in focus
• Images with consistent lighting where there is good contrast between the subject you want to select and the background
1 On the Tools toolbar, choose any of the selection tools and create a selection.
2 On the Tool Options palette, click the Refine Brush button.
3 In the Refine Brush window, choose Overlay from the Preview drop-list.
4 Ensure the Brush Mode is set to Refine, and adjust the Brush Size slider so that you can easily follow the edge of the selection.
5 In the document window, drag the brush over the details that you want to include in the selection.
6 In the Preview drop-list, choose a background that helps you evaluate the results.
7 If required, you can change the Brush Mode to soften the edge (Feather), add areas to the selection (Add), or remove areas from the selection (Remove).
8 When you are satisfied with the selection, choose one of the following options from the Output drop-list:
• Selection — selection displays on the image; no additional layers
• Mask — the selection displays on a transparent background; no additional layers
• New Layer — the selection displays on a new layer with a transparent background; the original image appears on a separate layer
• New Mask Layer — a mask group is created with three layers: a layer with the selection (transparent background), a mask layer (alpha), and the original image layer
9 Click Apply.
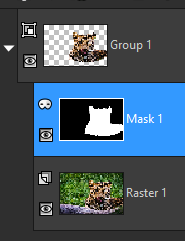
An example of New Mask Layer output
If your selection is fairly uniform, you can use the global sliders to refine the selection. You can also use a combination of the sliders and the brush.
You can resize the brush interactively by pressing Alt while dragging in the image window.