Animating images is usually quick and easy. You can achieve impressive results in less than five minutes in many cases. The amount of fine-tuning required to get the results you want will depend on the image and your experience with the application. Images with a plain background are usually easiest to animate and images where you want a specific movement (such as a moving staircase) take a little more time and precision.
Animation projects can be simple (upper images), or they can require a little more experimentation to get the results you want (lower images).
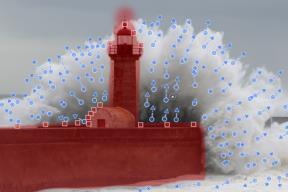
To animate a photo
1 In PhotoMirage, click File > New or Open, and choose the image that you want to animate.
2 Click Animation , and click the Motion Arrow tool (active by default when you open an image).
3 In the preview area, click and drag to set motion arrows on the areas that you want to animate. Here are some guidelines:
• The simpler the area you want to animate, the less arrows you need. Start with a few, add more after you preview, as needed.
• Shorter arrows tend to give you more control over the movement and reduce harsh edges in animations. Arrows that cross paths can also result in harsh edges in the animation.
• To set a continuous line of arrows (or any situation where one arrow touches another), hold Shift while you click and drag.
4 To isolate the animated areas from areas that you want to keep still, do one of the following:
• Click the Anchor Point tool , and click along the outer edge of the area that you want to keep still. Start with a few anchor points, and add more after you preview, as needed.
• Click Mask , choose the settings you want, and drag across the image areas that you want to keep still. Applying a mask is a good way to keep larger areas still. Use the Feather control to determine edge softness. After you preview, you can use one or more anchor points if there are any edge issues.
5 Click Play to preview your animation and determine what areas need to be fine-tuned. This might include adding more motion arrows or anchor points, or adjusting the current motion arrows, anchor points, or mask.
6 Click Stop , and make the adjustments you want.
7 Click Play and repeat the preview and fine-tuning process until you get the results you want.
8 Click Crop , choose a crop preset, and drag in the preview area to set the crop box.
The crop presets are matched to export presets in most cases, making it easy to perform a one-click export when you are finished animating.
9 Click Export to share your animation.
To move, edit, and delete animation markers
• Move or delete multiple arrows or anchor points: Click Select or Freehand Select , and in the preview area, drag or draw around the items you want to select. You can then drag the selection to a new position or click the Delete button to remove the items.
• Change motion arrow length or direction: Click the Motion Arrow tool , in the Preview area, click the arrow that you want to adjust, and when the cursor changes to a four pointed arrow icon, drag the start or end point of the arrow to the position you want.
• Delete individual motion arrows and anchor points: Click the Delete Mode button (Animation page), and in the Preview area, click the arrow or anchor point that you want to remove.