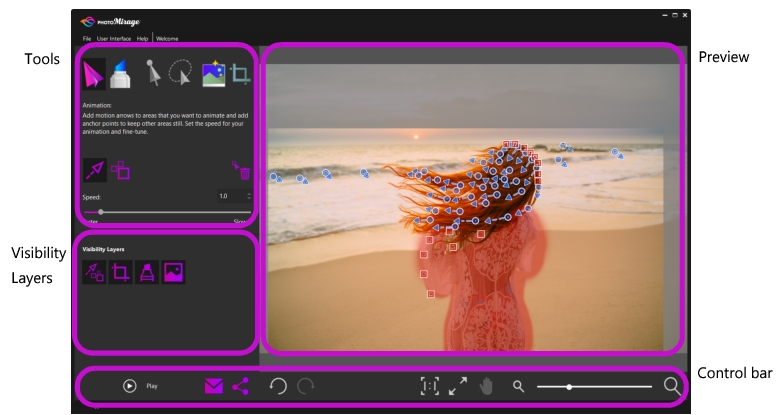
The PhotoMirage workspace includes a menu bar and the following areas:
The image in the Preview area shows motion arrows (blue), anchor points (red), and a mask (semi-transparent ruby overlay).
Tools
The Tools area provides the tools you need to animate, crop, and fine-tune your image.
Animation: The Animation button lets you access key animation tools.
Motion Arrow tool: This is the main animation tool. It is active by default when you open an image. Motion arrows determine the direction of the animation.
Anchor Point tool: Lets you apply anchor points that are typically positioned along the outer edge of an area that you want to keep still. The number of the anchor points required depends on the complexity of the image.
Delete Mode: When active, Delete Mode lets you remove individual arrows or anchor points by clicking on them.
Speed: The speed setting lets you specify how many seconds it takes for the animation to complete a single loop: the lower the number, the faster the animation. For export, it’s recommended that final Animation Loop Duration be a multiple of the Speed setting.
Mask: The Mask button lets you access tools that let you keep areas still by applying a mask overlay. A mask is an alternative to anchor points and is particularly useful when there are large areas that you want to keep still. Sometimes one or more anchor points can be used with a mask to fix an edge. You can choose a Round Brush or Square Brush, and set the Add to Mask or Remove from Mask mode. Brush Size and Feather lets you set the brush size and specify how the mask blends along the edges.
Select tool: Lets you drag across the image to enclose one or more motion arrows or anchor points in a rectangular marquee. You can then move or delete the items that are selected.
Freehand Select tool: Lets you draw on the image to enclose one or more motion arrows or anchor points in an irregular-shaped marquee. You can then move or delete the items that are selected.
Smart Photo Fix: Click Apply to automatically adjust the image brightness, saturation, sharpness, and white balance of your image. Click the Undo button on the Control bar if you want to remove the changes.
Crop tool: Click a crop preset, and drag the crop box across the image to set the crop area. Using a crop preset lets you prepare for export—in many cases, the crop preset aligns with the export preset.
Visibility Layers
Visibility layers let you hide or show elements of your image, making it easier to see different aspects of the image that you want to animate.
Animation Markers: Hides or shows all motion arrows and anchor points.
Crop: Hides or shows the crop box
Mask: Hides or shows the mask overlay (shown as a ruby-colored overlay).
Image: Hides or shows the image in the Preview area.
Control bar
The control bar includes a variety of controls that help you view and share your image, as well as undo and redo changes that you make.
Play button: Play your animation in the Preview area. Animating usually involves several preview cycles as part of the fine-tuning process. The Play button changes to the Stop button during playback.
Email: You can email your animation directly from PhotoMirage if you use a default e-mail application that supports the MAPI Standard (such as Microsoft Outlook).
Export: Opens the Export window where you can choose from a variety of export presets or choose custom settings.
Undo: Undoes the last action.
Redo: Cancels the last undo.
Zoom to 100%: Sets the image zoom level to 100% of the actual image size.
Zoom to Fit: Fits the longest side of the image to the Preview area so the full image can be viewed.
Pan: Click Pan and hold to choose the portion of the image that you want to view when the current zoom settings result in hidden image areas.
Zoom: Drag the Zoom slider to set the zoom level or click the zoom icons at either end of the slider to decrease or increase the zoom level.
Switching languages
You can change the user interface language (File > Switch Languages) if you installed other languages when you installed the application.
Workspace color
You can choose between two user interface colors (Midnight Black or Arctic Silver) in the User Interface menu.