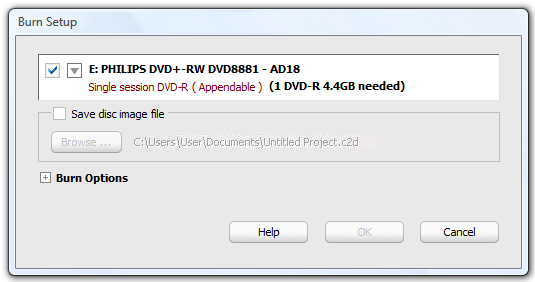
Burning media files to a disc
Note: This procedure describes how to use the Burn Setup dialog box to burn files. To display this dialog box, you may need to select the files you want to burn and click Burn.
1 Select recording devices from the list. Selecting multiple recording devices lets you burn multiple disc copies at the same time.

The default device is checked with a check mark.
2 Insert a writable disc in the disc drive.
3 To view more information about the recording device, or to eject, erase or format the disc, click the arrow button beside the check box, and choose one of the following options from the drop-down menu:
n To eject the disc, select Eject.
n To erase or format the disc, select Erase/Format. Choose this option to erase the content of a rewritable disc, or to format a blank disc.
Note: Nonrewritable discs can be formatted only once, and cannot be erased at all. Rewritable discs can be formatted and erased multiple times.
4 If you want to create a disc image file, select Save disc image file, and then click Browse to specify the name and location of the image file.
A disc image file is a complete copy of the data as it will appear on the disc you want to burn, only it’s stored on your hard drive. Saving a disc image file is useful if you want to later create another copy of the disc, without needing the original one.
Note: When making a disc image file, make sure you have enough space on your hard disk to store the disc image file.
5 Optional: To view or edit burn options, click the Plus (+) sign located to the left of Burn Options.
You can set any of the following options:
General | |
n Write speed | The speed for recording discs. The available speeds are dependent on the speeds supported by your recorder. |
n Number of copies for this project | The number of copies to burn. |
n Burn Options | The recording method. For example, Write Only, or Read Only. |
n Read Only disc | Select to format the disc as read-only. You will not be able to add data to the disc. |
Advanced | |
n Revert to default settings | Click to reset all options to their original settings. |
n Buffer Underrun Prevention | Select to enable the buffer underrun feature of your recorder. This option is available only if your recorder supports buffer underrun prevention. |
n Raw Mode (Exact Copy) | Select to burn single-session data discs that cannot be burned using normal burn settings. In order use this option, both source and destination driver must support it. |
n Eject After Write | Select to automatically eject the disc after the burn process. |
n VariRec laser power settings | Adjust the amount of laser power used to burn a disc. Note: This option only supports blank CD-R media and enforces a recording speed of 4x (704KB/Sec). |
n Write density settings | This option allows you to write more data to a disc than its native capacity would normally allow. Select a value to increase the capacity percentage. Note: This feature only supports blank CD-R media, enforces a recording speed of 4x (704KB/Sec), and makes the disc Read-Only. |
n Perform read speed test when reading from another drive | Select to test the actual read speed of the source disc, and then adjust the write speed or caching options accordingly. |
n Cache to hard disk | Select an option from the drop-down list to indicate when to cache data before burning. |
n Temporary hard disk location | Click to specify the location in which to cache your project. |
n Maximum write buffer allocation | Click to set the maximum amount of memory to allocate for buffering. |
n Enable error logging | Select to create an error log each time you burn a disc. |
n Error log file name | Click and select a location and name for the error log file. |
n Reset “Do not show me again” warnings | Select to reset the “Do not show me again” warnings. Burn setup warnings that you have asked not see again will appear. |
6 To start burning to disc, click OK.
The Burn Progress dialog box appears, showing you the progress while the project is burning to disc.
Tip: If an error occurs during the burn process, you can find out more about the error by clicking on the error link.