Controls and settings in the 360 to Standard dialog box
n The key frame controls  let you modify the key frames on the timeline, according to the position of the scrubber. You can go to Previous Keyframe or Next Keyframe. You can also Add keyframe, Remove keyframe, Remove all keyframes, Copy keyframe and Paste keyframe.
let you modify the key frames on the timeline, according to the position of the scrubber. You can go to Previous Keyframe or Next Keyframe. You can also Add keyframe, Remove keyframe, Remove all keyframes, Copy keyframe and Paste keyframe.n The playback bar  let you navigate your clip (Home, Previous Frame, Play, Next Frame, End)
let you navigate your clip (Home, Previous Frame, Play, Next Frame, End)n Scrubber  let you scrub through the clip. Clicking a key frame will move the scrubber to the current position in the timeline.
let you scrub through the clip. Clicking a key frame will move the scrubber to the current position in the timeline.n The timeline in the 360 to Standard dialog box is a simple bar that contains any key frames you set and can be navigated with the scrubber.
n Pan — Lets you adjust the view horizontally (x-axis)
n Tilt — Lets you adjust the view vertically (y-axis)
n Field of View — Lets you adjust the how close or how far away the camera appears to be from the scene in the selected view—the effect is similar to zooming. Lower values zoom in for a narrower view; higher values zoom out for a wider view.
To convert 360 video to standard video
1 In the Production Editor area, click the Timeline tab.
2 Right-click a 360 video clip in the Video track, and choose 360 Video > 360 to Standard, choose one of the following:
n Equirectangular to Standard
n Single Fisheye to Standard (Pro)
n Dual Fisheye to Standard (Pro)
The conversion window opens with two preview panes—the 360 video source is on the left and a standard video preview is on the right.
3 In the 360 video pane (Source), drag the View Tracker icon  until its position corresponds to the view that you want to show in the standard video pane (Preview).
until its position corresponds to the view that you want to show in the standard video pane (Preview).4 Click Play and as the 360 video plays, drag the View Tracker if you want to change the view seen in the standard video pane.
Each time you change the view, key frames are added.
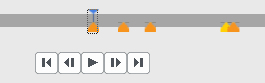
Key frames appear as yellow markers along the timeline.
You can also drag in the Preview window and scroll with the mouse wheel to zoom in or out.
5 When you are finished, you can replay the video and edit the view by doing any of the following:
n Delete a key frame by clicking it on the timeline and clicking Remove keyframe.
n Drag a key frame on the timeline to change when the view appears.
n Click a key frame and change the view by adjusting the Pan, Tilt, and Field of View values.
n Clear all key frames by clicking the Remove all keyframes button.
6 Click OK to accept the changes and return to the main workspace.
7 When you want to output your project, ensure that you choose the standard video settings for your playback devices.
Note: Note: You can reset the changes to a 360 video by right-clicking the clip in the Timeline and choosing 360 Video > Reset.