Making a bootable CD or DVD
The Burn Data Disc project can be used to create a bootable CD or DVD from a bootable floppy disk or from a disc image file on your hard drive. A bootable CD or DVD can be used to start your computer if your operating system becomes damaged. It can also be used to perform maintenance and repair operations in DOS.
For the advanced computer user, bootable discs can provide a level of flexibility and customization not available from the recovery discs provided with most modern computers.
Note: For best results in Windows XP, use boot floppies created by your Windows operating system. The Windows Help and Support Center explains how to create bootable floppy disks. Boot floppies created using third-party software are not supported. Windows Vista, Windows 7, and Windows 8 cannot be booted from a floppy disk.
To create a bootable CD or DVD:
1 Select the Data - Copy project category.
A list of projects is displayed.
2 Click the Burn Data Disc project name.
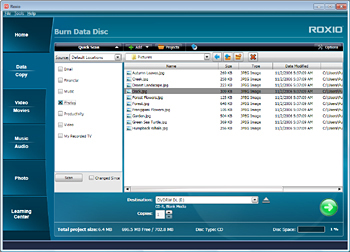
A Burn Data Disc project opens in the project window.

The Burn Data Disc project window
3 If you have more than one recorder drive, select a drive using the Destination drop-down menu.
4 Insert a blank disc into the selected drive.
5 Click the Make Bootable button.

Make Bootable button is in the lower right corner of this illustration
The Bootable Disc dialog box appears.
6 To create a bootable CD or DVD from a floppy disk, your computer must have a floppy disk drive. Follow these steps:
a Insert a bootable floppy disk into your floppy disk drive.
b Select Bootable floppy disk in drive A:
c Click the OK button.
d A disc image file is created from the boot floppy and is added to the file selection window.
7 To create a bootable CD or DVD from a disc image on your hard drive, follow these steps:
a Select Bootable image on hard drive.
b Click the Browse button, and navigate to the disc image file using the Select Image dialog box. When you have selected a disc image file, click the Open button.
c Click the OK button to add your selection to the file selection window.
8 Add additional files to your project, if desired.
9 If desired, type a name for your disc in the Name Your Disc text box at the top of the project window.
10 Click the action button  to begin recording data to your disc.
 to begin recording data to your disc.
See also: