Correcting photographic perspective
When you take pictures of tall or wide objects, the resulting photographs may have perspective distortion — that is, the objects may seem to be leaning or angled. This distortion occurs when the camera is at an angle to the subject.
By using the Perspective Correction tool, you can fix perspective distortion, such as the angled sides of a building. You can also fix photographic perspective in an entire layer by using the Pick tool.
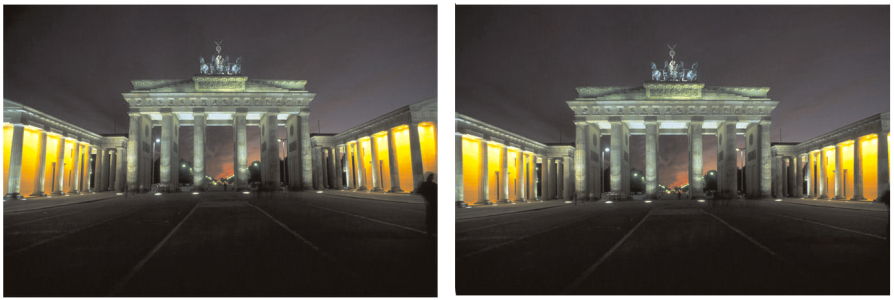
Using the Perspective Correction tool changes the angle of the building.
To correct perspective in a photo

1
On the Tools toolbar, choose the
Perspective Correction tool

.
A bounding box with corner handles appears on the image.
2
On the Tool Options palette, choose settings for the following controls:
•
Grid lines — lets you type or set the number of gridlines to display
•
Crop image — recrops the image to a rectangular shape after the perspective is applied
Note: Marking the
Crop image check box deletes the areas of the image that fall outside the rectangle.
3
Drag each handle to the corner of the object that should be rectangular.
4
Click the
Apply button

.

You can also apply the command by double-clicking the image.
To reset the perspective correction box to the original rectangle, click Cancel  on the Tool Options palette.
To correct perspective in an image layer
1
On the Layers palette, select the layer to correct.
2
Choose
View  Grid
Grid to display the gridlines.
The gridlines help you correct lines in your photograph that should be vertical or horizontal.
Note: To adjust the grid settings, choose
View Change Grid,
Guide, Object & Snap Properties, and then use the controls on the
Grid page of the dialog box.
3
On the Tools toolbar, choose the
Pick tool

.
A bounding box appears around the entire layer.
Note: It may be helpful to expand the image window so that you can see all of the corner handles of the current layer. To expand the image window, drag from a corner or side.
4
Hold down
Ctrl, and drag a corner handle on the selected layer.
The image is updated when you finish dragging. Continue adjusting the perspective until the image looks correct.
If the correction causes some image data to fall outside the image canvas, you can restore that data by increasing the size of the canvas. For more information about changing the canvas size, see Resizing the canvas.