Placing images in shapes or text with the Frame Tool
The Frame Tool lets you place images in shapes and text. It offers a fast and easy way to place images into a layout. The frame and image can then be moved and sized as a unit, or adjusted separately. Images added to frames can be extracted and changed easily, making frames ideal for layout placeholders.
The Frame tool was used to fill this template with photos in just a few moments. Note: The original template was also created in PaintShop Pro (using layers, shapes, and picture tubes).
When you create a frame, a Frame Group is added to the Layers palette. When you drag an image to the frame, the image appears in the Layers palette as part of a Frame Group. It’s helpful to have the Layers palette open when you work with frames—it makes it easy to select the element that you want to adjust.
In this example, starting at the top, you can see the Frame Group layer, which you can collapse or expand to access the Frame layer and the image layer (shows the full image). At the bottom is the original Background layer.
You can convert a shape drawn with the Rectangle, Ellipse, Symmetric Shape or Preset Shape tool into a frame. You can also convert text created with the Text tool into a frame.
To place an image in a shape or text with the Frame Tool

1
On the
Tools toolbar, click the
Frame Tool 
.
2
On the
Tool Options palette, do one of the following shapes:
•
Choose
Rectangle 
,
Ellipse 
,
Preset Shape 
, or
Symmetric Shape 
and drag in the image window (on the Background or a Raster layer) to draw a frame.
When drawing a rectangular or elliptical frame, you can constrain the shape to a square or circle by holding down
Shift as you drag.
•
Choose
Text 
, and type in the image window.
3
To fill the frame with an image, do one of the following:
•
Click
File  Embed Image
, and navigate to the image that you want to use.
•
From the
Organizer palette, drag an image thumbnail into the frame.
•
From Windows File Explorer, drag an image file into the frame.
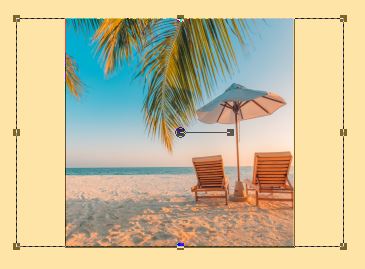
The image automatically fills the frame according to the longest edge, maintaining the image aspect ratio. Both the frame and the bounding box for the image are displayed.
Note: At this point, the image is active, and you can simply drag the image or an image node to reposition or resize the image. For full editing options, continue to the next step.
In the example above, a square frame is filled with a rectangular image. A bounding box indicates the area of the image that exceeds the frame.
4
Do any of the following to adjust the frame or image:
•
To reposition the image, in the
Layers palette, select the image layer in the
Frame Group, and in the image window drag the center node for the image to the position you want.
•
To resize the image, in the
Layers palette, select the image layer, and in the Image window drag a node on the image bounding box.
•
To reposition or resize both the frame and the image, double-click inside the frame (or select the
Frame Group layer in the
Layers palette), and drag the center node to a new position or drag a node on the bounding box to resize it.
•
To reposition the frame only, in the
Layers palette, select the
Frame layer, and in the image window, drag the center node to a new position.

If at any time you experience issues selecting or creating a frame, check to see what is active in the Layers palette. If adding multiple frames, it can be helpful to select the original layer (such as the Background layer) before adding a new frame.
To replace an image in a frame
•
Do one of the following:
•
Click the frame, then choose
File Embed Image, and navigate to the replacement image.
•
From the
Organizer palette, drag an image thumbnail into the frame.
•
From Windows File Explorer, drag an image file into the frame.
The image automatically fills the frame according to the longest edge, maintaining the image aspect ratio. Both the frame and the bounding box for the image are displayed.
Note: At this point, the image is active, and you can simply drag the image or an image node to reposition or resize the image.
To extract an image from a frame
1
On the
Tools toolbar, click the
Frame Tool .
2
Right-click the image that you want to remove from a frame, and choose
Extract Image from the context menu.
The image is removed from the frame group and appears as an independent layer that you can keep or delete. You can now drag a new image to the frame.
To convert a shape to a frame
1
Do one of the following to select a shape previously created with the
Rectangle or
Ellipse,
Preset Shape, or
Symmetric Shape tool:
•
On the
Tools toolbar, click the
Pick tool

, and click a shape.
•
In the
Layers palette, click a vector layer for the shape that you want to select.
If there are multiple vector shapes, you might need to expand the vector layer group so that you can select a specific shape.
A marquee indicates that the shape is active.
2
On the
Tools toolbar, click the
Rectangle or
Ellipse,
Preset Shape, or
Symmetric Shape tool.
3
In the image window, right-click the active shape and choose
Convert to Frame Object from the context menu.
4
Drag an image to the frame.
To convert text to a frame
1
Do one of the following to select text previously created with the
Text tool:
•
On the Tools toolbar, click the
Pick tool
, and click the text.
•
In the
Layers palette, click a vector layer for the text that you want to select.
A marquee indicates that the text is active.
2
On the Tools toolbar, click the
Text tool.
3
In the image window, right-click the text and choose
Convert text to Frame Object from the context menu.
4
Drag an image to the frame.