Using AfterShot Lab
AfterShot Lab offers advanced features and tools for optimizing RAW images. AfterShot Lab is non-destructive; your original image files are always safe.
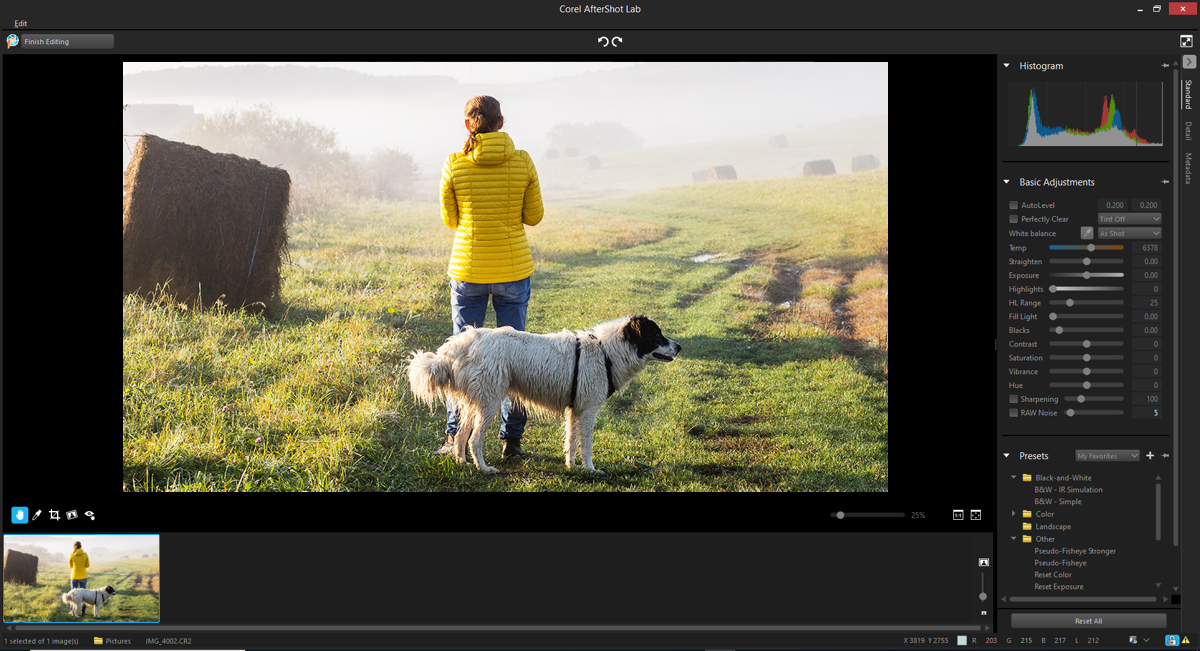
The Basic Adjustments section of the Standard tools panel contains the most commonly used image-adjustment controls.
The Detail section lets you correct a number of RAW-image issues:
•
RAW Noise is an image improvement process that you can use very early in the image editing workflow to provide the highest quality final images. The feature can be applied only to RAW files.
•
Noise Removal improves images by reducing noise, a graininess caused by color or luminance-related artifacts, without losing image detail. Noise occurs for a number of reasons, including low-lighting or limitations of the camera's sensors.
•
Lens correction fixes lens distortion. While zoom lenses with a large range of focal lengths show the greatest lens distortion, even fixed-focal length, or "prime" lenses, can cause some types of distortion. The following types of lens distortion can quickly and easily be corrected: Barrel and Pin Cushion distortion, Chromatic Aberration, and Vignetting.
•
Chromatic Aberration distortion (known as CA distortion) is a result of the nonuniform bending of light as it passes through a lens. The result is a color fringe (often appears purple) and uneven colors around edge details in high contrast scenes, such as branches of a tree silhouetted against a bright sky. Zoom lenses, particularly at their widest and longest focal lengths, exhibit the most severe distortion.
•
Vignetting is the darkening of corners of an image due to light fall-off, and can be caused by optics (the lens itself), the sensor (many sensors are less sensitive to light that hits the sensor at an angle), or from other causes like a filter or lens hood that shades the corners of an image. Vignetting can be corrected by brightening the corners of an image.
When you’re finished, you can continue working on a TIFF version of the image.
AfterShot Lab
To launch AfterShot Lab

1
Do one of the following:
•
Click the
Manage tab, select
File  Open
Open, choose a RAW image file and click
Open.
•
Click the
Manage tab, right-click one or more thumbnails for RAW images, and choose
Edit RAW.
•
Click the
Edit tab, drag a RAW image thumbnail from the
Organizer palette to the image window, or double-click the thumbnail.
2
Choose the
Use AfterShot Lab option.
The
AfterShot Lab window opens with the image.
To make basic adjustments in AfterShot Lab
1
In
AfterShot Lab, click the
Standard tab in the Tools panel.
2
Do any of the following:
•
To examine the tonal range of your image and set the black and white points to be at points such that a fixed percent of the image will be pure black and pure white, mark the
AutoLevel check box and adjust the settings in either edit box. The left box sets the percentage of the image to be set to pure black and the right box sets the percentage to be set to pure white.
•
To remove abnormal tint and restore faded photos, mark the
Perfectly Clear check box, and choose
Tint Max to apply the full range of tint correction,
Tint Min to limit the tint correction (allowing some tint change to occur, but preserving some of the original tint), or
Tint Off apply Perfectly Clear without tint correction, preserving the color of your original image.
•
To manually set the white balance, click the
Enable the Click White tool button, click a neutral image area, and fine-tine the results with the
Temp slider.
You can also select a preset from the drop-list to automatically set the white balance.
•
To rotate an image to level a horizon or otherwise straighten it, move the
Straighten slider or set a value in the corresponding control.
•
To perform an overall exposure correction, either brightening or darkening all portions of an image, move the
Exposure slider or set a value in the corresponding control.
•
To recover detail from apparently overexposed portions of an image, move the
Highlights slider or set a value in the corresponding control.
•
To control how much of the image is adjusted by Highlights, move the
HL Range slider or set a value in the corresponding control. Lower numbers recover detail and color from only the lightest areas; higher numbers expand the recovery to a broader range of light areas.
•
To brighten shadows and the darker portions of the image without overexposing highlights, move the
Fill Light slider or set a value in the corresponding control.
•
To control the black point in the image, move the
Blacks slider or set a value in the corresponding control. Values lower than zero remove black from the image; values higher than zero darken the image.
•
To control the difference between the lightest and darkest areas of an image, move the
Contrast slider or set a value in the corresponding control. Increasing the contrast makes the dark areas in the image darker and the bright areas brighter.
•
To adjust the intensity of the colors in the image, move the
Saturation slider or set a value in the corresponding control. High saturation settings boost colors and provide rich, vivid color. Low saturation settings produce pastel and more muted colors. Setting
Saturation to zero produces a pure monochrome, black-and-white image.
•
To gently correct skin and other image areas that are already richly saturated, move the
Vibrance slider or set a value in the corresponding control. Vibrance is a version of saturation.
•
To change the colors in an image, move the
Hue slider to rotate the "color circle" by the amount indicated in the control box. For example, if the Hue slider is set to 60, then 60 is added to the original hues in your image, so greens become cyan, blues become magenta, and reds become yellow.
•
To make the high detail portions of the image stand out more by making the edge details more pronounced, mark the
Sharpening check box, and move the slider or set a value in the corresponding control. This should be applied and evaluated while looking at a 100% Zoom of the image.
•
To reduce digital noise, mark the
RAW Noise check box, and move the slider or set a value in the corresponding control.

The AfterShot Lab toolbar also gives you quick access to frequently used tools — Crop, Straighten, Red Eye Removal, Pan, and White Balance.
To apply an AfterShot Lab preset
1
In
AfterShot Lab, click the
Standard tab in the Tools panel.
2
In the
Presets section, click a preset in the list.
|
|
|
|
|
Click Manage. Click the Add Preset button  , pick a name for the settings, choose which settings you want to save, and click OK. |
Add or remove a preset to the My Favorites list |
Click Manage. In the Show column, mark a check box to display the corresponding preset in the My Favorites drop-down list; unmark the check box to remove the preset from the list. |
Create folders for presets |
Click Manage. Click the Add Folder button  , double-click the new folder that appears at the bottom of the preset list and type a name for the folder. |
|
|
Click Manage, and drag a preset from one folder to another folder. |
Delete presets or preset folders |
Click Manage, click the preset or folder that you want to delete, and click the Delete button or press Delete on your keyboard. |
View the settings for a preset |
Click Manage, click the preset and click the View preset settings button. |
To sharpen a RAW image
1
In
AfterShot Lab, click the
Detail tab in the Tools panel.
2
In the Sharpen area, mark the
Sharpening check box.
3
Do any of the following:
•
Move the
Amount slider to adjust the overall sharpness.
•
Move the
Sensitivity to limit what portions of the image are sharpened.
A high
Sensitivity value results in less of your image being sharpened. If sharpening your image makes noise or highly detailed areas too distracting or too sharp, then try raising the Sensitivity value.
To remove noise from a RAW image
1
In
AfterShot Lab, click the
Details tab in the Tools panel.
2
In the RAW Noise area, mark the
Raw Impulse Noise Removal check box.
You can control the strength of the noise reduction using the
Raw Noise slider and set the level of sensitivity for noise detection in the image using the
Threshold slider.
3
To improve images by reducing noise, a graininess caused low-lighting or limitations of the camera's sensors, mark the
Enable Noise Removal check box in the Noise Removal area.
You can choose automatic noise reduction based on some common noise-reduction options from the
Preset drop-list, set how much noise reduction is applied using the
Strength slider, or control how much detail is preserved using the
Detail slider.
To correct lens distortion
1
In
AfterShot Lab, click the
Details tab in the Tools panel.
2
In the Lens Correction area, mark the
Enable Correction check box.
e
|
|
|
Automatically scale the image to fill the image frame |
Mark the Resize image check box. Do not enable if you want to fill the empty sections of your image manually. |
Correct chromatic-aberration distortion |
Mark the Chromatic Aberration Correction check box, and adjust the R / C slider to control the shift of colors along the Red/Cyan color axis or the B / Y slider to control the shift of colors along the Blue/Yellow color axis. |
Re-read the EXIF data from the selected image, guess the camera and lens type, and select the appropriate entries in the drop-downs |
|
Brighten the corners of an image |
Mark the Enable vignette correction check box, adjust the Strength slider to control how light (positive or right) or dark (negative or left) the correction will be, and adjust the Radius slider to control how far into the image the correction should extend. This control is independent of other types of lens correction. |
Edit the currently selected lens correction profile |
Click Edit, and adjust the settings on the Manual tab. |
Open a saved lens correction profile (XML file) |
Click Load, navigate to the profile, and click Open. |
Save your changes to the current profile |
Click Save, navigate to the folder to which to save the profile, and click Save. |
Remove all changes made to the profile during the current session |
|
The Manual tab lets you enter correction parameters instead of using correction parameters from profiles built into the application. This is useful for lenses that are not yet in the lens correction database.

The Manufacturer, Model, and Lens drop-lists on the Database tab show what camera and lens Corel PaintShop Pro assumes your image was taken with. Some cameras and lenses include data in the image file that allows the application to determine exactly what camera and lens was used, but other times the application estimates the closest option based on the data available. You can change incorrect guesses by selecting the correct manufacturer, camera model, and lens in the lists. These determine which Lens Distortion profile to use when removing distortion.
The Focal Length box shows the focal length setting for the lens at the time the image was taken. You can set the focal length manually if the image file doesn't include this information.
To mirror and invert a RAW image
1
In
AfterShot Lab, click the
Details tab in the Tools panel.
2
In the Mirror and Invert area, do any of the following:
•
Mark the
Mirror check box to mirror your image (from left to right).
•
Mark the
Invert check box to invert the colors (like a film negative).
This option can be useful when working with scanned negatives.
To work with metatdata
•
In
AfterShot Lab, click the
Metadata tab in the Tools panel.
This tool shows EXIF and IPTC metadata assigned to the Active Version, and allows you to add, remove or edit the IPTC data from all selected images.
You can select different metadata sets from the drop-down list at the top of the Metadata section, which changes the type of metadata that is shown. Some metadata is read-only, like Shutter Speed and ISO Rating, while other metadata is editable, like Caption, Rating, and Date.
|
|
|
|
|
Click Manage check box, and click the Add a new Set button. A new set with the default name New Set is created at the end of the Metadata Sets list. |
|
|
Click Manage check box, and click the Remove Set button. |
|
|
Double-click the metadata set that you want to rename, and type the new name. |
Add metadata to a metadata set |
Select the metadata entry in the left column, and drag it to the metadata set in the right column. |
The left column in the Metadata Manager lists all metadata entries available in AfterShot Lab. The right column lists metadata sets and their current content.
To return to PaintShop Pro
A TIFF version of the image opens in PaintShop Pro.