Working with the Mask Creator (Ultimate)
You can create and edit masks in VideoStudio Ultimate that let you apply an effect to selected areas. The Mask Creator helps you apply a mask by using a brush or freehand tool, shape tools, or a text tool. You can also invert a mask to swap the selected and unselected areas.
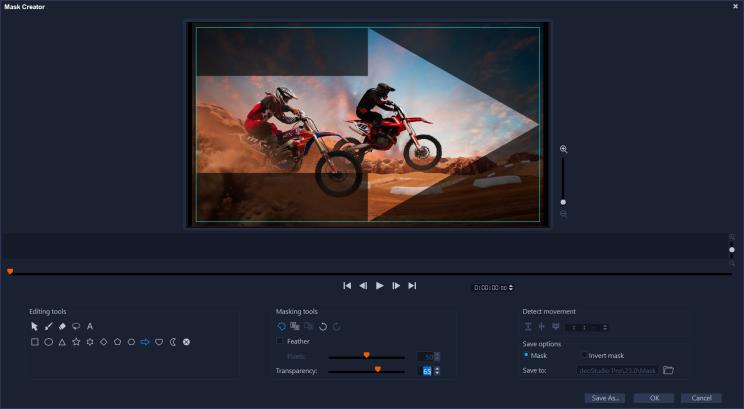
In the Mask Creator, a shaded area and a blue bounding box show the mask area.
If you want to create a dynamic mask that moves (instead of a still mask), you can use keyframes or use Detect movement options to help match the mask to the movement of the selected object or background. Note that the Edge tolerance settings affect the edge detection of the mask as it plays. You can choose to detect the movement from frame-to-frame, from the current position to end of video, and from the current position to a specified timecode. Video masks require fine-tuning for best results.
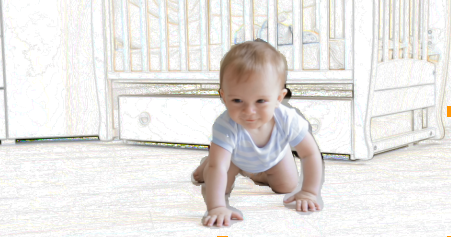
A video mask and a special effect (Colored Pen) creates a unique scene.

A text mask can be used with video or images.
Editing options, such as copy, paste, and move, let you customize and fine-tune a video mask. You can also activate the Move Mask tool to move, resize, or rotate mask elements interactively.
You can save your mask so that you can use it with other projects. When you exit the Mask Creator, the mask appears as a mask clip on a track below the corresponding source clip. If you create a mask for a clip on the Overlay track, the mask appears directly on the overlay clip. By default, the currently selected clip is applied to the mask, but you can replace it at anytime by dragging a new clip from the Library to the mask in Replace Mode or by holding down the Ctrl key while you drag.
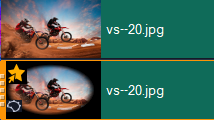
Masks appear in a track below their corresponding clip and can be identified by a mask icon and an elliptical vignette thumbnail.
Saved masks can be imported to the Mask Frame or Video Mask library (Options panel > Blending tab > Matte Modes). For more information about using mask frames and video masks with overlays, see Adding a mask frame and Using video masks with overlay clips.
Mask Creator tools and options
You can use the following Masking tools:
• Move Mask  — Lets you move the mask to a new position in the frame. You can also resize or rotate the selected mask element with the Move Mask tool.
— Lets you move the mask to a new position in the frame. You can also resize or rotate the selected mask element with the Move Mask tool.• Mask Brush  — Lets you draw a freehand mask. Can be adjusted with the Brush size and Edge tolerance sliders.
— Lets you draw a freehand mask. Can be adjusted with the Brush size and Edge tolerance sliders.• Smart Mask Brush  — Lets you draw a freehand mask that uses edge-detection to make it easier to select distinct objects. Can be adjusted with the Brush size and Edge tolerance sliders.
— Lets you draw a freehand mask that uses edge-detection to make it easier to select distinct objects. Can be adjusted with the Brush size and Edge tolerance sliders.• Eraser  — Lets you erase the mask. In addition to the Brush size slider, you can use the Edge tolerance slider.
— Lets you erase the mask. In addition to the Brush size slider, you can use the Edge tolerance slider.• Smart Eraser  — Lets you erase the mask using edge-detection to make it easier to select distinct objects. Can be adjusted with the Brush size and Edge tolerance sliders.In addition to the Brush size slider, you can use the Edge tolerance slider.
— Lets you erase the mask using edge-detection to make it easier to select distinct objects. Can be adjusted with the Brush size and Edge tolerance sliders.In addition to the Brush size slider, you can use the Edge tolerance slider.• Freehand tool  — Lets you draw an outline around the area you want to mask (start and end points must meet).
— Lets you draw an outline around the area you want to mask (start and end points must meet).• Text Mask  — Lets you create a text mask. When active, standard text options display (font, size, alignment, and formatting options).
— Lets you create a text mask. When active, standard text options display (font, size, alignment, and formatting options).• Shape tools  — Let you create a mask using shapes. For video masks, edge-detection adjusts the edges for subsequent frames.
— Let you create a mask using shapes. For video masks, edge-detection adjusts the edges for subsequent frames.• Clear Mask  — Removes the mask completely.
• Brush size slider — Changes the diameter of the Mask Brush and Eraser.
• Edge tolerance slider — Determines the sensitivity for mask edge detection based on how closely the pixels that you select with the masking tools match the adjacent pixels. At low settings, only similar pixels are included in the mask; at high settings, the mask expands to include a wider range of pixels.
You can manage and edit masks with the following Editing tools:
• Show/Hide Mask  — Hides or shows the mask highlight and bounding box in the playback area.
— Hides or shows the mask highlight and bounding box in the playback area.• Copy  — Lets you copy a mask from a specific frame
— Lets you copy a mask from a specific frame• Paste  — Lets you paste a mask that you copied from another frame
— Lets you paste a mask that you copied from another frame• Undo  — Removes the last edit
— Removes the last edit• Redo  — Reapplies the last edit if Undo was used
— Reapplies the last edit if Undo was usedVideo masks can use the following Detect movement options:
• Next Frame  — Detects movement and adjusts mask from the current scrubber position to the next frame
— Detects movement and adjusts mask from the current scrubber position to the next frame• End of Clip  — Detects movement and helps to adjust a mask for all frames from the current scrubber position until the end of the clip. Note: This can take a few minutes, depending on the length and quality of the clip.
— Detects movement and helps to adjust a mask for all frames from the current scrubber position until the end of the clip. Note: This can take a few minutes, depending on the length and quality of the clip.• Specified Timecode  — Detects movement and helps to adjust the mask for all frames from the current scrubber position until the specified timecode. Note: This can take a few minutes, depending on the length and quality of the clip.
— Detects movement and helps to adjust the mask for all frames from the current scrubber position until the specified timecode. Note: This can take a few minutes, depending on the length and quality of the clip.Note: Creating precise video masks requires fine-tuning between frames.
1 In the Timeline view (Edit workspace), select a clip on the Video track, and click the Mask Creator button  on the Timeline toolbar.
on the Timeline toolbar.Note: You can also select a clip in the Overlay track. If you choose this The overlay clip is used as a reference point for the mask (no relationship to Video track content).
2 In the Mask Creator window, choose one of the following: Mask Brush, Smart Mask Brush, Text Mask, or any of the shape tools (Rectangle, Ellipse...).
3 In the playback window, drag, draw, or type to create a mask. The area not selected appears shaded. Do any of the following:
• To move, resize, or rotate a mask element, in the Masking tools area, click the Move Mask tool , and in the playback window, click and drag the element to a new position or use the bounding box handles to adjust the selected mask element.
, and in the playback window, click and drag the element to a new position or use the bounding box handles to adjust the selected mask element.• To adjust the mask transparency, in the Editing tools area, drag the Transparency slider (applies to all mask elements)
• To soften the edges of the mask, in the Editing tools area, mark the Feather check box, and drag the Pixels slider to set the amount of edge feathering (applies to all mask elements).
• To add more elements to your mask, in the Masking tools area, choose the tool you want, and drag, draw, or type in the playback window.
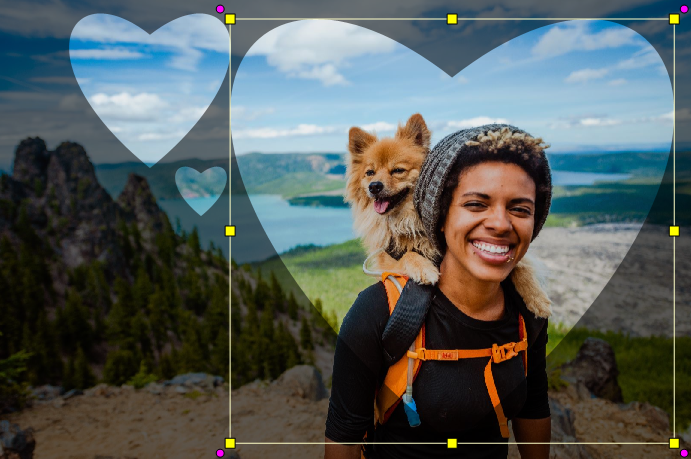
The Heart shape tool was used to create a mask from three hearts. Each heart is a separate element that can be edited and moved independently. The elements can also be merged into a single unit.
• To merge mask elements (so you can move, resize, or rotate them as a single unit), in the Masking tools area, click the Move Mask tool , and in the playback window, drag over the mask elements that you want to merge. An outline appears around the selected elements. Right-click and choose Merge All Masks from the context menu.
, and in the playback window, drag over the mask elements that you want to merge. An outline appears around the selected elements. Right-click and choose Merge All Masks from the context menu.• To delete one or more mask elements, click the Move Mask tool , and in the playback window, click the mask element to select it, right-click and choose Delete from the context menu. Choose Delete All to remove all mask elements.
, and in the playback window, click the mask element to select it, right-click and choose Delete from the context menu. Choose Delete All to remove all mask elements.• To invert the mask, in the Save options area, enable the Invert mask option.
4 If you want to add movement to one or more mask elements, click the Move Mask tool , select a mask element in the playback window, and use the keyframe controls under the playback window to add keyframes. For each selected keyframe, you can set the size, position, and rotation of mask elements interactively in the playback window, or you can change the values in the Keyframe settings area.
, select a mask element in the playback window, and use the keyframe controls under the playback window to add keyframes. For each selected keyframe, you can set the size, position, and rotation of mask elements interactively in the playback window, or you can change the values in the Keyframe settings area.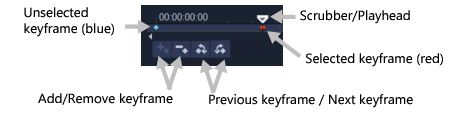
5 If you want to save the mask, click Save As and type a name for your mask.
6 Click OK to exit Mask Creator.
The mask appears on its own track in the Timeline, below the original source clip.
7 To change the clip for the mask, drag a clip from the Library to the masked clip while pressing the CTRL key (or enable Replace Mode before dragging).

Adding a red background video in the Video track helps the mask stand out. Adding keyframes lets the heart shapes move across the screen.
Note: You can adjust the length of the mask as you would other clips and you can apply effects to the mask by dragging an effect onto the mask in the Timeline.
1 In the Timeline view (Edit workspace), select the clip you want to work with, and click the Mask Creator button  on the Timeline toolbar.
on the Timeline toolbar.2 In the Mask Creator window, scrub through the video to figure out when you want the masking to start and stop. Make note of the timecode for the stop time.
3 In the tools area, choose a masking tool.
4 In the playback window, drag across the area that you want to select (a subject that you want to track using Detect movement).The area not selected appears shaded.
5 In the Detect movement area, choose Next Frame  , End of Clip
  , or type a timecode in the timecode box and then click Specified Timecode
  . Note that when you detect movement to the end of a clip or to a specified timecode, it can take a few minutes, depending on the length of the clip and the quality.
, End of Clip , or type a timecode in the timecode box and then click Specified Timecode . Note that when you detect movement to the end of a clip or to a specified timecode, it can take a few minutes, depending on the length of the clip and the quality.6 Review the results in the playback window. You can fine-tune by scrubbing through the video and using the Eraser tool and Brush tool to modify the selected area from frame-to-frame.
If you want to invert the mask, in the Save options area, click the Invert mask option.
If you want to save the mask as a Video Mask (Options panel, Blending > Matte Modes > Video Mask), click Save As and type a name for your mask (saved to the .uisx format).
7 Click OK to exit Mask Creator.
1 In the Timeline view (Edit workspace), select a clip that has a mask, and click the Mask Creator button  on the Timeline toolbar.
on the Timeline toolbar.The Mask Creator dialog box opens. Make any adjustments you want and click OK to return to the Timeline.
1 After you create a mask, in the Save options area of the Mask Creator dialog box, click Mask (default) or Invert mask.
Note: If you invert the mask, the preview area does not show the inverted mask—it displays when you return to the Timeline.
2 Set a destination in the Save to box.
3 Click the Save As button at the bottom of the dialog box, and choose a name for the mask.
If you want to link the mask to the original clip, mark the Link mask to source clip check box. Note that you can link only one mask per file. Linking is particularly helpful for masks customized to shapes and movement within the source clip.
If you save your mask to the default location, they are added to the Matte Modes drop-list on the Blending tab of the Options panel.
1 In the Timeline, select a clip that has a mask.
2 In the Options panel, click the Blending tab.
3 In the Matte Modes drop-list, choose None.
1 In the Timeline, select an overlay clip.
2 In the Options panel, click the Blending tab.
3 In the Matte Modes drop-list, choose Mask Frame (for a still mask) or Video Mask.
4 Click the Add mask item(s) button  to the right of the mask preview area, and browse to a saved mask file (.uisx format for a video mask, .png for a still mask).
to the right of the mask preview area, and browse to a saved mask file (.uisx format for a video mask, .png for a still mask).The mask is added to the preview area.
You can remove files from the video masks list by clicking the thumbnail for the mask, and clicking the Remove mask item button  .
.
.You can create a folder for masks in the default user content folder: ...Documents/Corel VideoStudio Pro/24.0/.