Using the Player panel
The Player panel consists of the Preview window and the Navigation area, which provides buttons for playback and for precision trimming of clips. Use the controls in the Navigation area to move around a selected clip or your project. Use the Trim Markers and Scrubber to edit your clips. In the Capture workspace, this panel also acts as the device control for a DV or HDV camcorder.
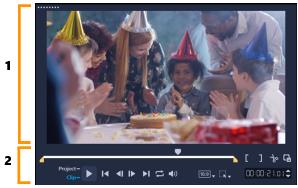
The Player panel consists of the 1. Preview Window and the 2. Navigation area
The preview window in the Player panel is where you can interactively edit your project. The type of edits depend on the content and tool that you select.
Smart guides
Smart guides are alignment lines that show automatically when you select and move objects in the preview window. For example, if you move text in the preview window, Smart guides help you identify the project center or edge, or the alignment relative to other objects.
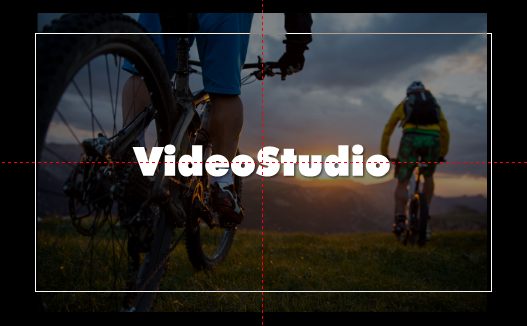
Smart guides appear as red dashed lines to help you align the selected object in the Preview window.
The Navigation area
The table below describes the controls available in the Navigation area.
Part | Description | |
|---|---|---|
 | Scrubber | Lets you scrub through the project or clip. |
 | Trim Markers | Lets you drag the scrubbers to set a preview range in the project or to trim a clip. |
 | Project/Clip mode | Specifies a preview of the entire project or of a selected clip. |
 | Play | Plays, pauses, or resumes the current project or a selected clip. |
 | Home | Returns to the starting segment or cue. |
 | Previous | Moves to the previous frame. |
 | Next | Moves to the next frame. |
 | End | Moves to the end segment or cue. |
 | Repeat | Loops playback. |
 | System Volume | Lets you adjust the volume of your computer's speakers by dragging a slider. |
 | HD Preview and 360 Preview drop-list | Lets you preview clips or projects in high definition (HD) or 360 degree (360). |
 | Change project aspect ratio | Lets you change the aspect ratio (updates the project settings). |
 | Resize/Crop | Lets you access Crop mode and Scale mode (resize or distort). |
 | Timecode | Lets you jump directly to a part of your project or selected clip by specifying the exact timecode. |
 | Enlarge Preview Window | Increases the size of the Preview Window. |
 | Split Clip | Splits the selected clip. Position the Scrubber to where you want the clip to be split, and then click this button. |
 | Mark-in and Mark-out | Sets a preview range in the project, or sets the start and end points for trimming a clip. |
The Play button in the Navigation area serves two purposes: for playback of your entire project or a selected clip.
• Click Project or Clip, then click Play.

While working on your project, you will want to preview your work frequently to see how your project is progressing. Instant Playback allows you to quickly preview changes in your project. Playback quality will be dependent on your computer’s resources.
You may choose to play only a part of your project. The selected range of frames to preview is referred to as the preview range, and it is marked as a colored bar in the Ruler Panel.
1 Use the Trim Markers or the Mark-in/out buttons to select the preview range.
2 To preview the selected range, select what you want to preview (Project or Clip), then click Play. To preview the entire clip, hold [Shift], then click Play.