Split screen video templates
You can easily create a split screen video in VideoStudio to play multiple videos in a preset or customized template. Custom options include keyframes to help you create dynamic templates that include motion.

You can use a template to create a split screen video project or create your own split screen template.
Before you start
• Ensure that the video clips you want to use are imported to the Library.
• Preview the video clips you want to use so that you have an idea what shapes will suit the content that you want to focus on. For example, if the main action is vertical, it won’t fit a horizontal shape very well.
1 In the Edit workspace, click the Template button  in the Library panel.
in the Library panel.2 Click Split Screen in the category list.
3 Drag the thumbnail for the template that you want to use into the Timeline.
You will be prompted to enable Replace Mode. Click Yes to facilitate placeholder replacement. For more information, see Using Replace Mode.
4 Drag a video or photo from the Library to the appropriate placeholder and release the mouse button.
5 In the Player panel, click the Resize/Crop drop-down  , and enable the Scale mode
  (button is blue when mode is active). Select a clip in the Timeline and do any of the following:
, and enable the Scale mode (button is blue when mode is active). Select a clip in the Timeline and do any of the following:• Resize the selected clip by dragging the sizing orange nodes that appear in the preview window.
• Position the clip by dragging it in the preview window.
6 In the Timeline, click another track to adjust the other clips in the template.
1 On the Timeline toolbar, click the Split Screen Template Creator button  .
.
.2 In the Template Editor, choose a tool from the Splitting Tools panel, and drag in the editor window to split the area into different clip zones.

A number appears in each clip zone.
If you want to add a shape, in the Graphics area, click a shape and drag in the editor window.
3 To adjust the lines, shapes, or graphics, in the Splitting Tools or Graphics area, choose the corresponding Select tool  , and select the element that you want to edit in the editor window.
, and select the element that you want to edit in the editor window.You can drag the lines and shapes to reposition them and resize them. You can also adjust the Rotation, Border width, and Border color, and Opacity in the Properties area. For shapes, you can also apply Swivel and Tilt settings.
4 To add motion to your template, use the scrubber and keyframe controls at the bottom of the window to add keyframes and assign new property settings and/or move the template elements. Use the playback controls to review the motion.

Note: You can copy a keyframe and its settings by right-clicking the keyframe, and choosing Copy in the context menu. Move your pointer to a new position on the timeline, right-click and choose Paste. You can also copy and paste keyframes between different shapes in your template.
5 If you want to save content with your template (for example, an image or video that will be part of the template), using the panel on the left-side of the window, navigate to the content you want to add and drag the corresponding thumbnail to the number you want in the drop zone.
Note: To replace the content, drag different content to the drop zone.
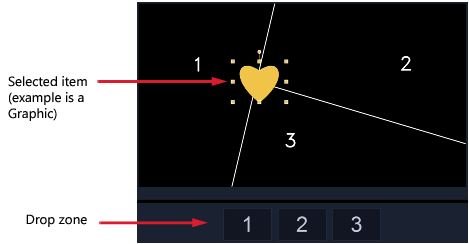
6 To size or position the content within the template, click the drop zone for the item you want to edit, and in the edit window, drag the nodes on the bounding box to adjust the size or drag the bounding box to a new position.

Clicking the item that you want to adjust in the drop zone is an easy way to select it. You can then use the bounding box to adjust the position and size of the content within the split screen frame.
7 When your template is complete, click the Export as template button to save your template. Your template is saved in the Library to the Template category, Split Screen folder.
8 Click OK to return to the Timeline.
9 Add and edit the clips as you would with an existing template.
You can use the Zoom In and Zoom Out buttons to the right of the editor window timeline to stretch or expand the timeline units. This can be helpful when using keyframes.