AR Stickers
Celebrate holidays, special occasions, or simply add a little fun to your videos with AR Stickers (augmented reality image effects). AR stickers are either static images or simple animations, such as hats, glasses, creature features and other fun elements. VideoStudio tracks a person’s face in a video and maps the AR sticker to the movement. For example, you can choose an AR sticker of sunglasses that will be added to a person’s eye area and move with them in the video. AR stickers work best when applied to a person who is facing the camera. You can apply one or more stickers to each person detected in the clip.

VideoStudio comes with a library of AR stickers that are categorized by type. You can also import PNG image files or animated GIF files to create your own stickers. In most cases, files that you use for stickers should have a transparent background, leaving only the elements that you want to display.
1 Click the AR Stickers button  in the Library, and in the filter category list, click one of the following:
in the Library, and in the filter category list, click one of the following:• Static Stickers
• Animated Stickers
2 Drag and drop the thumbnail for the AR sticker you want from the Library onto your clip in the Timeline.
3 If prompted, in the preview area, click the face to which you want to apply the sticker.
Like other effects, you can apply more than one AR sticker to a selected video clip by unmarking the Replace Last Filter check box (Options panel > Effect tab > AR Stickers button).
1 In the Timeline, double-click a clip that has one or more AR stickers applied.
The Options panel opens.
2 In the Options panel, click the Effects tab.
3 Click the AR Stickers button on the Effects tab.
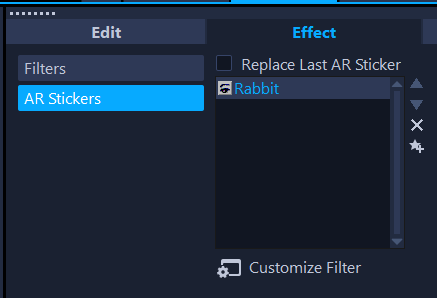
4 In the Effect list, click the name of the sticker that you want to remove, and click the X button to the right of the list.
1 In the Timeline, double-click a clip that has one or more AR stickers applied.
The Options panel opens.
2 In the Options panel, click the Effects tab.
3 Click the AR Stickers button on the Effects tab.
4 In the Effect list, click the name of the sticker that you want to edit, and click Customize Filter below the list.
5 Drag the sticker to the position you want, and drag a corner node to adjust the size of the sticker.
1 Click the AR Stickers button  in the Library.
in the Library.2 Click the Import AR Stickers button  to locate your PNG file.
to locate your PNG file.3 Select the file that you want to import.
4 Click Open.
5 In the Import a new sticker window, drag the imported image to the position you want, and drag a corner node to adjust the size of the sticker. Ensure the sticker is aligned the way you want it to appear relative to the face.
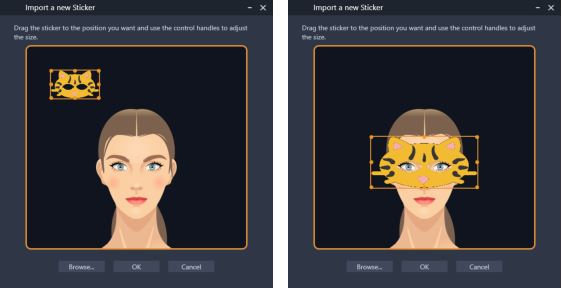
6 Click OK.
The new sticker is added to the Library.