Matching motion to a tracking path
Using the Match Motion feature, you can automatically match the motion of overlays and titles with a tracking path to create the effect of one element following another. For example, you can identify a moving person in a video by matching a title name to his tracking path.
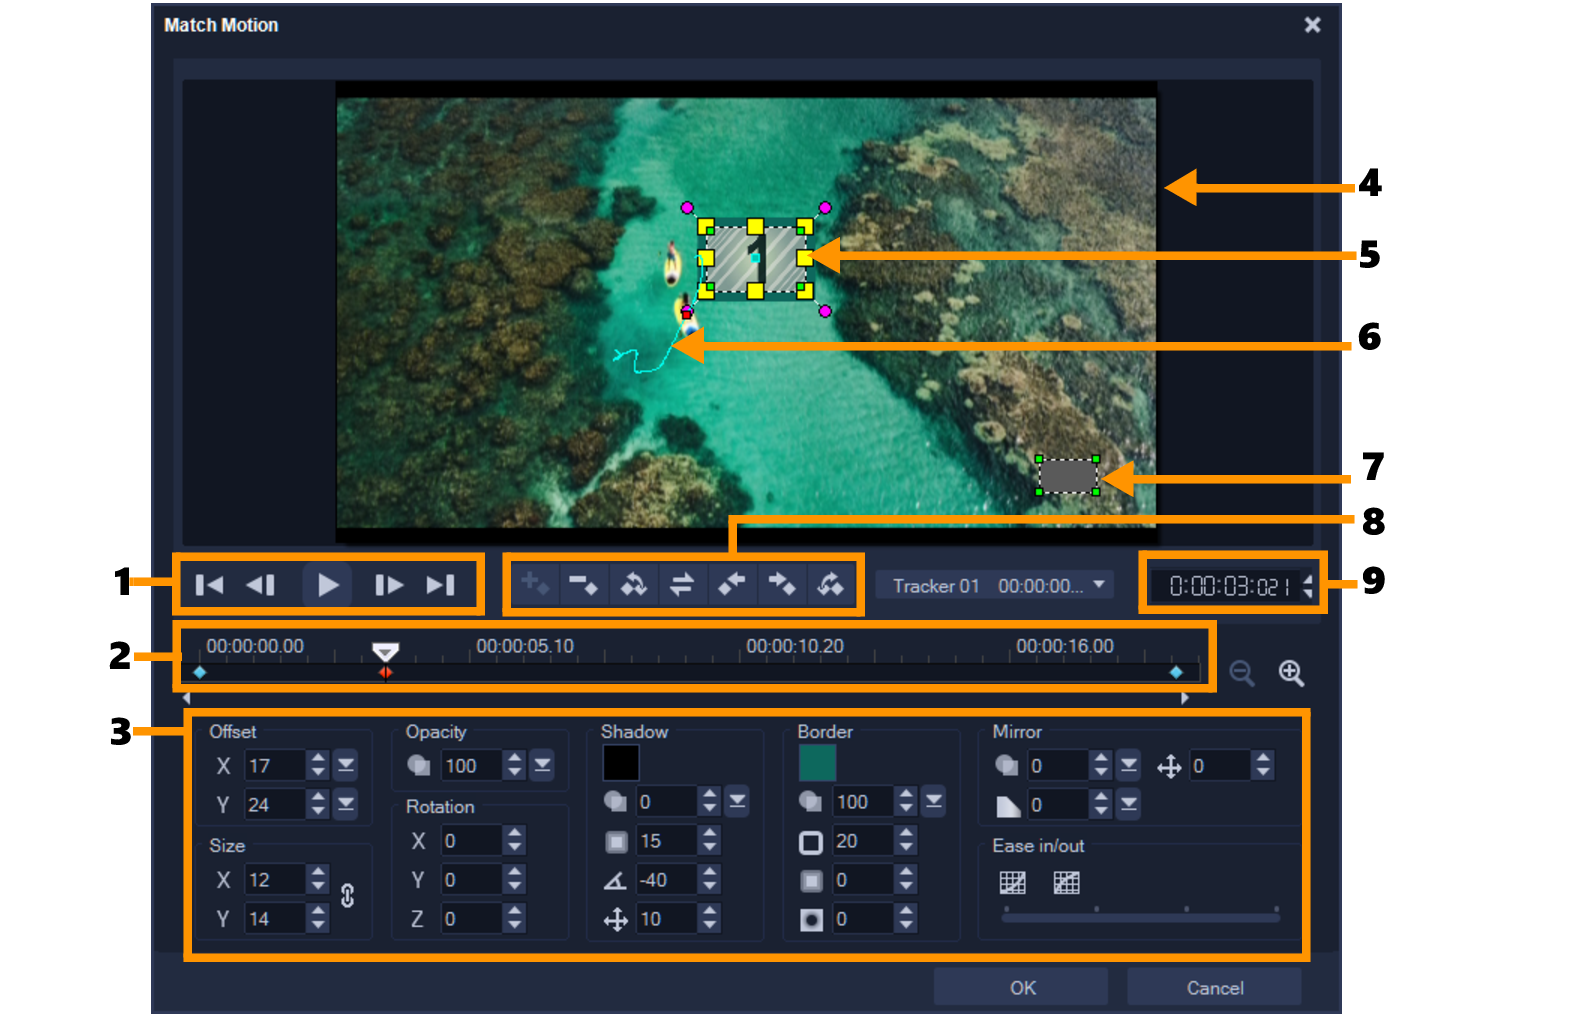
Match Motion dialog box
|
|
|
|
|
Buttons that control video playback. |
|
|
The Video Timeline along with zoom controls. |
|
|
Defines the Position, Size, Opacity, Rotation, Shadow, Border, Mirror and Ease in/out controls. |
|
|
Shows the current video being played. |
|
|
Specifies where the matched object is placed, which can be a title or overlay. This is applicable only in Match Motion. |
|
|
The path of the motion as manually defined. This is shown only in the Customize Motion dialog box. |
7 — Object distortion window |
Controls the orientation of the video clip / overlay object. |
|
|
Adds, removes and controls the position / offset of key frames. |
|
|
Lets you jump directly to a specific part of the video by specifying the exact timecode. |
Match Motion / Customize Motion buttons and options |
|
|
Add keyframe — Adds a keyframe |
|
|
Remove keyframe — Removes a keyframe |
|
|
Go to previous keyframe — Jumps to the previously available keyframe |
|
|
Reverse keyframe — Reverses the current keyframe |
|
|
Move keyframe to the left — Moves the current key frame one step to the left |
|
|
Move keyframe to the right — Moves the current key frame one step to the right |
|
|
Go to next keyframe — Jumps to the next available keyframe |
|
|
Tracker menu — Lets you select the tracker that the matched object will follow. This is shown only in the Match Motion dialog box. |
|
|
Reset — Discards all actions. This is shown only in the Customize Motion dialog box. |
|
|
Save to — Saves the active paths to the path library. This is shown only in the Customize Motion dialog box. |
|
|
Cancel — Closes the Customize Motion / Match Motion dialog box and discards any changes made on the video. |
|
|
OK — Closes the Customize Motion / Match Motion dialog box and saves the path tracked as a video clip attribute. |

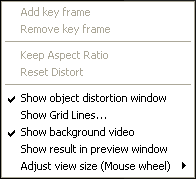
Match Motion / Customize Motion right-click menu
Match Motion / Customize Motion right-click menu |
|
|
|
|
|
|
|
|
Maintains the width to height ratio when you resize the video clip or overlay object. |
|
|
Reverts to the original aspect ratio after you distort the clip or object. |
Show object distortion window
|
Displays/hides the object distortion window that controls the orientation of the video clip / overlay object. |
|
|
Launches the Grid Line Options window that modifies the grid line settings. |
|
|
Displays/hides the other tracks in the Timeline. |
Show result in preview window
|
Enables/disables simultaneous display of edits on the preview window. |
Adjust view size (Mouse wheel)
|
Changes zoom settings to 100%, 50%, or 33%. Alternatively, you can zoom in or out using the mouse wheel. |
To launch the Match Motion dialog box

•
Right-click an overlay clip on the Timeline and choose
Motion >
Match Motion.
To match motion to a tracking path

1
Insert a video with tracking path in the video track.
2
Insert a title clip in the overlay track and adjust its properties to match your project.
In this example, the name of the boy in the video is added to the title track.
3
Right-click the title in the title track and select
Motion >
Match Motion. This opens the
Match Motion dialog box.
4
If you have more than one tracker, select the tracker that you want to match.
In the sample video, Tracker 01, which represents the tracking path of the boy, is selected.
5
Adjust the properties of your title depending on the requirements of your project.
Each time you set a value, a key frame is added.
In this example,
Offset values are adjusted to set the ideal distance between the boy and the title. The
Size and
Opacity values are also adjusted to make sure that the title is visible and yet a bit transparent.
If you need to turn and move the clip around the video, you can set the values under Offset and Rotation. You also have the option to add a shadow and border, or mirror your image. Clicking the Ease in/Ease out button  /
/ allows the motion to start out slowly or slow down as it comes to an end. Drag the slider to control the timing.
6
Play the video to test your animation. When done, click
OK.
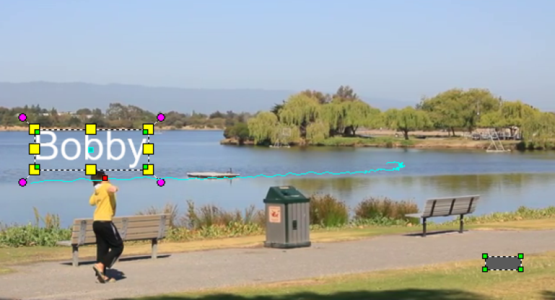
The result of our sample project is shown below.

You can tweak the properties of your overlays and titles by using key frames, dragging the tracker and adjusting values in the Match Motion dialog box.
To unlink overlay clips from tracking paths

•
Right-click the overlay clip and select
Motion >
Remove Motion.
![]() /
/![]() allows the motion to start out slowly or slow down as it comes to an end. Drag the slider to control the timing.
allows the motion to start out slowly or slow down as it comes to an end. Drag the slider to control the timing.


