Fine-tuning audio
The key to making narrations, background music, and audio blend well together is to control the relative volume of your clips. VideoStudio offers different ways to fine-tune audio in your projects. You can use keyframes to manipulate the volume of a clip.
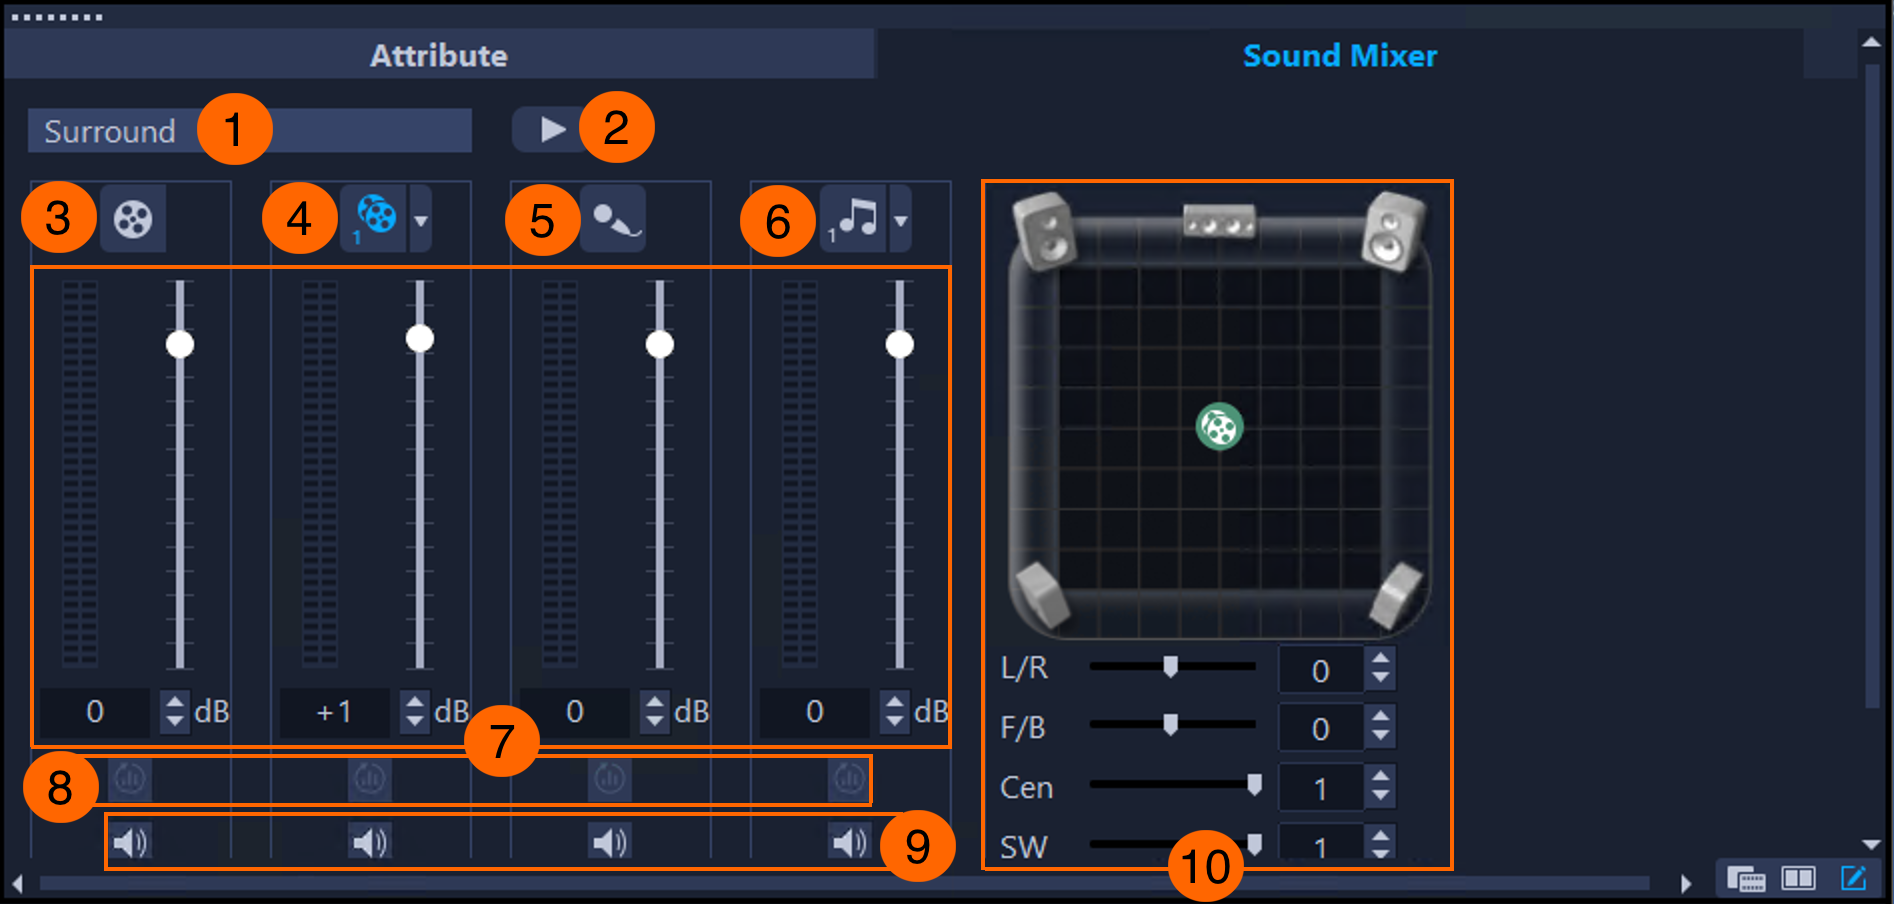
(1,2) Keyframe nodes are points that you add to an audio track to specify a volume change. You can adjust the volume of each keyframe node and the volume of the horizontal segment between the two keyframe nodes.
Dragging a node or horizontal segment up increases volume, dragging a node or horizontal segment down decreases it, and dragging a node left or right sets where the volume change starts or ends.
You can use the Sound Mixer panel to blend audio on different tracks.
The Sound Mixer is an all-in-one panel that lets you adjust the volume and pan of clips.
The following table describes the main components of the Sound Mixer.
0
|
|
|
|
|
Shows the mode. There are two modes, Stereo and Surround. |
2 Play/Pause button  |
Lets you play, pause, and resume the entire project |
3 Video track button  |
Lets you select the video track |
4 Overlay track button  |
Lets you select an overlay track |
5 Voice track button  |
Lets you select the voice track |
6 Music track button  |
Lets you select a music track |
|
|
Let you adjust the volume of the audio clips on a track |
8 Normalize buttons  |
Let you balance the volume level in several clips on a track |
9 Mute/Unmute buttons  |
Let you mute or unmute the audio on tracks |
10 Audio pan and channel controls |
Let you adjust the left and right, front and back, center, and subwoofer channels In Stereo mode, you can pan left or right. In Surround mode, you can pan front to back as well as left and right, giving you full control of audio positioning in a Surround sound project. Cen controls the amount of output sound from the center speaker. SW controls the amount of low-frequency sound output. Note: When you switch between tracks, the icon of the pan control changes depending on the track you choose.
|
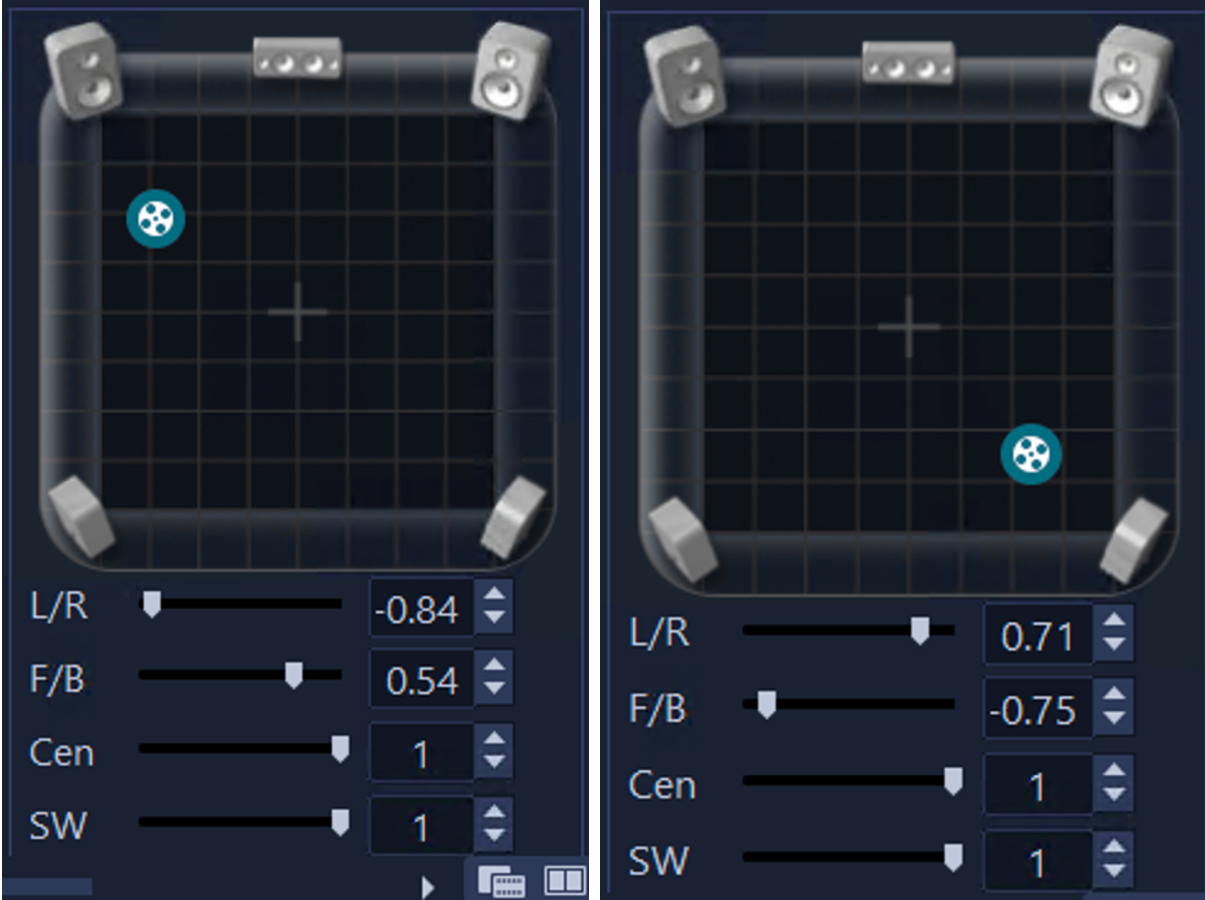
The Sound Mixer provides controls for panning and balancing. Panning is the moving of audio from one output channel to another, over time. In stereo files, a single waveform represents the left and right channels. You can pan audio in stereo files, directing the sound signal from one part of the stereo field to another. For example, if an airplane flies from the left side of a video frame to the right, you can pan the channel containing the airplane audio so it begins on the left side and ends on the right to create a realistic experience for the viewer.
Panning the audio of a clip on the Video track in Stereo mode. Dragging the audio pan control left or right moves the sound left or right.
Unlike a stereo stream that carries only two audio channels, surround sound has five separate audio channels encoded into one file which is delivered to five speakers and one subwoofer.
Panning the audio of a clip on the Video track in Surround mode. Dragging the audio pan control positions sounds around the surround spectrum, outputting the audio through the 5.1 configuration of multiple speakers.
To manipulate volume with keyframe nodes

1
Click the
Sound Mixer button

on the
Timeline toolbar.
2
Click an audio clip or a video clip with sound in the
Timeline.
3
Perform a task from the following table.
|
|
|
Add a keyframe to specify a change in volume |
Position the cursor over the yellow volume bar running through the track. When the cursor changes to an up arrow, click on the yellow volume bar to add a keyframe node. • You can also add a keyframe node by hovering over the yellow volume bar running through the track, right-clicking the volume bar when the cursor changes to an up arrow, and clicking Add. • Point to a keyframe node and when the node is highlighted in red and cursor changes to a hand, drag the node left or right to set where the volume change starts or ends, respectively. • You can also add a keyframe by right-clicking an existing keyframe, choosing Copy, right-clicking the yellow line where you want to add the node, and choosing Paste. Note: When you adjust the volume interactively by clicking the Play/Pause button in the Sound Mixer and dragging the Volume slider of the track, VideoStudio automatically adds keyframe nodes to the specified locations as you drag.
|
Remove a keyframe which specifies a change in volume |
Point to the keyframe node and when the node is highlighted in red and cursor changes to a hand, do one of the following: • Drag the node outside the clip. • Right-click, and click Delete. Note: You cannot delete start and end keyframe nodes, which the application adds to every audio clip by default.
Tip: To delete all keyframe nodes in a clip, point to a keyframe node, and when the cursor changes to a hand, right-click, and click Delete All.
|
Increase or decrease the volume of a keyframe |
Point to a keyframe node and when the node is highlighted in red and cursor changes to a hand, drag the node up or down to increase or decrease the volume, respectively. |
Increase or decrease the volume of a horizontal segment between two keyframe nodes |
Position the cursor over a horizontal segment between two nodes. When the cursor changes to an up arrow, drag the segment up or down to increase or decrease the volume, respectively. Note: By default, audio clips contain a start keyframe node and an end keyframe node. If there are no additional nodes between the start and end nodes, dragging the segment between the nodes up or down changes the volume of the entire clip.
|
To access the Sound Mixer
•
Click the
Sound Mixer button
on the
Timeline toolbar.

If the Audio Type is set to 3/2 in the Project Properties Audio Settings, the Sound Mixer opens in Surround mode. If the Audio Type is set to 2/0 Stereo mode, the Sound Mixer opens in Stereo mode. To modify project settings, click Settings > Project Properties. Click Edit in the Project Properties dialog box, and then click the Compression tab in the Edit Profile Options dialog box.
To manipulate volume in the Sound Mixer
1
Click the
Sound Mixer button
on the
Timeline toolbar.
2
Click one of the following buttons and choose a track:
•
Video Track •
Overlay Track •
Voice Track •
Music Track If there are several clips on the track, the first clip is automatically selected. If you need to make changes to a different clip, select the clip you want in the
Timeline.
3
Perform a task from the following table.
|
|
|
To adjust the volume of a keyframe in a clip |
In the Timeline, drag the scrubber to the location where you want to adjust the volume. In the Sound Mixer panel, move the Volume slider of the track (or enter a value in the Volume box.) VideoStudio automatically adds a keyframe node at the position of the current-time indicator and adjusts the volume in this part of the clip. Tip: To restore the volume default settings, right-click the Volume slider.
|
A adjust the volume of a clip |
Position the scrubber at the beginning of the clip. In the Sound Mixer panel, move the volume slider of the track up or down to increase or decrease the volume, respectively. Note: If there are several keyframe nodes in the clip, positioning the scrubber at the beginning of the clip automatically selects the start node; therefore, moving the volume slider in the Sound Mixer will adjust only the volume of the first node.
|
Balance the volume of several clips on a track |
In the Timeline, select the clips to balance, and click the Normalize Audio button of the track in the Sound Mixer panel. |
|
|
In the Sound Mixer panel, click the Mute/Unmute button of the track. |
To blend audio tracks in the Sound Mixer
1
Click
Settings >
Project Properties.
The
Project Properties dialog box appears.
2
Choose a format from the
Project format list box.
Tip: Choose
DVD for Surround mode.
The
Edit Profile Options dialog box appears.
4
Click the
Compression tab.
5
In the
Audio format list box, choose one of the following options:
•
Dolby Digital Audio — for Stereo mode
•
PCM 5.1 Channels — for Surround mode
6
In the
Audio Type list box, choose one of the following options:
•
2/0 (L, R) — for Stereo mode
•
3/2 (L, C, R, SL, SR) — for Surround mode
7
Click
OK to close the
Edit Profile Options dialog box.
8
Click
OK to close the
Project Properties dialog box.
9
In the
Sound Mixer, choose a track.
10
In the
Timeline, do one of the following:
•
Place the scrubber in the section of the clip where you want to make a change.
•
Position the cursor over the yellow volume bar running through the track. When the cursor changes to an up arrow, click on the yellow volume bar to add a keyframe node.
11
Drag the audio pan control to a new position.
The position of the audio pan control determines the direction from which the sound will come.
12
Drag the
Volume slider to adjust the volume level of the audio.
13
Repeat steps
10 to
12 until you are satisfied with the changes.
(Surround mode only) You can also |
|
Control the amount of output sound from the center speaker |
Enter values in the Cen box or move the slider. |
Control the amount of low-frequency sound output |
Enter values in the SW box or move the slider. |
In stereo tracks, you can pan only left and right. The 5.1 pan control and the F/B (front and back), Cen (centre) and SW (subwoofer) controls are enabled only in 5.1-channel tracks.
Depending on the track you select, the icon of the audio pan control changes as follows: video track  , overlay track
  , voice track
  , music track
  .
.

You can also adjust the volume interactively by clicking the Play/Pause button in the Sound Mixer and dragging the Volume slider of the track.
You can also change the sound direction interactively by clicking the Play/Pause button in the Sound Mixer and dragging the pan control. VideoStudio automatically adds keyframe nodes to the specified locations as you drag.