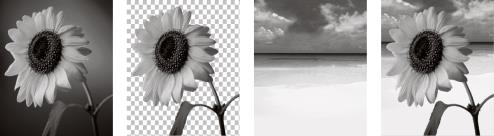
You can create a mask from an image by loading the image file from disk. When you use an image as a mask for another image, Corel PaintShop Pro applies the mask as a grayscale image. The source image is not altered. You can also create a mask by customizing one of the sample masks included with Corel PaintShop Pro.
An example of an image used as a mask
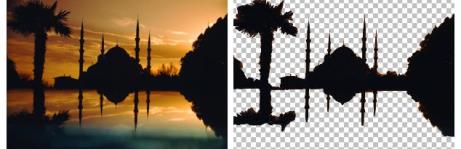
You can use a selection to create a mask that shows or hides the selection. You can use this mask as a starting point for creating artistic effects.
An example of a selection used as a mask
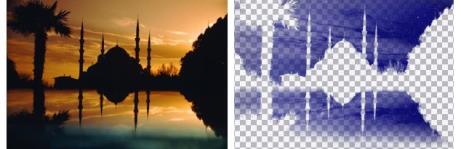
You can also create a mask from a channel by first splitting an image into its RGB, HSL, or CMYK channels. Corel PaintShop Pro creates a grayscale image for each channel. You can use one of these channel images to create a mask for the original image or for another image.
An example of the grayscale channel used as a mask
To create a mask layer
Edit workspace
1 On the Layers palette, choose the layer that you want to mask.
2 Choose LayersNew Mask Layer, and choose one of the following options:
• Show All — shows all underlying pixels
• Hide All — hides all underlying pixels
You can also
Display the mask on the image
On the Layers palette, click the Highlight mask area button .
View the image as it will appear in print or online (without the transparency grid or the mask overlay)
Choose ViewPalettesOverview.
Reorder the layers on which the mask is applied
Drag the mask layer on the Layers palette to a new position in the stacking order.
To apply the mask layer to all underlying layers, drag it from the layer group to the main level.
You can paint on the image to show portions of the underlying layer. For information about editing the mask, see Editing masks.
2 On the Layers palette, choose the layer that you want to mask.
3 Choose LayersNew Mask LayerFrom Image to open the Add Mask From Image dialog box.
4 Open the Source Window drop-list, and choose the image.
5 In the Create Mask From group box, choose one of the following options:
• Source luminance — determines the degree of masking based on the luminance value of the pixel color. Lighter colors produce less masking; darker colors produce more masking. Transparent areas completely mask the layer.
• Any non-zero value — applies masking without gradation. Pixels with an opacity between 1 and 255 pixels become white; transparent pixels become black. Transparent areas completely mask the layer.
• Source opacity — determines the degree of masking based on the opacity of the image. Fully opaque pixels produce no masking; partially transparent pixels create more masking; transparent pixels produce full masking.
If you want to reverse the transparency of the mask, mark the Invert mask data check box.
6 Click OK.
The mask layer and the selected layer are added to a new layer group. The mask layer applies to the selected layer only.
For information about editing a mask, see Editing masks.
To display the mask on the image, click the Highlight mask area button on the Layers palette.
To apply the mask layer to all underlying layers, drag it from the layer group to the main level on the Layers palette.
To create a mask from a selection
Edit workspace
1 Make a selection on a layer by using the Selection tool , the Freehand Selection tool , or the Magic Wand tool .
2 Do one of the following:
• To mask the selection, choose LayersNew Mask LayerHide Selection.
• To mask everything except the selection, choose LayersNew Mask LayerShow Selection.
You can also
Display the mask on the image
On the Layers palette, click the Highlight mask area button .
Apply the mask layer to all underlying layers
On the Layers palette, drag the mask layer from the layer group to the main level.
If you apply a mask layer to the background, the background is automatically converted to a raster layer.
The mask layer and the selected layer are added to a new layer group. The mask layer applies to the selected layer only.
For information about editing masks, see Editing masks.
To create a mask from a channel
Edit workspace
1 Choose ImageSplit Channel, and choose one of the following:
• Split to RGB
• Split to HSL
• Split to CMYK
2 Select the grayscale image in which you want to create the mask.
3 Choose LayersNew Mask LayerFrom Image to open the Add Mask From Image dialog box.
4 In the Source Window drop-list, choose the channel that you want to use for the mask.
5 In the Create Mask From group box, choose the Source luminance option.
If you want to reverse the transparency of the mask data, mark the Invert mask data check box.
6 Click OK.
The mask layer and the selected layer are added to a new layer group. The mask layer applies to the selected layer only.
You can also
Display the mask on the image
On the Layers palette, click the Highlight mask area button .
Apply the mask layer to all underlying layers
On the Layers palette, drag the mask layer from the layer group to the main level.
For information about editing the mask, see Editing masks.