Sorting photos according to the people in them is a great way to organize your photos. There are two ways to tag people in your photos:
• Face recognition — analyzes facial characteristics and uses reference photos to build a list of possible matches. People with similar characteristics are sorted into groups, making it easier for you to look through your photos and identify people. You can move photos between groups until all photos of the same person are in one group, and then type a name for the group to automatically tag all photos in the group with the name of that person.
• Manual tagging — lets you tag people manually in your photos. You can add multiple tags to the same photo, or tag objects or other areas of the photo with the names of people, to make sure that they are notified when the photo is uploaded.
Importing your friends list from sharing sites
You can import your friends list from sharing sites, such as Facebook and Flickr, and link the names in your photos with names from the sharing sites. When the local tags in Corel PaintShop Pro are linked with the sharing site tags, the people who appear in the photos will be automatically notified when you upload the photos to the site. No need to tag them again!
To sort photos by people
Manage workspace
1 In the Navigation palette, click the Collections tab.
2 Navigate to the folder containing the images that you want to sort.
3 In the Organizer palette, click the Find People button on the Organizer toolbar, and choose one of the following options:
• Scan selected photos
• Scan current folder
• Scan subfolders
If no photos are selected, face recognition is applied to the whole folder.
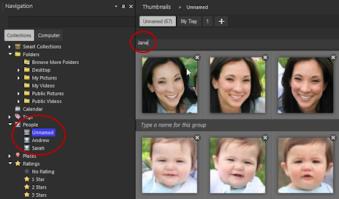
After you run face recognition, the photos are sorted into groups of people and placed in a folder called Unnamed.
4 If the Manage workspace is not in Thumbnail mode, click the Thumbnail Mode button in the upper-right corner of the Manage workspace to view the groups.
The group containing the most photos is listed first. Within each group, the most recent photos are displayed first. People that appear in only one photo are grouped together in a group called Single Face Group.
5 Click in the title bar of a group and type a name for the group.
All photos in the group are tagged with the name.
If you want to increase the accuracy of the face recognition results, you can select 10 clear photos of the same person and run face recognition on those 10 photos first. These reference photos will increase the accuracy of future facial matches for that person.
After you type a name for a group, the group is moved from the Unnamed folder to a new, named folder in the Navigation palette.
You can also
Toggle view between face and full photo
Click the View Face and View Full Image buttons on the group tab.
Rename a group
In the Navigation palette, right-click the folder name, and choose RenameGroup.
Delete a group
In the Navigation palette, right-click the folder name, and choose Delete Group. The group name is deleted, the tags are removed from the photos, and the photos are moved back to the Unnamed folder.
Move a photo from one group to another
Right-click the photo, choose Move Person, and choose a name from the list. You can also drag a photo to another folder in the Navigation palette.
Remove a photo from a group and create a new folder for it
Right-click the photo, choose Move to New Person, and type a name for the new group. The photo is removed from the current group and placed in the new group.
Move a photo from a named folder back to the Unnamed folder
Right-click the photo, and choose Remove Person from Group. You can also drag a photo from a named group to the Unnamed folder in the Navigation palette.
Move a face to the Ignored Bin
Right-click the photo, and click Ignore Person. In the Unnamed group, you can also click the Delete button in the upper-right corner of the photo.
Exclude a face from face recognition
Select the Unnamed folder in the Navigation palette, and click Ignored. Select the photo, and click Do Not Detect.
Link a group tag to a contact from a sharing site
Click the icon for the sharing site in the Link tags area, and choose a name from the list. Note: The friends list from the site must be imported first (see To import a friends list from a sharing site).
To import a friends list from a sharing site
Manage workspace
1 In the Navigation palette, click the Collections tab, and click a name in the People list.
2 In the Link tags area, click the icon that corresponds to the sharing site from which you want to import your friends list.
If you are not currently logged into the sharing site, you’ll be asked to log in and allow Corel PaintShop Pro to access the site.
To tag people manually
Manage workspace
1 In Preview mode, select the photo that you want to tag.
2 Under the People tab in the Info palette, click Tag Person.
A square frame appears in the center of the photo in the preview window.
3 Click in the Who is this? box.
A name picker appears, showing a local name list, as well as the contacts from sharing sites that you have imported.
4 Do one of the following:
• Type a name in the box, and click Add New Person.
• Choose a name from the local list of names.
• Click a sharing site tab, and choose a name from the list.
You can also
Create a frame with a different size, shape, or location
Drag in the preview area
Move the frame
Drag the frame in the preview area to the desired location.
Resize the frame
Point to the edge or corner of the frame. When the pointer changes to a two-way arrow, drag to resize the frame.
Edit the tag
Point to the frame, click the button next to the name, and choose a new name from the picker.
Remove the tag
Point to the frame, and click the Delete button in the upper-right corner of the frame. If the tag is part of a face group, the photo is removed from the group.
View all tags in a photo
Hover over areas of the photo to see existing frames. In addition, all tags for the selected photo are listed in the Names box under the People tab in the Info palette.
Link a local tag to one or more social tags
In the name picker, click a name in the local list, and then click the corresponding name in one or more of the sharing site lists. Click Save to tag the photo and link the local and sharing site name tags.