Using Single RAW Photo to create an HDR effect
You can split a single RAW photo into three exposures and recombine the exposures to create an HDR effect. Although this is not “true” HDR (you aren’t extending the tonal range by combining multiple photos), you can still optimize the tonal range of a single photo with powerful HDR tools.
Single RAW Photo was used to create an HDR effect to optimize the tonal range of the photo.
To create an HDR effect by using Single RAW Photo
1 In the Manage workspace, select the thumbnail of a RAW photo.
An orange outline appears around the thumbnail of the selected photo.
2 Click File HDR Single RAW Photo.
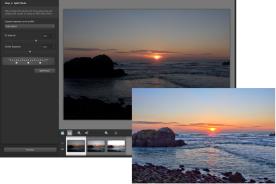
3 In the Step 1: Split Photo window, choose a profile from the Camera response curve profile drop-list.
If you are not sure what to choose, select Auto Select.
4 Drag the EV Interval slider to set the simulated exposure interval. This value is used to split the photo into three versions.
If you don’t want the middle exposure to be set at 0, drag the Center Exposure slider to set a new value.
5 Click Split Photo to break the photo into three versions. Three thumbnails appear in the tray.
6 If you’re happy with the results, click Process.
You can also use Single RAW Photo with camera-generated TIFF files (not saved as TIFF in image-editor).