Dialog boxes are windows that open when you choose certain Corel PaintShop Pro commands. You can use them to select and preview command options. All dialog boxes remember where you last positioned them on the screen and re-open in the same location.
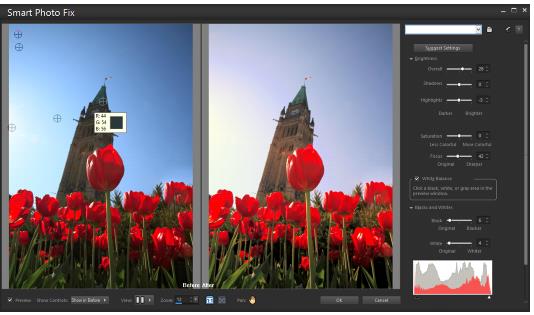
There are two styles of dialog boxes. The following Adjust and Effect filters use a larger layout to make it easier to use interactive controls: Depth of Field, Digital Noise Removal, Graduated Filter, Red Eye Removal, Retro Lab, Selective Focus, Smart Photo Fix, and Vignette.
Some Adjust and Effect dialog boxes use a larger layout.
For an example of the other style of dialog box, see Choosing effects.
Common features found in many dialog boxes include the following:
• Before and After panes — let you see the effect of the dialog box settings on your image before the effect is applied
• Zoom and Pan controls — let you zoom in and out on the preview areas, and change the current viewing area
• Presets — display saved settings, or scripts, that you can use to make quick changes to images. For more information, see Using and creating presets.
• Reset to Default button — lets you reset dialog box settings to their initial values
• Numeric edit controls — let you select or enter numeric values
• Color boxes — let you select colors for a command setting
• Randomize parameters button — lets you preview random settings.
Using preview areas
Most dialog boxes that you use to correct images, apply effects, or modify selections contain Before and After panes that show the image with changes applied.
In some dialog boxes, you can show or hide the Before and After panes by clicking the Show/Hide Previews button:
When you hide the Before and After panes, you can still see the effects of the current settings on the image by marking the Preview on Image check box in the upper-right corner of the dialog box.
Editing numeric values
To edit values in Corel PaintShop Pro dialog boxes, you can use the numeric edit control to enter values and change settings.
Using color boxes
In some dialog boxes, a color box displays the currently selected color for a given control. When you move the pointer over the color box, the pointer changes to a dropper and displays the RGB values.
Randomizing parameters
Many correction and effect dialog boxes contain a Randomize Parameters button that lets you update settings with random values.
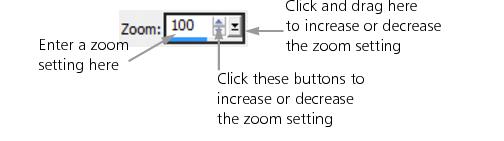
To zoom in or out of the image preview
• Set the value in the Zoom control.
You can also expand the dialog box to create more room for the Before and After panes.
To pan the image preview
Edit workspace
1 Move the pointer into the After pane.
The pointer changes to a hand.
2 Drag the image.
You can also hold down the Pan button , and then center the selection rectangle over the part of the image you want to display.
To proof changes in the main image window
Edit workspace
• Mark the Preview on Image check box.
Any change to a dialog box setting will be applied to the main image window.
To edit numeric values
Edit workspace
• Perform a task from the following table.
To
Do the following
Enter a specific value
Click in the control, press Delete or Backspace, and type a new value.
Increase or decrease the number by one
Click the up or down arrow.
Choose an approximate value
Click the slider.
Choose from the range of available settings
Move the slider.
If you enter a value that is out of range for the control, it turns red.
You can also double-click the number to highlight it, and type a new value.
To choose a color from a dialog box
Edit workspace
• Perform a task from the following table.
To
Do the following
Select a color
Click the color box, and select a color from the Color dialog box.
Select from recently used colors
Right-click the color box, and select a color in the Recent Colors dialog box.
To randomize settings within a dialog box
Edit workspace
• Click the Randomize parameters button .
You can try a variety of settings by continuing to click the Randomize parameters button until you get the effect you want.

 , and then center the selection rectangle over the part of the image you want to display.