Gradients are gradual blends between two or more colors. You can paint, draw, or fill with gradients to create interesting effects or color transitions. You can use gradients to create Web buttons with shadows and highlights, to make objects look shiny or glowing, or to add dimension to objects. You can also use gradients to fade Web page graphics into other content, and you can use a black-to-white gradient as a mask.
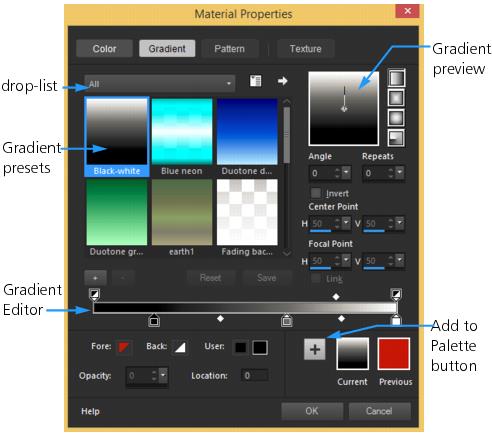
The Gradient page in the Material Properties dialog box lets you choose and edit gradients.
Important! Gradients are available for grayscale and 16 million color–images only. For more information about increasing the color depth of an image, see Increasing the color depth of an image.
To apply the current gradient
Edit workspace
• On the Materials palette, click the Gradient button on the Style drop-list for the Foreground and Stroke Properties box or the Background and Fill Properties box.
The most recently chosen gradient becomes active.
To choose a gradient
Edit workspace
1 On the Materials palette, do one of the following:
• To choose a foreground gradient, click the Foreground and Stroke Properties box.
• To choose a background gradient, click the Background and Fill Properties box.
The Material Properties dialog box appears.
2 Click the Gradient button.
3 If necessary, choose a gradient category from the Category drop-list containing the desired gradients.
4 Click a gradient thumbnail.
5 Choose one or more of the following options:
• Style — lets you choose a Linear , Rectangular , Sunburst , or Radial gradient.
• Angle — specifies the angle or direction of the gradient, from 0 to 359 degrees. This option applies to linear, rectangular, and radial gradients only.
• Repeats — sets the number of times (from 0 to 999) to repeat the gradient pattern
• Invert — inverts the colors of the gradient
• Center Point — determines the horizontal and vertical coordinates of the point from which the gradient disperses or radiates. The distance is measured as a percentage of the fill area’s width. You can change the center point to create fills in circles or other shapes in which the center of the gradient is not at the center of the object. This option applies to rectangular, sunburst, and radial gradients only.
• Focal Point — determines the horizontal and vertical coordinates of the point where the foreground color of the gradient begins. The distance is measured as a percentage of the fill area’s width. You can change the focal point to create fills in circles or other shapes in which the effective light source is not at the center of the object. This option applies to rectangular and sunburst gradients only, and is available only when the Link check box is unmarked.
• Link center and focal points — assigns the same values to the center and focal points. Unmark the check box to edit the focal point separately from the center point. This option applies to rectangular and sunburst gradients only.
6 Click OK.
You can also
Save this gradient as a swatch that you can access later
Click the Add to Palette button.
Apply the current materials to all tools
On the Materials palette, mark the All toolscheck box. If you unmark this check box, the current materials are applied to the active tool only.
You can also move the center point by dragging the control needle or crosshairs shown in the gradient preview. If you unmark the Link check box, you can move the focal point by dragging the crosshairs on the gradient.
To save an edited gradient
Edit workspace
1 On the Gradient page, click Save.
The New Gradient dialog box appears.
2 Enter a unique name for the gradient, and then click OK.
To create a gradient
Edit workspace
1 On the Gradient page, click the New Gradient button .
The New Gradient dialog box appears.
2 Type a name for the new gradient, and click OK.
The gradient is created with two markers at 0% and 100% that use the custom color.
 .
. .
.