The Layers palette lists all layers in an image. The order of layers on the palette is the order of layers in the image. The top layer is listed first, and the bottom layer is listed last. You can change the stacking order of layers on the Layers palette, depending on the layer types.
You can create layer groups to organize the Layers palette. You can also link layers or groups so that they move together when you use the Move tool in the image.
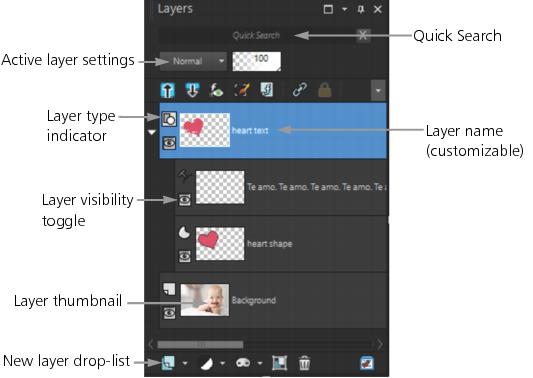
By default, a thumbnail view of the layer’s contents appears to the left of the layer name. You can set the size of the thumbnail or turn the thumbnail off. By default, the settings of the active layer appear above the topmost thumbnail preview, but you can modify the appearance of these settings. For more information about changing the appearance of the Layers palette, see To modify the look of the Layers palette.
The Layers palette displays the names of layers and layer groups. You can customize the names of layers in the palette (see examples in the illustration above). It also indicates the types of layers (background, raster, vector, art media, mask, adjustment, group, selection, or floating selection) and lets you toggle the layer visibility on or off. If there are too many layers for the palette to display at one time, you can use the scroll bars on the right side to move the list up or down.
The Layers palette toolbar, positioned along the bottom edge of the palette, includes controls for tasks such as adding new layers, grouping and deleting layers, and provides a quick access button for setting preferences.
At the top of the Layers palette are controls that let you change the blend mode and opacity of layers, collapse or expand all layers, display the Quick Search, enable Edit Selection, display Layer Effects, link layers, lock transparency, and access layer styles.
You can display or hide the Layers palette or move it anywhere on the screen. For more information about moving, docking, and undocking the Layers palette, see Using palettes.
If an image has more than one layer, you must select the layer that you want to work on. Changes to the image affect only the selected layer (also called the active layer). You can select only one layer at a time.
The Layers palette displays its components as a “tree” of folders and subfolders. Items with subcomponents have a down-facing arrow in front of them when expanded, and a right-facing arrow in front of them when contracted. You can expand a vector layer or layer group to see the names of its subcomponents, or contract a vector layer or layer group to navigate the Layers palette more easily.
To display or hide the Layers palette
Edit workspace
• Choose ViewPalettesLayers.
This command toggles the display of the Layers palette on and off.
To select a layer
Edit workspace
• On the Layers palette, click the name of a layer.
To expand or collapse layers
Edit workspace
• On the Layers palette, perform a task from the following table.
To
Do the following
Expand the group
Click the right-facing arrow in front of the layer or layer group name.
Collapse the group
Click the down-facing arrow in front of the layer or layer group name.
Expand all layer groups
Click the Expand All Layers button .
Collapse all layer groups
Click the Collapse All Layers button .
To modify the look of the Layers palette
Edit workspace
1 Choose FilePreferencesGeneral Program Preferences.
The General Program Preferences dialog box appears.
2 On the left pane of the dialog box, choose Palettes.
3 Perform a task from the following table, and click OK.
To
Do the following
Resize thumbnails
In the Layers palette group box, mark the Palette thumbnails check box, and type or set a value in the Size control. (The default setting is 50 pixels.)
Turn off thumbnails and display the right pane
In the Layers palette group box, unmark the Palette thumbnails check box, and mark the Right Pane check box. (This is how the Layers palette appeared in earlier versions of the application.)
Resize the right pane
With the right pane of the Layers palette displayed, drag the pane flyout control horizontally.
Display layer settings at the top of the palette
In the Layers palette group box, unmark the Right Pane check box.
You can hide the right pane by clicking when the arrow on the vertical divider points to the right. When the arrow points to the left, clicking the control restores the right pane to its previous view.