3D Photo Creator
Creating 3D photos
This topic explains how to create 3D photos using either a single 2D photo, or image pairs you have created. For information on how to create image pairs, see How to create image pairs.
To create a 3D photo:
1 Open 3D Photo Creator.

2 Do one of the following:
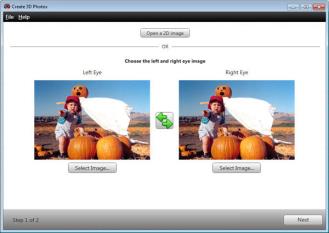
n To convert a single 2D image into an image pair and load the images, click the Open a 2D image button and browse to the photo you want to use.
n To load two images shot with a standard camera, click the Select Image buttons and browse to the photos you want to use.
n To load an MPO file, choose File > Open MPO File. The left and right images will be selected automatically. (MPO is a proprietary format used by Fuji 3D cameras.)
n To load a JPS file, choose File > Open JPS File. The left and right images will be selected automatically. (JPS files consist of two identically-sized JPG images placed side-by-side.)
n To load side-by-side stereoscopic images, choose File > Open Side-by-Side Image.
n To load top/bottom stereoscopic images (also known as over/under images), choose File > Open Top/Bottom Image.
3 Click Next, if necessary.
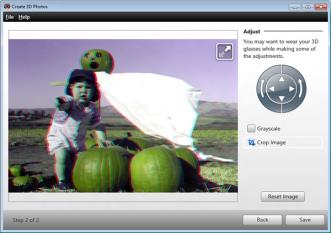
The images are modified and appear superimposed in a preview window.

4 Put on your 3D glasses.
5 Use the adjustment buttons to nudge or rotate the top image until you achieve the best possible 3D effect.
6 Click Save.
Tips for creating 3D photos
n Changing the offset of the right and left images adjusts the distance an object appears to be floating in front or behind the screen. Try to avoid floating objects that extend to the edge of the screen.
n The photo selection window includes a button you can use to switch the left and right images. If you are not seeing the 3D effect you were expecting, try switching the left and right photos and creating a new preview.

n You can preview images in full-screen mode by clicking the button in the upper-right corner of the preview image.

n If the picture will be viewed on a screen larger than your computer monitor, you may want to adjust the distance between the right and left images so the offset does not exceed 2.5 inches on the larger screen. For example, if your HDTV has a 60-inch screen and your computer monitor has a 14-inch screen, the maximum offset on a 14-inch screen should be 2.5 inches / (60/14) or just over half an inch.
n Processing an image for viewing with anaglyph glasses distorts the color.
n The adjustment increment for the image adjustment buttons can be modified on the Preferences dialog box. Choose File > Preferences.
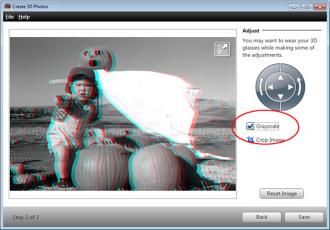
n With some photo pairs, selecting the Grayscale checkbox on the adjustment window will create a more pleasant 3D effect. Converting images to grayscale can be undone at any time by clearing the checkbox or by clicking Reset Image. The original image pair is not affected by any changes made in this window.

n The Save dialog box includes a Save as type drop-down list you can use to create side-by-side and over-under images. To view 3D images in these formats requires a compatible television or computer monitor and graphics card. If you are planning to view your photos on a standard display with a pair of anaglyph glasses (one red lens and one cyan lens), choose JPS, JPEG, Bitmap, or PNG. The MPO option is a proprietary format used by Fuji 3D cameras.
Note: Some users may experience headaches, eye strain, fatigue, dizziness, disorientation or nausea when viewing 3D content. It is recommended that users take frequent breaks to lessen these effects. If you experience any of these symptoms, please discontinue 3D viewing, and do not resume until the symptoms have subsided. You may want to consult with a physician if your symptoms persist or return each time you attempt to view 3D content.