E-mailing media files
You can share your photos and other media files with friends and family by e-mail.
Using the E-mail Assistant, you can e-mail photos individually, either as an attachment or in the body of an HTML-formatted e-mail message (if your e-mail program supports HTML-formatted messages).
To e-mail your files:
1 On the tool bar, click E-mail.

2 To add media files to be e-mailed, follow these steps:
a Click Add Files.
The Add Files dialog box appears.
b Browse to and select the files to be added.
Tip: To select more than one media file at a time, press and hold Ctrl while you select the files.
c Click Add Files.
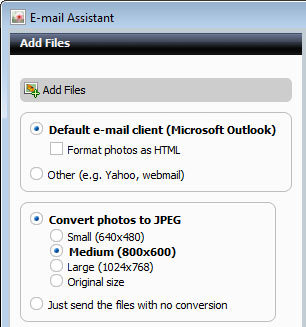
3 Select the e-mail program you want to use to send the files by choosing one of the following options:
n Default e-mail client: E-mail the files using your default e-mail program. If you select this option, choose whether to send the e-mail in HTML format. If you choose this option, the photos appear in the body of the message, rather than as attached files.
n Other (e.g. Yahoo, webmail): Save the files on your hard drive and e-mail them later using a web mail account.
4 If you are e-mailing photos, you can choose the format in which they will be sent. For example, you may want to convert a photo to best fit a particular screen size, or to reduce the size if you are e-mailing a large number of photos to someone with a dial-up connection.
Choose one of the following conversion options:
n Convert photos to JPEG: Sends the photos in JPEG format. You can choose the approximate size of the converted photos:
n Small (640x480): Converts photos so they are no larger than 640-pixels wide by 480-pixels tall while maintaining the current proportions.
n Medium (800x600): Converts photos so they are no larger than 800-pixels wide by 600-pixels tall.
n Large (1024x768): Converts photos so they are no larger than 1024-pixels wide by 768-pixels tall.
n Original size: Maintains the current size of photos.
n Just send the files with no conversion: Sends the photos without changing their file format and size.
Note: Photo conversion options are available only if you have selected photo files to e-mail.
The conversion does not affect your original files.
The conversion does not affect your original files.
5 If you are e-mailing video files, you can optimize their quality by setting the conversion options.
In the Quality box, choose the desired resolution. The higher the resolution, the better the picture quality, but the larger the resulting file.
Note: Video conversion options are available only if you have selected video files to e-mail.
The conversion does not affect your original files.
The conversion does not affect your original files.
6 Click OK.
If you chose to use your default e-mail program in step 3, the conversion status indicator appears. When the conversion is complete, an e-mail message appears.
If you chose to use an e-mail program other than your default, the Select the location for your e-mail files folder appears. Browse to the location in which you want to save the converted files, and click OK. The files are converted and copied to this folder. Use the e-mail program to attach the files to a message and send them.
7 Complete and send the message. For detailed instructions, refer to the documentation for your e-mail client.