Retrieving files and folders
You can retrieve files and folders on the disc to either a specific location on your hard disk, or to the original location on your hard disk from where they were recorded.
Note: You can also use Windows Explorer to retrieve files and folders on the disc. Drag, or copy and paste, one or more files on the disc from Windows Explorer to a location on your hard disk.
If your discs contains a split file, you must retrieve the file using Roxio Retrieve. Attempting to copy a split file to your hard disk using Windows Explorer results in an unusable file.
If your discs contains a split file, you must retrieve the file using Roxio Retrieve. Attempting to copy a split file to your hard disk using Windows Explorer results in an unusable file.
To retrieve files and folders from a multi-disc project or an encrypted disc:
1 Insert the disc that you want to retrieve files and folders from into your drive. If you are retrieving data from an encrypted disc, be prepared to decrypt the disc or files by entering the appropriate password when prompted.
The contents of all files and folders written to the disc (or multiple-disc set) appear in the Source window.
The Source Disc columns identifies which disc of the multiple disc set the file is located on. If a file has multiple discs listed, this indicates the file is a “split file.” For example, “1-2” indicates the file is split across disc 1 and 2 of the multiple disc set.
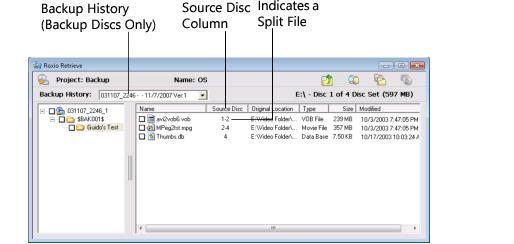
Note: A disc recorded with earlier versions of Creator Classic (Easy Media Creator 9 or earlier) may display a backup history in the Backup History list. If more than one backup history is available, you can choose one to retrieve. Typically, you would choose to retrieve the most recent backup history.
2 Select the files and folders that you want to retrieve:
n To select all of the files on the disc: Select the check box next to the name of the disc in the left pane. All folders and files on the disc are automatically selected. (You can clear the check box to deselect all files.)
n To select specific folders: Select the check box next to the name of the folder. All files in the folder are automatically selected.
n To select specific files: Select the check box next to the name of the file.
Note: A blue checkmark in the box indicates that the disc, file, or folder is selected. No checkmark indicates that the file or folder has not been selected. A grey checkmark indicates that the folder contains one or more files that are not selected.
3 Click the Copy  button.
button.The Choose Destination dialog box appears.
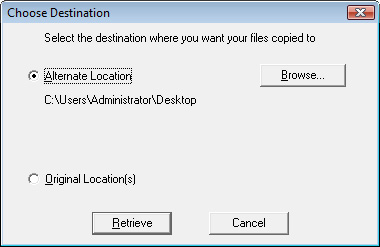
4 Select the destination where you want your files copied to:
n Alternate Location: Select this option to copy the selected files to the displayed location. Click Browse if you want to specify a different location.
n Original Location(s): Select this option to copy the selected files to the original location from where they were recorded from
5 Click Retrieve.
See also: