Making a data disc
A data disc is a disc used to store electronic data, such as the files and applications that reside on your computer’s hard drive. Unlike audio CDs, data discs are primarily used to store files for use on a computer.
You can add or append information to most data discs again and again until they are full. If you’re using a rewritable disc, you have the choice of appending your new files or erasing the disc first and then adding new files.
To create a data disc:
1 Select the Data - Copy project category.
A list of projects is displayed.
2 Click the Burn Data Disc project name.
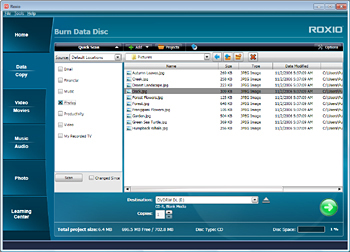
A Burn Data Disc project opens in the project window.

The Burn Data Disc project window
Note: To open a saved Burn Data Disc project, choose File > Open Saved Project and navigate to the project file you would like to open. By default, saved projects are stored in your Documents\Roxio Projects folder or My Documents\Roxio Projects folder with a .rox file name extension.
3 Select a recorder drive using the Destination drop-down menu.
4 Insert a blank or appendable disc into your selected recorder drive. If you are using an appendable disc that contains files, the files may be loaded automatically. See Using a disc that already contains data for more information.
5 If desired, type a name for your disc in the Name Your Disc text box.
6 Before adding new files in the project window, consider how you would like the files organized. New folders can be created directly on your disc. These folders can be named, and files can be moved directly into them. You will find it easier to organize your discs if you create these folders before you begin adding files.
See Organizing files in a Burn Data Disc project for more information.
7 Add files using one or more of the following methods:
n Click the Add button and navigate to the files or folders you wish to copy. Click the files or folders to select them, then click Open.
n Drag files and folders directly from a directory window to the project window.
n Open the Quick Scan panel. Select the file categories you would like to add. If desired, narrow your scan by using the Changed Since calendar or the Source drop-down list. Click the Scan button. All files matching your scan criteria are added to the project.
8 To save this project so the same list can be easily selected in the future, select File > Save.
9 Select the number of disc copies you want to make. If you have more than one disc burner, you will be able to burn more than one disc at a time.
10 Click the action button  to begin recording data to your disc.
 to begin recording data to your disc.
A progress indicator will inform you when the project has been completed.
11 Click the Label Disc button if you wish to make a label for your disc.
Note: The Label Disc button will not appear if the disc labeling software is not detected on your computer.
12 Click the Finish button to return to the project window. Remove the disc from your drive and store it in a safe place.
When creating data discs, keep the following important issues in mind:
n Write-once DVD media can only be appended if the correct compatibility setting is selected in the Data - Copy options panel. (This does not apply to DVD-R DL discs, which are always closed after a recording.)
n The Burn Data Disc project can be used to add data to an appendable disc that already contains data. See Using a disc that already contains data for more information.
n Canceling a project after it starts burning to a write-once DVD disc will result in an unusable disc. If you cancel a project after it starts burning to a rewritable disc, you will need to erase the disc before you can use it again.
n Large projects can be spanned across more than one disc, but individual files must be able to fit on a single disc.
Here is some additional information you may find useful when creating Data Disc projects that span more than one disc:
n Within each project, use discs that have the same capacity and format.
n Discs used in a multi-disc project are closed once they are recorded. If you used write-once discs, you will not be able to add additional data.
n An HTML file is placed on each disc listing its contents.
See also: