Pan and zoom for video and photos
You can apply a pan and zoom effect to your photos and video clips. For example, you can choose to start playing a video clip with a the full frame in view, and gradually zoom in to show a specific subject in the video, then pan to show other subjects in the video. Conversely, you can start with a close-up of a subject in your video, and gradually zoom out to show the full scene. You can also create a static zoom that does not change as the video plays. For example, a static zoom can be applied to draw attention to the main action in a video that was originally set to capture a wide area, for example, a scene captured with a tripod.
Pan and Zoom is a great tool to use with 4K video because you can pan and zoom across your 4K video source and still get an HD result.
Whether it’s a quick pan and zoom effect, or a customized result that requires key frame precision, the Pan and Zoom window provides you with the tools you need.
There are three editing modes for Pan and Zoom:
• Static: Maintains the zoom level that you set throughout the video.
• Animated: Lets you use crosshairs to adjust pan and zoom key frames precisely.
• On the Fly: Lets you adjust pan and zoom settings interactively while the video plays.
Pan and Zoom: Settings and controls
The following settings and controls are available in the Pan and Zoom window. The availability of controls depends on what is currently selected and the Edit Mode you choose. For information about common key frame, playback, and preview controls, see Customizing filters.
• Edit Mode: Choose between the Static, Animated or On the Fly editing modes.
• Preset Size: Choose a preset for HD, 2K, 4K, and more.
• Stay within source boundary: Ensures that the boundary of the project is used as the boundary for the pan and zoom effect (the effect will not extend beyond project edge).
• Position: A one-click way to position the marquee in one of nine common alignment options.
• Ease in: Starts slower and gradually brings the pan and zoom effect up to full video speed.
• Grid lines: Displays a grid that helps you align the marquee.
• Grid size: Specifies grid line spacing according to the number of divisions you set.
• Snap to grid: Aligns marquee to closest grid line automatically.
• Background color: Specifies the color of the background if marquee extends beyond the boundary of the media.
• Vertical: Specifies the y-axis position (top to bottom).
• Horizontal: Specifies the x-axis position (left to right).
• Rotation: Specifies the angle of the marquee in degrees.
• Zoom ratio: Specifies the zoom level by adjusting the size of the marquee.
• Transparency: Specifies the opacity of the photo or video at the selected key frame.
1 In the Timeline, select a photo or video clip and click the Pan and Zoom button  on the Timeline toolbar.
on the Timeline toolbar.The Pan and Zoom window opens.
2 In the Edit Mode drop-down, choose Static.
3 In the Preset Size drop-down, choose a preset (such as HD if you’re zooming in on a 4K video), or in the Original pane of the preview window, use the marquee to set the zoom area and position.
1 In the Timeline, select a video clip and click the Pan and Zoom button on the Timeline toolbar.
on the Timeline toolbar.The Pan and Zoom window opens.
2 In the Edit Mode drop-down, choose On the Fly.
3 In the Original pane (on the upper left side of the window), adjust the starting size and position of the marquee. The result displays in the Preview pane on the right.
4 Click the Play button.
5 As the video plays, reposition and resize the marquee as you want. Key frames are added automatically for each change you make.
6 Fine tune the results by using the key frames and adjusting the settings.
7 Click OK to return to the Edit workspace.
1 In the Timeline, select a video clip and click the Pan and Zoom button on the Timeline toolbar.
on the Timeline toolbar.The Pan and Zoom window opens.
2 In the Edit Mode drop-down, choose Animated.
3 Ensure that the Start key frame (first key frame) is selected in the effect timeline (appears as a red diamond).
If the Start key frame is not selected, click it.
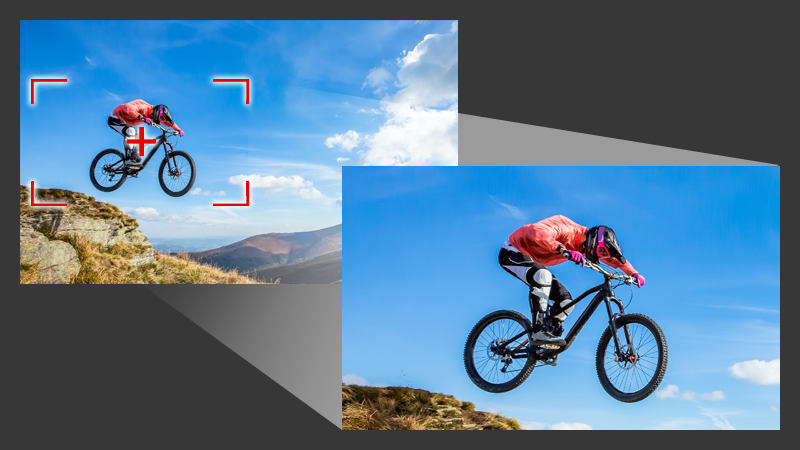
4 In the Original pane, click to set the position of the marquee.
A red crosshair displays to represent the currently selected key frame. Use the controls to set the Zoom ratio and any other settings you want.
5 In the effect timeline, click the End key frame (last key frame), and repeat step 4.
6 Click the Play button  to preview the effect.
to preview the effect.7 Double-click the timeline to add any additional key frames, and repeat step 4.
8 Click OK to apply effect and return to the main workspace.