Customizing motion
Using the Customize Motion feature, you can manually set the motion of overlays and titles to complement the motion of elements in a background video (without reference to any existing tracking information). You can also set the motion of graphics and videos added to title clips. For information about inserting videos and graphics into titles, see Adding media to titles.
VideoStudio lets you define a custom motion path and modify a number of properties to create simple or complex motion effects. For example, using keyframes, you can control the size, opacity, and rotation of an object as it moves across the path you set for it. You can also gradually ease the motion in or out and apply a motion blur that matches the movement of a selected object as it moves along a path.
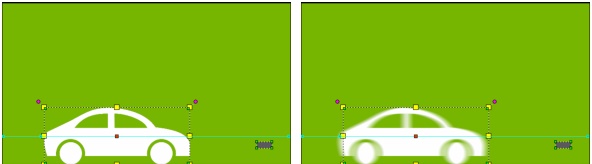
Adding Auto Motion Blur (example on right side) applies a blur that corresponds to the movement of the selected object as it moves along the path.
You can save a custom motion to the Library as a path, with or without other property settings.
Customize Motion dialog box
|
|
|
|
|
• preview a selected clip or object • set the motion path interactively • change the center reference for objects interactively • move, size, scale, and skew objects interactively |
|
|
The path of the motion as manually defined The motion path appears only in the Customize Motion dialog box. |
|
|
Lets you access controls for video playback |
|
|
Lets you access to the Position, Size, Opacity, Rotation, Shadow, Border, Mirror, Ease in/out, and Motion Blur controls, as well as controls for applying animation to the start, middle, and end of a clip and customizing animation options |
|
|
Lets you access the following controls: • controls for adding, removing, and repositioning keyframe nodes • handles for adjusting the length of the start, middle, and end segments in clips with motion effects |
|
|
Lets you access controls for manipulating keyframes |
7 — Object distortion window |
Lets you control the orientation of the video clip or overlay object |
|
|
Lets you switch between objects in title clips with merged media and adjust motion settings for the individual objects |
|
|
Lets you jump directly to a specific part of the video by specifying the exact timecode |
To access the Customize Motion dialog box

•
Do one of the following:
•
Right-click a video clip in the
Timeline and choose
Motion >
Customize Motion.
•
Right click a title clip in the
Timeline and choose
Motion Options >
Customize Motion.

To access the Customize Motion dialog box quickly and easily, add the Customize Motion button  to the Timeline toolbar. Click the Customize Toolbar button
  on the Timeline toolbar, and enable the Customize Motion check box.
To customize a motion path
1
Do one of the following:
•
Right-click a background video or an overlay clip in the
Timeline and select
Motion >
Customize Motion.
•
Right-click a title clip in the
Timeline and select
Motion Options >
Customize Motion. If your title contains merged media, click the Merged media picker and choose the media you want to edit when the
Customize Motion dialog box opens.
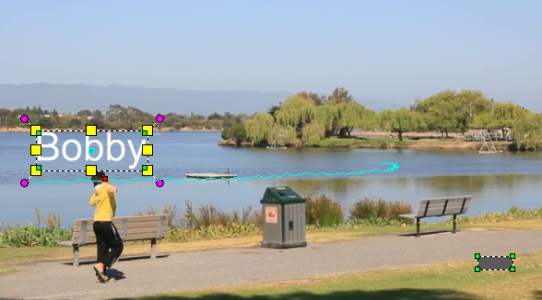
In this example, a title is shown with a straight line motion path.
2
In the
Customize Motion dialog box, change the shape of the motion path by dragging line segments and keyframe nodes.
Key frame nodes are automatically added every time you move to another frame and make a modification. You can also create a key frame node by dragging the scrubber and clicking the Add key frame button  .
.
3
Adjust the properties of the title or object depending on the requirements of your project.
Each time you set a value, a key frame is added.
To change the center reference for the object (to offset rotation or zoom effect), in the
Preview window, drag the red center marker to a new position.
4
Play the video to test the animation. When you are satisfied with the results, click
OK.
|
|
|
|
|
Choose options in the Opacity area. |
|
|
Choose options in the Shadow area. |
|
|
Choose options in the Border area. |
|
|
Adjust the values in the Mirror area. |
Set the motion to start out slowly or slow down as it comes to an end |
Click the Ease in/ Ease out buttons  /  . Drag the slider to control the time for the effect. |
Add a motion blur automatically |
Enable the Auto Motion Blur check box. |
Move an object interactively |
In the Preview window, hover over a selected object and when the cursor changes to a four-sided arrow  , drag the object to a new location. |
Scale an object interactively |
In the Preview window, hover over a yellow handle and when the cursor changes to a two-sided arrow  , drag to change the object’s width and height proportionally. |
Slant an object interactively |
In the Preview window, hover over a green handle and when the cursor changes to a  icon, drag to skew the object. |
Rotate an object interactively |
In the Preview window, hover over a pink handle and when the cursor changes to a rotation icon, drag clockwise or counter-clockwise. |
Apply animation to a selected title |
Click one of the following buttons: • Enter — to apply motion at the beginning of a title • Middle — to apply motion in the middle of a title • Exit — to apply motion at the end of a title Tip: To adjust the length of the animation in each part of the title, move the duration handles in the Timeline control.
Select a category from the Select the type of animation list box. Click the thumbnail of the animation effect that you want to apply. Adjust any of the settings that are available for the selected effect. |
Switch between objects in title clips with merged media |
Click the Merged media picker next to the Keyframe control, and choose the object you want. |
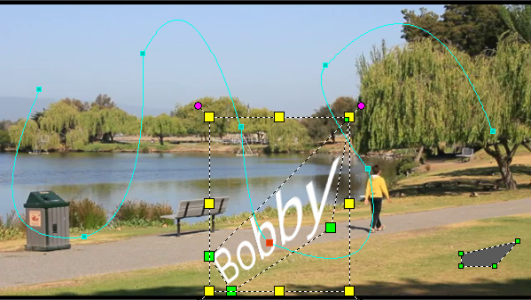
The title after adjusting the Position, Size and Rotation values.

If an existing tracking path is customized, existing match motion information in the video will be converted to a generic moving path.
To save a custom motion to the Path Library
1
Create a custom motion in the
Customize Motion dialog box.
3
In the
Save to Path Library dialog box, type a name in the
Path name box.
4
Choose one of the following
Options:
•
Path with all attributes — saves the path and the attributes assigned to the keyframes
•
Path only — saves the path only; no other attributes are saved
5
In the
Save to drop-list, choose a folder.
To remove custom motion from a clip in the Timeline
•
In the
Timeline, right-click a clip that has custom motion applied, and from the context-menu choose
Motion >
Remove Motion.