Using Map Mode to view, add, and edit image GPS info
If you are connected to the Internet, you can access Google Maps in Map Mode to view, add, and edit location information (GPS metadata) for your images. To open Map Mode, see To switch to Map mode.
In Map mode, you can view location information on an interactive map (center), the Navigation palette (left), and the Info palette (right).
There are several ways to add information about the locations where your photos were taken.
• Automatically — If your camera or smartphone has a GPS, it automatically records the latitude and longitude of each photo you take, and the information is imported with the photo.
• Manually — You can add location information manually in Map mode by searching for a specific location or choosing a location interactively on the map.
• By copying location info from other photos — You can copy and paste location information from one photo to another. This is useful, for example, if you use your smartphone to take a photo and then copy the location information to multiple photos taken with your camera at the same location.
• From Facebook check-in points — If you use the Facebook check-in function, you can match your check-in locations to your photos.
• From a GPS device — If your camera does not record location data, you can use a separate GPS device or a smartphone app, synchronized with your camera time zone, to keep track of the latitude and longitude as you travel and take photos. Then, you can import the data from the GPS device by importing a KML file. KML is a standard format for storing geographic data that can be displayed in Google Maps and other applications.
Viewing location information
After you assign a location to a photo, a location marker is displayed on the map in Map mode and added to the thumbnail of the tagged photo. Location information also appears in the Navigation and Info palettes.
• Navigation palette — Tagged photos are organized by location in the Places folder, following the hierarchy of country, district, city, and road. Photos that contain location information that cannot be matched to the map are listed in the Unknown Places folder. You can tag these photos either manually or by importing and matching location data. After the photos are tagged, they are moved to a folder that corresponds to their location.
• Info palette — Location information appears under the Places tab. Location markers can be viewed on a map, and the names of the corresponding locations are listed in the Location box below. The Info palette also displays editable latitude and longitude information.
Map mode is integrated with Google Maps, and it offers a variety of viewing options, such as zooming in and out, or using Google Street View. For more information about the available options, refer to the Google Maps Help.
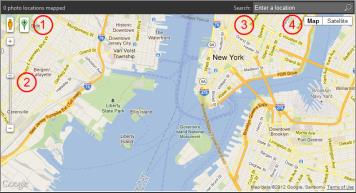
Map mode offers all standard Google Maps features. You can 1) activate Street View by dragging the yellow pegman to the map, 2) zoom in or out by dragging the slider, 3) search for a location, and 4) choose a map view.
You can also sort photos by location, or delete location information from a photo.
Privacy Note: Sharing sites use different methods to disable location information — some sites delete the information, some sites hide the information (but it’s still there). You can use Corel PaintShop Pro to delete location information before you upload photos that may have home, school, or work locations that you don’t want to make public.
To switch to Map mode
Manage tab
• Click the Map mode button in the upper-right corner of the Manage.
You can also
Choose a map view
Click the Map or Satellite button in the upper-right corner of the Map area, and choose the options you want.
Zoom in or out
Drag the Zoom slider up or down. Higher zoom levels reveal greater map detail, as well as any additional location markers that may have been grouped together as a single marker at lower zoom levels.
Use Google Street View
Drag the yellow pegman to a location on the map. To exit Google Street View, click the Close button .
If the selected photos already contain location information, the map zoom level is adjusted to fit all existing location markers. If no photos are selected, the map displays all locations associated with the current folder.
If a single photo is selected, and the photo contains direction information, the map shows Google Street View by default.
You can click a location marker on the map to display information about the photos tagged at that location.
To add location information manually
Manage tab
1 If Manage is not in Map mode, click the Map mode button in the upper-right corner of Manage.
2 In the Organizer palette, select all photos that you want to tag with a specific location.
If no photos are selected, the location tag will be added to all photos in the current folder.
3 Do one of the following:
• Start typing the name of the location in the search box, and choose a location from the list that appears.
• Click the Add location button , and then click directly on the map to tag the selected photos with the chosen location.
• Type latitude and longitude in the boxes under the Places tab in the Info palette. This option is available in Map, Thumbnail, and Preview modes.
A location marker is added to the map, and a marker also appears in the lower-right corner of each tagged photo.
If more than twenty photos are selected, a confirmation dialog box appears. Click Yes to tag all selected photos.
To copy and paste location information
Manage tab
1 Select the photo from which you want to copy location information.
2 In the Info palette, click the Places tab, and click Copy.
3 Select one or more photos to which you want to add the copied location information.
4 In the Info palette, click Paste.
Location tags are added to the photos.
To import location information
1 Select the photos for which you want to import location information.
2 Click the Import Location Info button .
3 In the Add Location Info dialog box, enable one of the following options:
• Import location info from your Facebook check-in list.
• Import location data from a GPS tracker (KML file).
If you choose to import data from a GPS tracker, click Import, and locate the KML file that you want to use. Choose an option from the Time Zone list.
4 Click Add.
If the selected photos already contain location information, a dialog box appears prompting you to choose whether to override the existing information and replace it with the imported data.
If the KML data does not match the photos, a warning appears.
When location information is added to RAW files, the information is stored in the application only, and the files are not altered.
You can click the Details tab to view a map and other details about the selected location.
To sort photos by location
Manage tab
1 In Thumbnail mode, click the Sort by drop-list on the Organizer toolbar.
2 Click the Place sorting option.
The selected photos are sorted by country, district, city, and road, with the most recent location listed first within each group.
To delete location information
Manage tab
1 Select the photos from which you want to delete the location tags.
2 In the Info palette, click the Places tab, and click Delete.
The location information is removed from the selected photos.