Switching between Timeline views
Two types of views are available in the Timeline: Storyboard View and Timeline View.
The fastest and simplest way to organize photos and video clips in a project is to use the Storyboard View. Each thumbnail in the storyboard represents a photo, video clip, or a transition. Thumbnails are shown in the order in which they appear in your project, and you can drag thumbnails to rearrange them. The duration of each clip is shown at the bottom of each thumbnail. In addition, you can insert transitions between video clips, and you can trim a selected video clip in the Preview Window.

VideoStudio Storyboard View
Timeline View gives you the most comprehensive display of the elements in your movie project. It divides a project into separate tracks for video, overlay, title, voice, and music.
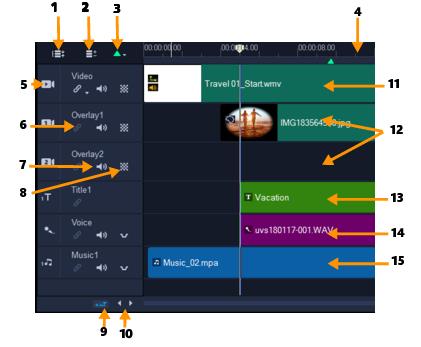
VideoStudio Timeline View
Part | Description |
|---|---|
1 — Show All Visible Tracks | Displays all tracks in your project. |
2 — Track Manager | Lets you manage the tracks visible in the Timeline. |
3 — Add / Remove Chapter or Cue | Lets you set chapter or cue points in your movie. |
4 — Timeline ruler | Helps you determine clip and project length by displaying the project's timecode increments in hours:minutes:seconds:frames. |
5 — Track button | Shows / Hides individual tracks. |
6 — Enable / Disable Ripple Editing | When enabled, clips maintain their relative positions when a clip is added to the track. For more information, see Using Ripple Editing mode. |
7 — Mute/Unmute | Lets you mute or unmute the audio for the track. |
8 — Track Transparency | Opens Track Transparency mode. See Track transparency. |
9 — Automatically scroll Timeline | Enables or disables scrolling along the Timeline when you preview a clip that extends beyond the current view. |
10 — Scroll controls | Lets you move around your project by using the left and right buttons or dragging the Scroll Bar. |
11 — Video Track | Contains videos, photos, graphics, and transitions. Note that in HTML 5 mode, you can also have a Background Track. |
12 — Overlay Tracks | Contains overlay clips, which can be video, photo, graphic, or color clips. Note the HTML 5 projects also have overlay tracks. |
13 — Title Track | Contains title clips. |
14 — Voice Track | Contains voice-over clips. |
15 — Music Track | Contains music clips from audio files. |
You can use the mouse wheel to scroll through the Timeline.
Right-click on any track button and choose Select all media to select all media clips that are in the track.
When the pointer is at the Zoom controls or Timeline ruler, you can use the mouse wheel to zoom in and out of the Timeline.
• Click the buttons at the left side of the Toolbar.